
One-click registration link
This article is for WebinarJam and EverWebinar.
One-Click Registration
One-click registration allows people to click a link to sign up for a webinar if they are already on your mailing list.
The benefits of using one-click registration include:
- Reduced sign-up friction, making it more likely that people will register.
- Integration with your autoresponder, so you can apply tags or fire automation based on the link click.
- Ability to bypass the registration page, register a subscriber to the webinar in the background, and forward the user straight to the Thank You page to get an access link for the event.
Take Note
- An API key is required to use one-click registration. If you are not already approved to use the API, apply for a key.
- Access to the API is not available for trial accounts. To access an API key, upgrade to a paid plan if needed.
- The configured one-click registration link must be sent in an email from your autoresponder to contacts that already exist in the autoresponder. The registration will not work in any other context.
- One-click registration can not be used for EverWebinar Just-in-Time or Instant Replay. On-demand session types do not have a session ID for use in the URL parameters.
- This article refers to shortcodes, dynamic variables, and merge fields. These all refer to the same thing: a piece of code from your autoresponder that is dynamically replaced by an email subscriber’s unique information.
Get the One-click Registration Link
In Webinars, find the webinar you want a registration link for:
- Click Advanced above the event module, then One-click registration
- Copy the registration URL into a separate window where it can be edited
- A plain text editor is recommended to avoid any unwanted formatting
Notice that some information is URL-encoded: %40 in place of ‘@’ and %2B in place of ‘+’.

One-Click URL Parameters
The one-click registration link uses URL parameters to capture a subscriber’s information and register them for your webinar.
Your default one-click link will look similar to this:

The URL is made up of two parts:
- Base URL: https://event.webinarjam.com/register/1click/8/UNIQUE
- Parameters: ?first_name=First&last_name=Last&email=YOU%40YOUREMAIL.com […]
The parameters portion of the URL begins with ? and individual parameters are separated by &.
| Parameters | Default (Replace) | Description |
first_name * |
First |
Dynamic variable from your autoresponder that will populate the first name of a subscribed lead. |
last_name |
Last |
Dynamic variable from your autoresponder that will populate the last name of a subscribed lead. |
email * |
YOU%40YOUREMAIL.com |
Dynamic variable from your autoresponder that will populate the email address of a subscribed lead. |
phone_country_code |
%2B1 |
Dynamic variable from your autoresponder that will populate the phone country code of a subscribed lead. |
phone_number |
1234567890 |
Dynamic variable from your autoresponder that will populate the phone number of a subscribed lead. |
timezone |
GMT-7 |
Dynamic variable from your autoresponder that will populate the timezone of a subscribed lead. The timezone parameter is only required for EverWebinar events configured to take place “under the user’s own time zone”. If that is how you’ve configured your webinar, you must enter the time zone in GMT terms (example: GMT-7, GMT+7, GMT-2, etc). |
schedule_id * |
1 |
The schedule_id is the Session number for the webinar session. Get the schedule ID from the Schedules > Webinar schedule step of the webinar configuration wizard.** |
* Required fields
** EverWebinar Just-in-Time and Instant Replay sessions do not have session IDs. One-click registration cannot be used for these event types.
Configure the One-Click Link
Using the table provided in this article, identify the parameters that represent information you want to collect for registration to your webinar.
- Remove any parameters you do not need.
- Replace the default value of each remaining parameter with a shortcode or variable from your autoresponder that matches the type of information the parameter calls for.
- The terminology for this type of code varies depending on the autoresponder you use. This type of field is typically found in email editors or builders and may be called something like: shortcode, variable, merge field, merge tags, etc.
Modification rules:
- The section of parameters that follows the base URL must begin with the
?character. DO NOT remove the?. - Individual parameters must be separated by a single
&character. After modifying the link, double check to make sure every parameter is separated by a&and there a no doubles left by mistake:&&
Modified URL Examples
Examples shown using Kartra dynamic variables as the value for each parameter. Replace the defaults with the correct format from your own autoresponder.
First name and email address only:
- https://event.webinarjam.com/register/1click/16/74qn4cw?
first_name={first_name}&email={email_address}&schedule_id=1
First name, email address, and phone number only:
- https://event.webinarjam.com/register/1click/16/74qn4cw?
first_name={first_name}&email={email_address}&phone_country_code={phone_country_code}&phone_number={phone}&schedule_id=1
Get the Schedule ID
The schedule_id parameter is the Session number for each webinar session. Get the schedule ID from the Schedules > Webinar schedule step of the webinar configuration wizard.
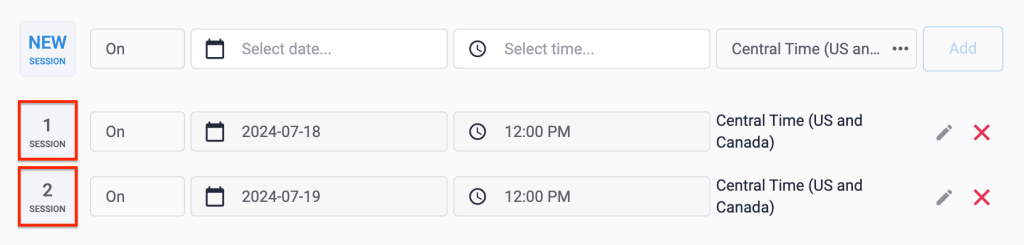
In the example above, if your one-click link includes “schedule_id=2”, then the user will be registered for the webinar scheduled for 2024-07-19 at 12:00 PM Central Time (US and Canada).
Autoresponder Field Variables
Use the following reference as a guide to common autoresponder shortcodes and field variables.
Active Campaign
- first_name=
%FIRSTNAME% - last_name=
%LASTNAME% - email=
%EMAIL%
Learn more about personalization tags from Active Campaign: Personalization Tags
Kartra
- first_name=
{first_name} - last_name=
{last_name} - email=
{email_address} - phone_country_code=
{phone_country_code} - phone_number=
{phone}
AWeber
- first_name=
{!name}or firstname={!firstname} - last_name=
{!lastname} - email=
{!email}
Learn more about variables from AWeber: What can I personalize in my messages?
ClickFunnels
- first_name=
#FIRST# - last_name=
#LAST# - email=
#EMAIL# - phone_number=
#PHONE#
Learn more about merge tags from ClickFunnels: Email Merge Tags For ClickFunnels Emails
GetResponse
- first_name=
[[name]]or firstname=[[firstname]] - last_name=
[[lastname]] - email=
[[email]]
Learn more about personalization from GetResponse: How to personalize my emails?
iContact
- first_name=
[fname] - last_name=
[lname] - email=
[email]
Learn more about merge fields from iContact: Merge Fields – Inserting Standard and Custom Field Data Into Messages
InfusionSoft / Keap
Make sure to follow the InfusionSoft Instructions on MergeFields. You should see:
- first_name=
~Contact.FirstName~ - email=
~Contact.Email~
Learn more about merge fields from Keap: Merge Field Defaults Explained
MailChimp
- first_name=
*|FNAME|* - last_name=
*|LNAME|* - email=
*|EMAIL|*
Learn more about merge tags from MailChimp: All the Merge Tags Cheat Sheet
Ontraport
- first_name=
[firstname] - email=
[email]
Learn more about merge fields from Ontraport: Set up and use merge fields