Auto-subscription to future webinars lets attendees register once to automatically be subscribed to all future WebinarJam events configured in your account.
Important: Subscription to new webinars requires manual action from a webinar manager when each new event is configured. While subscription will be “automatic” for the user, you control whether to complete the action in each new webinar.
To enable auto-subscription:
Go to the Registration step of the webinar configuration wizard
Open the Auto-subscription to future webinars module
Click Enable auto-subscription and Save the module
If enabled, the webinar registration form will display an extra check box labeled Auto-subscribe to future webinars from this host. The registrant must check the box to accept auto-subscription. This option cannot be turned on by default.
Register Auto-subscribed Users
Each time you create a new webinar, manually add auto-subscribed registrants from previous webinars to the new session.
In Webinars, find the new event
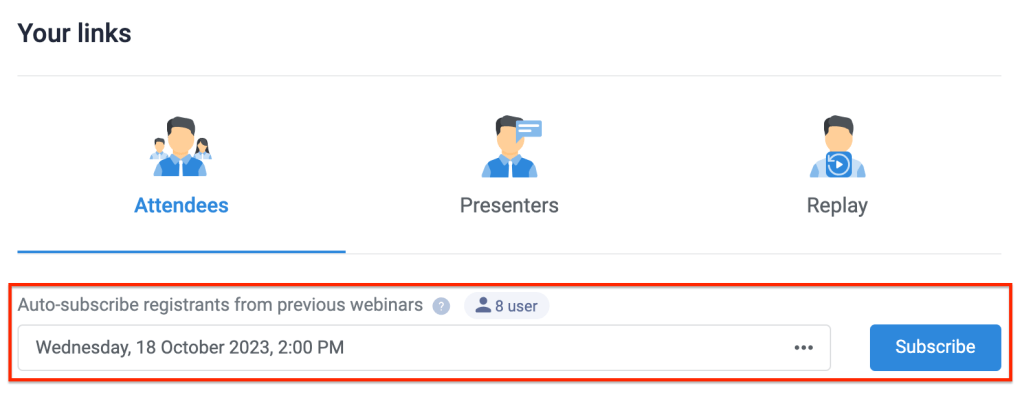
Click Your Links > Attendees
Select a session from the drop-down under Auto-subscribe registrants from previous webinars
A bubble appears with the total number of auto-subscribed users registered in your account
Click Subscribe to register all saved users for the selected session
The auto-subscription down-down and button disappear when the action is complete
Auto-subscribed registrants will receive the confirmation email with the details for your upcoming webinar: the webinar topic, scheduled date and time, their unique link to the live session, etc.
Customize the confirmation email at the Notifications step of your new webinar configuration.
Important: Auto-subscription must be enabled at the Registration step of the new webinar’s configuration or the auto-subscription option will not appear in Your Links.
Opt Out of Auto-subscription
A mandatory unsubscribe link appears in the footer of every email notification sent by your account. Registrants can click the link to opt out of future notifications for each webinar they are subscribed to.
One-click registration allows people to click a link to sign up for a webinar if they are already on your mailing list.
The benefits of using one-click registration include:
Reduced sign-up friction, making it more likely that people will register.
Integration with your autoresponder, so you can apply tags or fire automation based on the link click.
Ability to bypass the registration page, register a subscriber to the webinar in the background, and forward the user straight to the Thank You page to get an access link for the event.
Take Note
An API key is required to use one-click registration. If you are not already approved to use the API, apply for a key.
Access to the API is not available for trial accounts. To access an API key, upgrade to a paid plan if needed.
The configured one-click registration link must be sent in an email from your autoresponder to contacts that already exist in the autoresponder. The registration will not work in any other context.
One-click registration can not be used for EverWebinar Just-in-Time or Instant Replay. On-demand session types do not have a session ID for use in the URL parameters.
This article refers to shortcodes, dynamic variables, and merge fields. These all refer to the same thing: a piece of code from your autoresponder that is dynamically replaced by an email subscriber’s unique information.
IMPORTANT: To maintain compliance with anti-spam regulations, one-click registration may only be used with well-reputed autoreponders using the method described in this article. Any other use or abuse of the link is forbidden and may result in the termination of your account.
Get the One-click Registration Link
In Webinars, find the webinar you want a registration link for:
Click Advanced above the event module, then One-click registration
Copy the registration URL into a separate window where it can be edited
A plain text editor is recommended to avoid any unwanted formatting
Notice that some information is URL-encoded: %40 in place of ‘@’ and %2B in place of ‘+’.
One-Click URL Parameters
The one-click registration link uses URL parameters to capture a subscriber’s information and register them for your webinar.
Your default one-click link will look similar to this:
The URL is made up of two parts:
Base URL: https://event.webinarjam.com/register/1click/8/UNIQUE
The parameters portion of the URL begins with ? and individual parameters are separated by &.
Parameters
Default (Replace)
Description
first_name*
First
Dynamic variable from your autoresponder that will populate the first name of a subscribed lead.
last_name
Last
Dynamic variable from your autoresponder that will populate the last name of a subscribed lead.
email*
YOU%40YOUREMAIL.com
Dynamic variable from your autoresponder that will populate the email address of a subscribed lead.
phone_country_code
%2B1
Dynamic variable from your autoresponder that will populate the phone country code of a subscribed lead.
phone_number
1234567890
Dynamic variable from your autoresponder that will populate the phone number of a subscribed lead.
timezone
GMT-7
Dynamic variable from your autoresponder that will populate the timezone of a subscribed lead. The timezone parameter is only required for EverWebinar events configured to take place “under the user’s own time zone”. If that is how you’ve configured your webinar, you must enter the time zone in GMT terms (example: GMT-7, GMT+7, GMT-2, etc).
schedule_id*
1
The schedule_id is the Session number for the webinar session. Get the schedule ID from the Schedules > Webinar schedule step of the webinar configuration wizard.**
* Required fields
** EverWebinar Just-in-Time and Instant Replay sessions do not have session IDs. One-click registration cannot be used for these event types.
Configure the One-Click Link
Important: Registration fields that are required in your webinar settings must have a matching parameter in the one-click registration link in order for the attendee’s information to populate correctly. Parameters for information that is not required for registration can be removed from the URL.
Using the table provided in this article, identify the parameters that represent information you want to collect for registration to your webinar.
Remove any parameters you do not need.
Replace the default value of each remaining parameter with a shortcode or variable from your autoresponder that matches the type of information the parameter calls for.
The terminology for this type of code varies depending on the autoresponder you use. This type of field is typically found in email editors or builders and may be called something like: shortcode, variable, merge field, merge tags, etc.
Modification rules:
The section of parameters that follows the base URL must begin with the ? character. DO NOT remove the ?.
Individual parameters must be separated by a single & character. After modifying the link, double check to make sure every parameter is separated by a & and there a no doubles left by mistake: &&
Modified URL Examples
Examples shown using Kartra dynamic variables as the value for each parameter. Replace the defaults with the correct format from your own autoresponder.
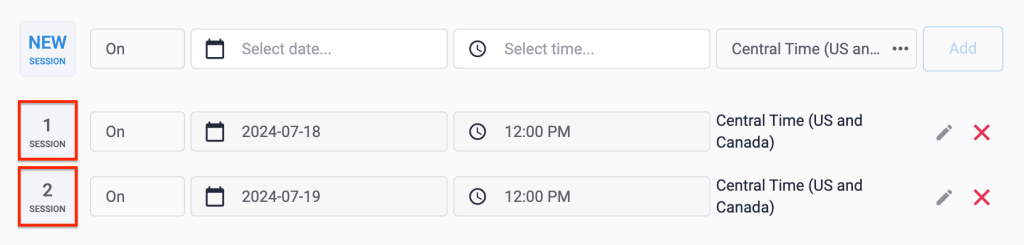
The schedule_id parameter is the Session number for each webinar session. Get the schedule ID from the Schedules > Webinar schedule step of the webinar configuration wizard.
In the example above, if your one-click link includes “schedule_id=2”, then the user will be registered for the webinar scheduled for 2024-07-19 at 12:00 PM Central Time (US and Canada).
Important: If your schedule is configured as a series of events (multiple sessions or recurring series of sessions), the end user will be registered for all webinars in the series.
Autoresponder Field Variables
Use the following reference as a guide to common autoresponder shortcodes and field variables.
Important: Always check your autoresponder for your specific shortcodes. This guide is provided as a courtesy only and may not match the current features offered by your autoresponder.
Active Campaign
first_name=%FIRSTNAME%
last_name=%LASTNAME%
email=%EMAIL%
Learn more about personalization tags from Active Campaign: Personalization Tags
Send unique access links for each webinar presenter and moderator so they can join and support the event.
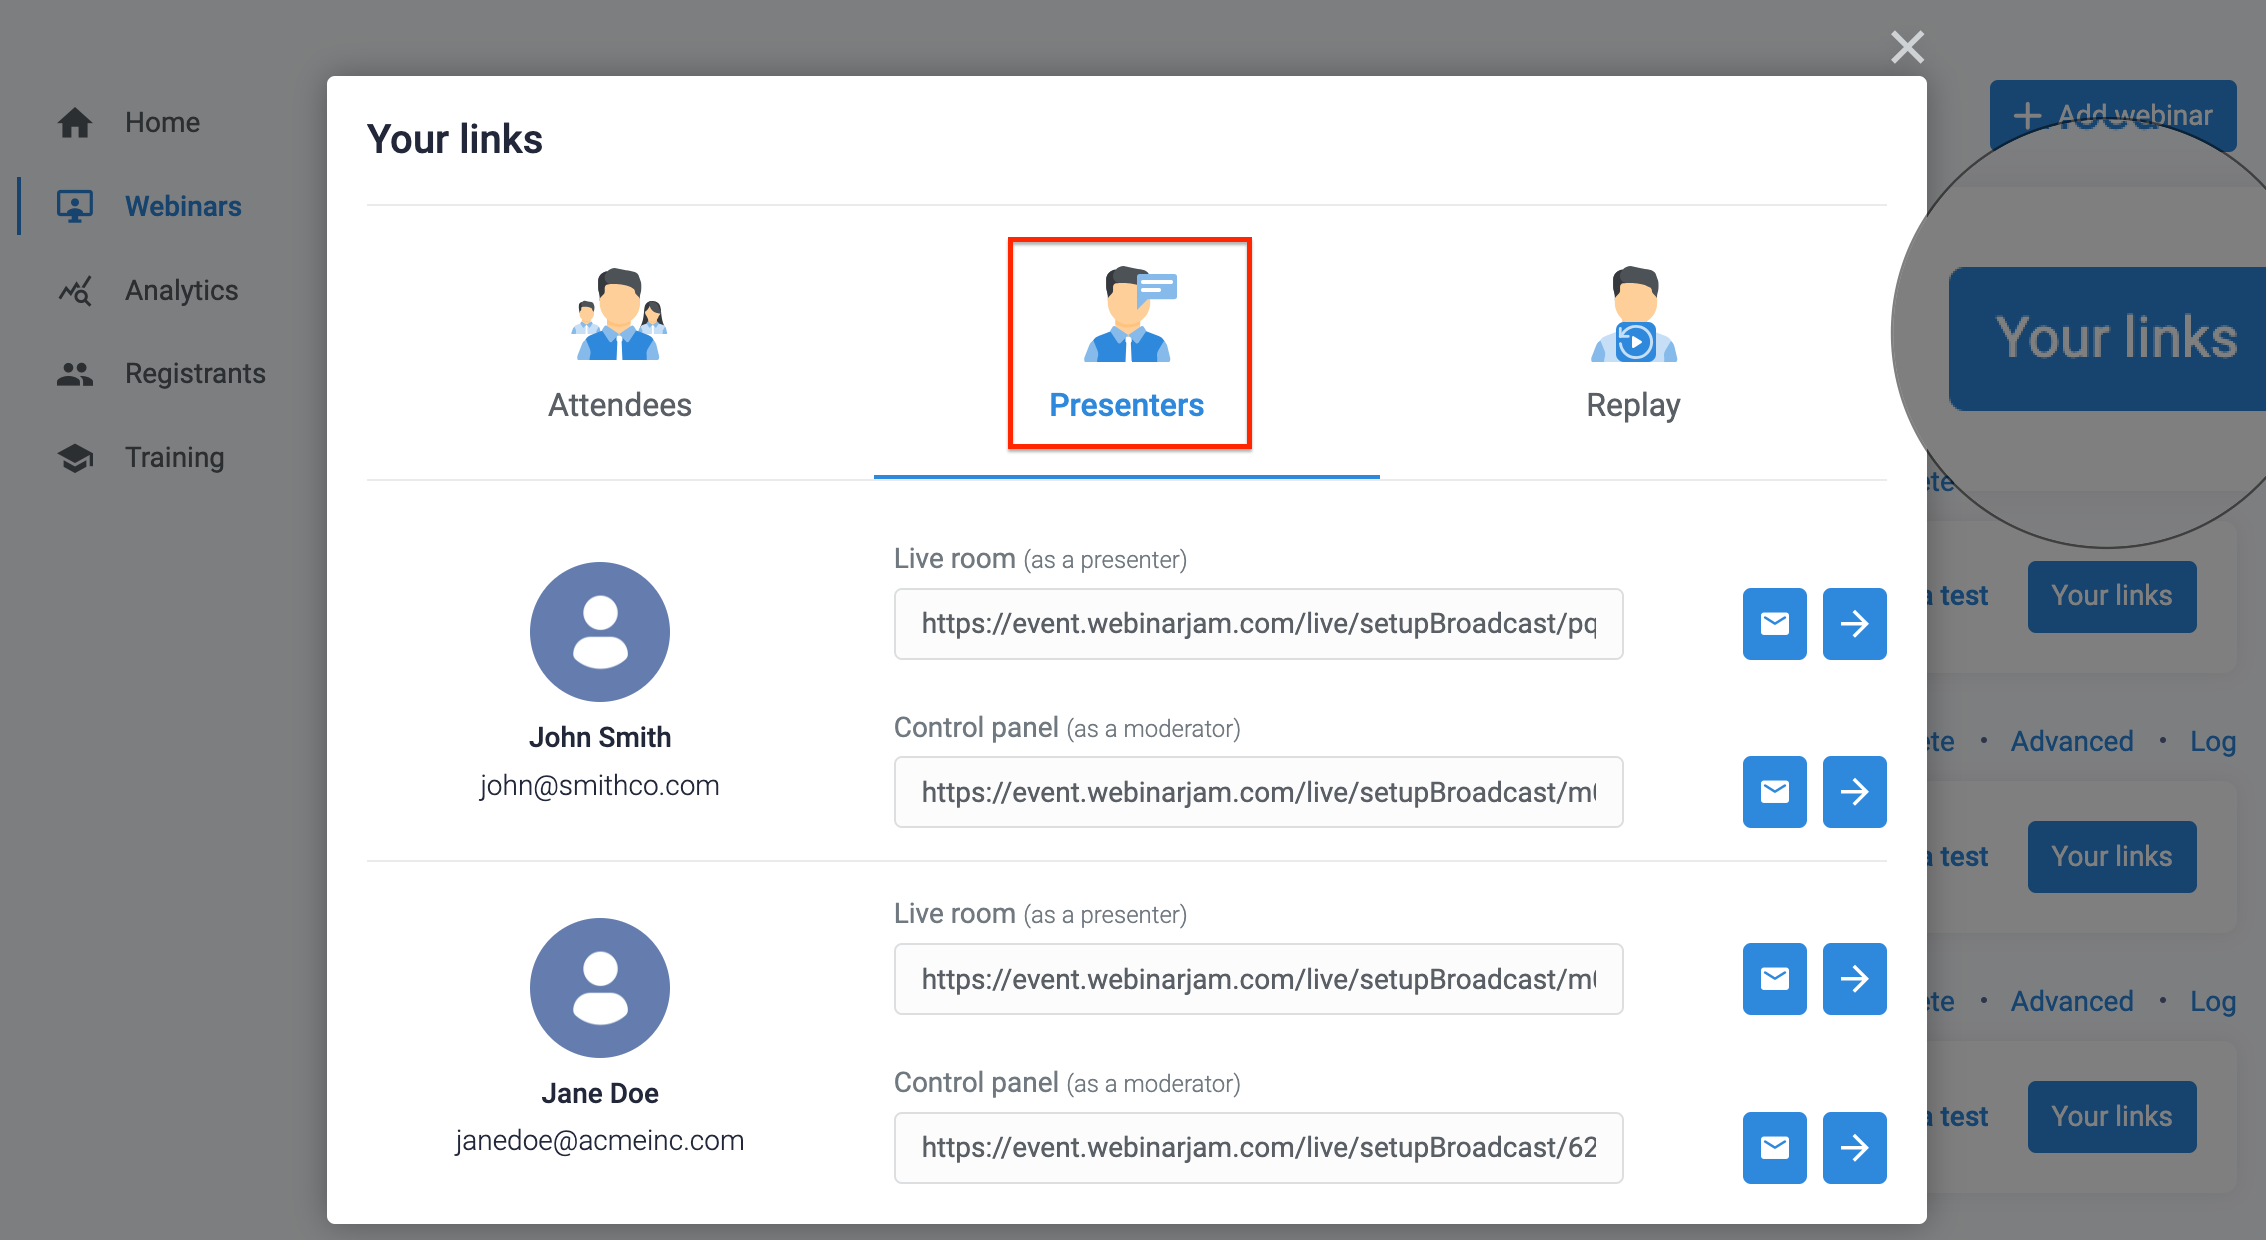
In Webinars, click Your links > Presenters
Each participant has two unique links that can be sent by email or copied to share through another channel.
Live Room is used to access the live room as the associated presenter and join the broadcast. The unique links register the presence of individual presenters as they join and create a video panel in the broadcast with their name.
Control Panel is an administrative center for the event where presenters or moderators can monitor the chat, view statistics on attendees, deploy live injections, etc.
Click the email icon to send a link to the associated user in an email
Click the arrow to immediately launch a link
Copy the unique link to share it with a presenter or moderator
Direct link to live room is an emergency bypass link that will let an attendee skip the registration process and go straight to your live room.
Attendees who enter the room through a direct-to-live link cannot be recorded or tracked in the event analytics. Use this link only when tracking doesn’t matter, or there’s no other way to give the person access to your event.
Pro Tip:
Click the pencil icon to the right of the registration or direct link field to customize it. Note that the domain cannot be changed.
Check your plan: Link customization is available in EverWebinar, WebinarJam Professional, and WebinarJam Enterprise.
Use a code snippet to embed your webinar registration form on an external web page. The embed code lets you turn any page into a custom registration page.
Embedded code requires basic HTML and CSS coding skills and access to the source code of the page where you want to put it.
Get Embed Code
In WebinarJam or EverWebinar:
Look for the webinar you want to start promoting registration for
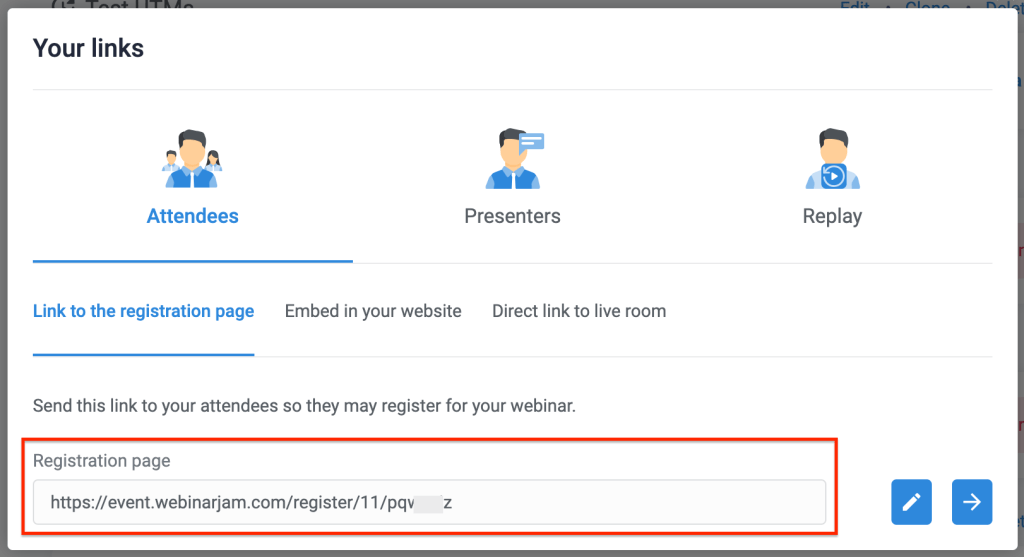
Click Your links
Under Attendees, click Embed in your website
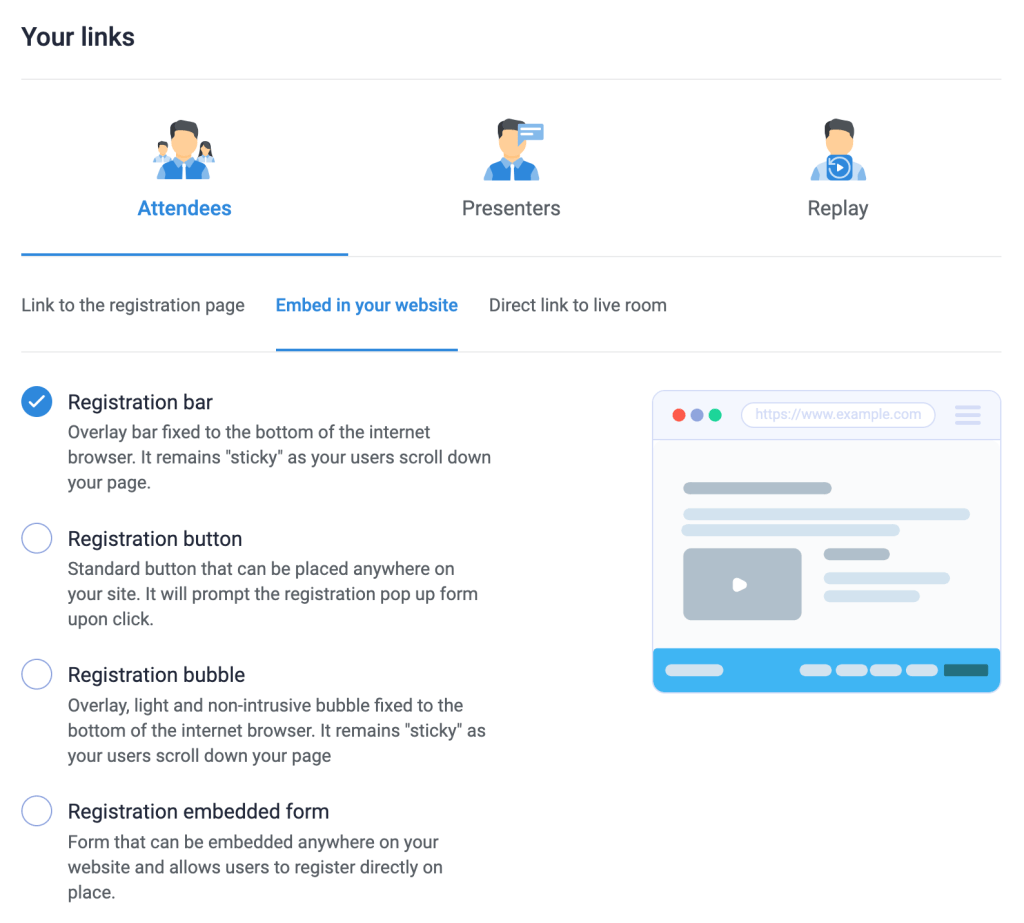
Choose a format for the embedded element:
Floating bar with pop-up form
Static button with pop-up form
Floating bubble pop-over with pop-up form
Static in-line form
Copy the code snippet below the customization options for each element type to get the embed code
IMPORTANT: Embed only one registration code in your external page. Multiple snippets in the same page can cause a conflict in the code.
Customize Embed Elements
Registration bar
The registration bar is a floating page footer with a countdown timer. The form to collect a registrant’s information is triggered with a button click. The bar stays sticky at the bottom of your page even as it scrolls.
Customize the description and button text, the bar and button color, and the style of the pop-up registration form.
Registration button
The registration button triggers a registration form pop-up on click. Insert the button code anywhere in the page content where you what to prompt a prospect to sign up.
Customize the button text, color, size, shape, border, and shadow. Select a style for the pop-up registration form.
Registration bubble
The registration bubble is a floating icon and pop-over window that appear in the bottom corner of the page that can be closed and reopened. The pop-over contains information about the webinar and a button to register. Clicking the button opens the registration form.
The registration bubble code contains parameters that can be used to customize the appearance of the pop-over.
Custom Style Parameters
Style parameters are separated in the embed code by an ampersand (&) character. For example:
Modify the code to edit each parameter according to your preferred styling.
Style Element
Parameter
Default Value
Custom Value Guide
Button Text
buttonText
Register
Text
Button Color
buttonBgColor
#29b6f6
Hex code for preferred color, URL-encoded
Button Opacity
buttonBgOpacity
0.95 (95%)
Decimal value between 0 and 1 to set opacity percentage
Bar Color
barBgColor
#ffffff
Hex code for preferred color, URL-encoded
Bar Opacity
barBgOpacity
1 (100%)
Decimal value between 0 and 1 to set opacity percentage
Pop-up Form Style
formTemplate
2
Template ID. Enter a template ID: 2, 4, 6, 8
Pop-up Form Color
formColor
1
Color variation ID. Enter a variation ID: 1, 2, 3, 4, 5, 6
Registration embedded form
The registration form is a simple opt-in form that appears directly in the page without a pop-up.
Customize the style of the embedded registration form with parameters:
Style Element
Parameter
Default Value
Custom Value Guide
Button Text
formButtonText
Register
Text
Accent Color (Button and “Convert to another timezone” text)
formAccentColor
#29b6f6
Hex code for preferred color, URL-encoded
Accent Opacity(Button and “Convert to another timezone” text)
formAccentOpacity
0.95 (95%)
Decimal value between 0 and 1 to set opacity percentage
Background Color
formBgColor
#ffffff
Hex code for preferred color, URL-encoded
Background Opacity
formBgOpacity
1 (100%)
Decimal value between 0 and 1 to set opacity percentage
Style Parameter Notes
All text, spaces and “#” symbols must be URL-encoded. For example, the # symbol is %23, a blank space is +, etc.