
Create DMARC record for domain authentication
This article is for WebinarJam and EverWebinar.
WebinarJam Mail is the sending service for both WebinarJam and EverWebinar events. Follow this series for all webinar event types.
Using this guide, create a DMARC policy to monitor DKIM and SPF alignment for your domain(s) and set up reporting so you stay informed. DMARC alignment refers to how closely a message From: header matches the sending domain specified by either DKIM or SPF.
Step 1: Identify Your Sender Domain(s)
Start by identifying the domain(s) you want to protect. Your domain is the part of your email address that comes after the ‘@’ symbol, such as yourcompany.com.
The person identified as the Webinar Host & Presenter is used as the sender for all notification emails for a particular event (the host is shown in the following image as “John Smith”).
To protect all the email domains you use for your webinars, look at the primary host information each time you create a new event. The email addresses associated with each host are the ones you must authenticate.
It is not necessary to authenticate the email domains for secondary presenters (ie, “Jane Doe” in the following image is a secondary presenter).
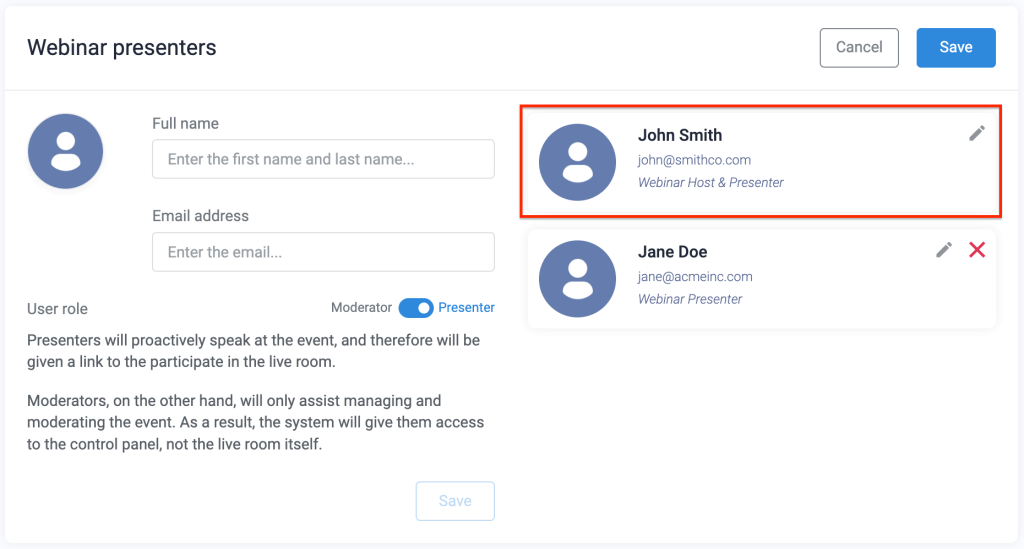
Remember: If you add different hosts with different email address domains to your webinars, DMARC records must be added to the DNS settings for each one.
Step 2: Login to Your Domain Host
Your DNS (Domain Name System) provider is where your domain’s settings are managed. Popular providers include GoDaddy, Namecheap, or Cloudflare, but there are many similar services your domain could be registered through.
Once logged in, find the DNS settings or management section of your account. Look for an option like “DNS Management” or “DNS Settings.”
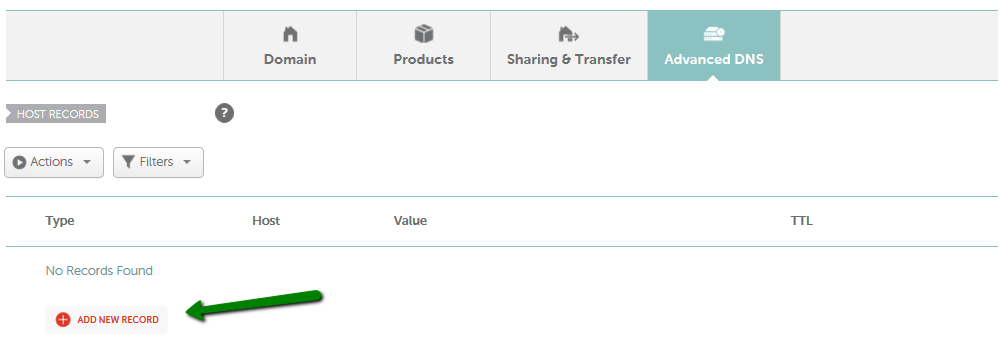
Example of Advanced DNS settings in Namecheap domain management
Source: How do I add TXT/SPF/DKIM/DMARC records for my domain?
Step 3: Create Your DMARC Record
Now, you’ll need to define the DMARC policy. A basic DMARC record includes the following components:
- v=DMARC1: The DMARC version.
- p=none: DMARC policy, example value set to “none.” This instructs mail servers to monitor emails but take no action if the sender cannot be authenticated.
- rua=mailto:[email protected]: Specifies the email address where aggregate reports of mailing activity for the domain should be sent. In your record, replace “[email protected]” with the email address where you want to receive DMARC reports. The address must be located on the same domain as the DMARC record OR be issued by a DMARC monitoring service.
A finished DMARC record value with these components looks like this:
v=DMARC1; p=none; rua=mailto:[email protected];
Note: If you sign up for a DMARC monitoring service, most will generate a DMARC record for you. They will provide the exact record and instructions to add it to your DNS. Otherwise, you can create the record manually as shown above.
Understanding DMARC Policies
The DMARC policy is specified by ‘p=value’ in your record. The value dictates what should happen with a message that could not be verified with DKIM or SPF.
The policy is set to one of three values:
- p=none: Deliver all mail, regardless of verification.
- p=quarantine: Treat the message as suspicious and potentially spam.
- p=reject: Do not deliver at all.
If you are new to sender verification, it’s best to take a cautious approach to your initial DMARC policy and set it to “none,” with a plan to increase the strictness.
As long as a valid RUA value is defined in your record, you will receive DMARC activity reports with information about the messages that pass or fail the verification process. With the help of a DMARC monitoring service to distill the reports, they can help you find legitimate services that need to be added to your SPF record and see if spoofers are currently using your domain.
As you learn more about how accurately your mail is being verified and delivered, you can increase the strictness of your DMARC policy to make it more secure.
Step 4: Publish Your DMARC Record
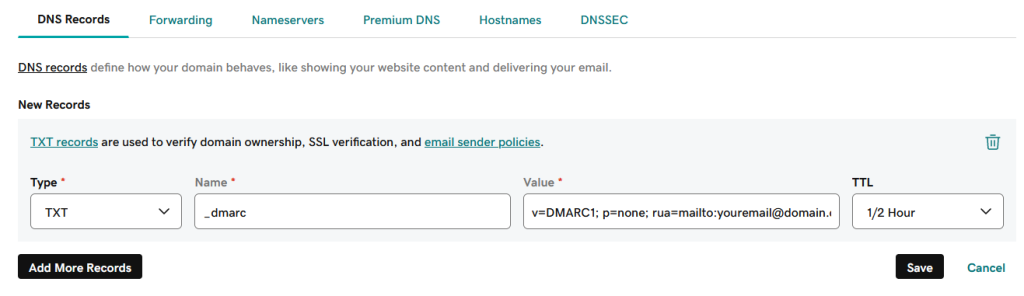
Create a TXT record for your domain and add the policy defined in the previous step.
- Go to the DNS Settings or DNS Management area.
- Locate the domain(s) you use to send email.
- Add a new TXT record to the domain and enter the DMARC details:
- “Host” or “Name”: _dmarc
- “Value” or “Content”: enter the DMARC record details you defined at the previous step.
Note that the terminology you see in your account for the record fields can vary depending on your hosting service. If you’re not sure how to follow these steps in your DNS console, your domain host support will be able to help.
After publishing the DMARC record, wait about an hour for the changes to propagate through the internet.
Step 5: Test Your DMARC Record
Before testing the DMARC, make sure you also have valid DKIM or SPF records set up for your domain. Remember, DMARC works to validate and report on DKIM and SPF authentication, so all the pieces must be in place before you test.
If you have not configured and tested DKIM or SPF records yet, stop here and do that now:
- Create DKIM authentication records
- Create SPF authentication record (integrated SMTP only)
When all your sender authentication records are complete, use a DMARC Record Check tool to confirm that the DMARC record is correct. Your domain host may provide one, or you can use an online service like DMARC Check Tool from MxToolBox. There are lots of free tools available online to help you test!
Step 6: Monitor and Analyze Reports
Sign up for a DMARC monitoring service and regularly check the mail server reports sent to the email address specified in your record’s rua tag.
The monitoring service will distill the information contained in each report into usable insights – without it, the XML reports can be difficult to understand. The information you get from the reports will help you review any email authentication failures and fine-tune your DMARC policy over time.
There are many services online that you can use to monitor DMARC reports. One example to get you started with a free monitoring tier is Valimail.