WebinarJam and EverWebinar User Documentation Webinars for everyone!

Zapier

This article is for WebinarJam and EverWebinar.

Before Getting Started

  • An API key is required to allow Zapier to communicate with your account. If you are not already approved to use the WebinarJam / EverWebinar API, apply for a key.
  • Access to the API is not available for trial accounts. To access an API key for use with Zapier, upgrade to a paid plan if needed.

Overview

Zapier is a tool that lets you automate workflows between web applications that are otherwise unrelated. This article describes the process of creating automation between WebinarJam or EverWebinar and many third-party applications using Zapier.

Popular automations to try:

  • Send registrants to an autoresponder not in our integration list
  • Tag registrants in an autoresponder not in our integration list
  • Add new registrants to a Google Sheets Spreadsheet
  • Send yourself a notification when someone registers
  • Send registrants a survey or form for additional information
  • Add registrants to an SMS service for additional messaging
  • Create Trello boards for follow-up services
  • Create tasks with Project Management Programs
  • Create a purchase (for sending a free follow-up file)

Zapier Resources

Zapier is a third-party program and cannot be supported in-depth by the WebinarJam team. For detailed information about Zapier and how to set up your Zaps, refer to the Zapier knowledge base:


Start a Zap and Connect WebinarJam / EverWebinar

Before starting, review some basic concepts:

ONE TIME: Zapier does not have a mechanism to keep items in sync after the first time they run through a Zap. Think of Zapier like a one-way, one-time pipeline.

ONE TRIGGER: Zaps are triggered by a single event. If you want the same action to happen based on multiple triggers, create a separate Zap for each unique trigger.

NEW DATA ONLY: Zaps cannot see data that was created before your Zap was turned on. Zaps are triggered by events that happen after the Zap is turned on – in other words, by data that is newly added. To force Zapier to process data that existed before your Zap, refer to this article on bulk importing existing data into zaps.

Create a Zap

Log in to the Zapier dashboard and select your preferred creation method. This article describes the Classic process.

If not already selected, click Classic view in the dashboard to follow this article.
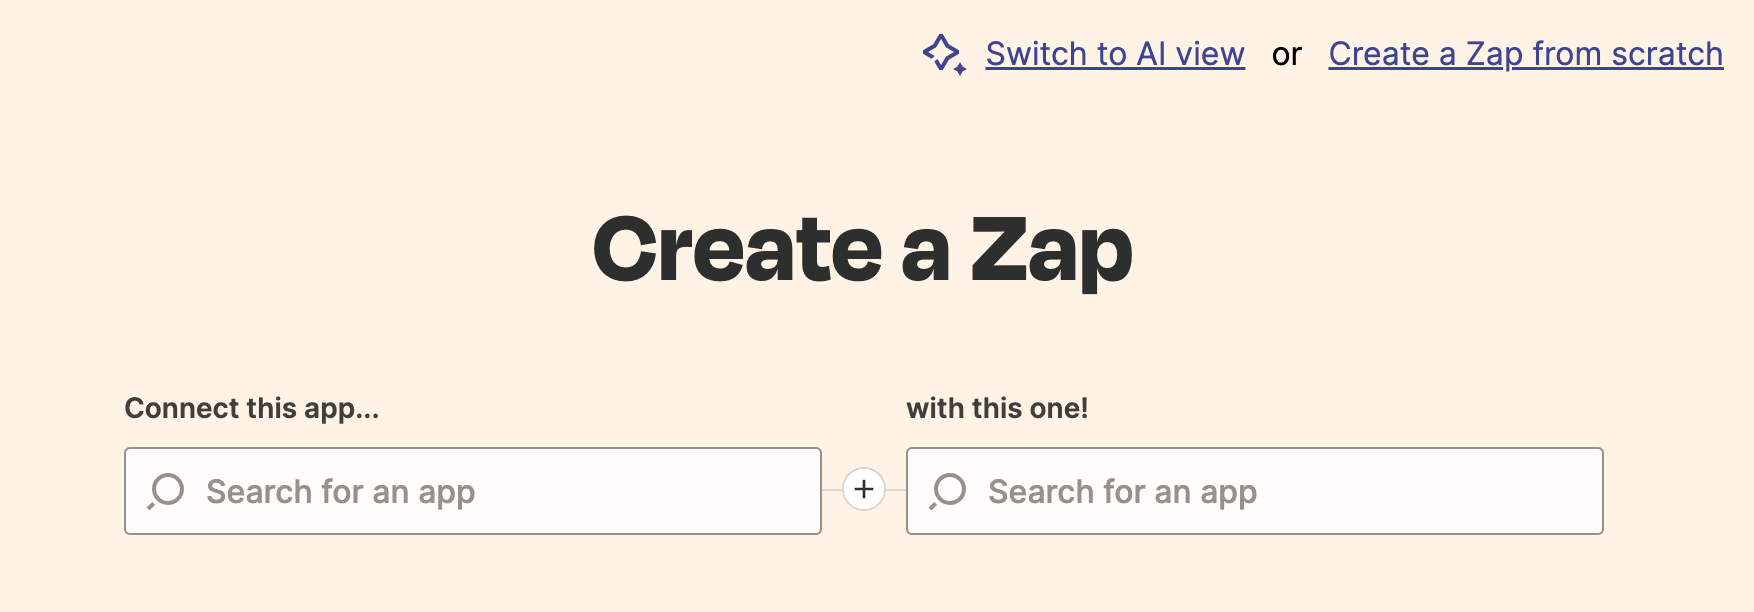
Zapier dashboard classic view

To set up a Zap, four parameters are defined:

1) Connect this app → 2) with this one!

3) When this happens → 4) then do this!

Zaps are IF/THEN automation rules. They create automatic processes that trigger when one event happens (IF) and initiate a follow-up action in response (THEN)

  1. Under Connect this app… search for WebinarJam / EverWebinar
  2. Under with this one! Search for the app where you want to send information
  3. Under When this happens… select a WebinarJam or EverWebinar event to trigger the Zap
  4. Under then do this! Select an action to occur in the destination app you selected

WebinarJam / EverWebinar Triggers

Available WebinarJam / EverWebinar triggers include:

Trigger Timing Description
New Live Attendee Immediate Triggers when a registrant joins a live webinar.
Registrant Joins Webinar After After session Triggers if a registrant was late for a live webinar.
Registrant Misses Webinar After session Triggers if a registrant missed the live webinar.
New Registration Immediate Triggers when a user registers for a webinar.
Registrant Attends Replay Immediate Triggers when a registrant joins the webinar replay.
Registrant Leaves Before After session Triggers if a registrant left the live webinar before a specific timestamp.
Registrant Purchases Immediate Triggers when a registrant buys a product during the live webinar. Dependent on active sales goal tracking.
Registrants Stays Until After session Triggers if a registrant stayed in a live webinar past a specific timestamp.


Go to Zapier’s app catalog for the most up-to-date list of available WebinarJam / EverWebinar triggers.

Important:

  • Certain triggers fire when the webinar session is over. If you want to trigger a zap before or during the event, use triggers that fire immediately instead.
  • Zaps are triggered by a single event. If you want the same follow-up action to happen based on multiple triggers, create a separate Zap for each unique trigger.
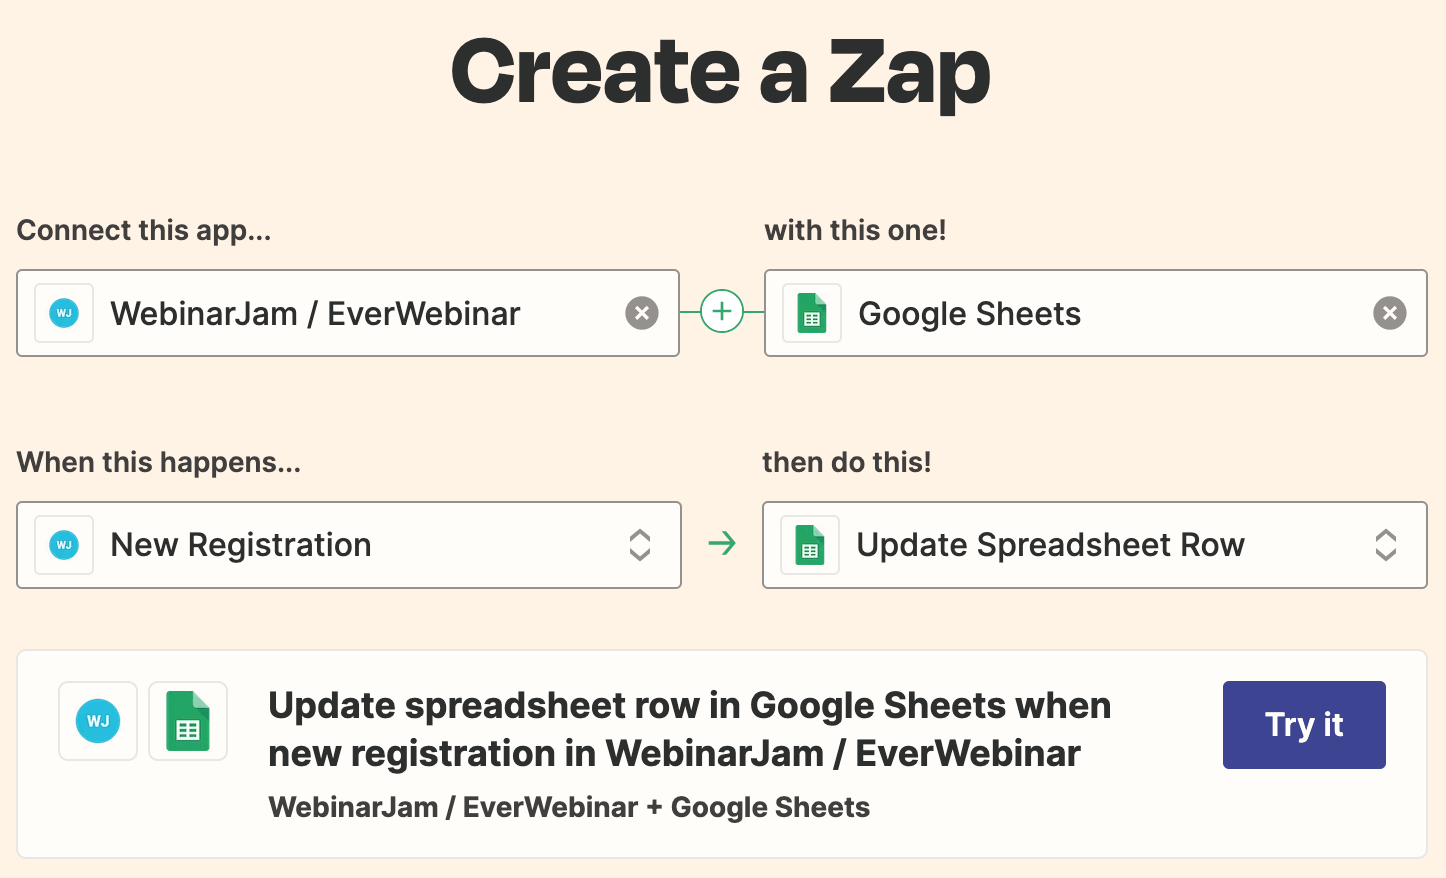
Zap example showing spreadsheet update when a new registration happens in WebinarJam
The example in the preceding image shows a Zap that connects WebinarJam or EverWebinar to Google Sheets

After defining the trigger and action for your new Zap, click Try It to enter the editor and complete the configuration.

Connect with WebinarJam

WebinarJam API key

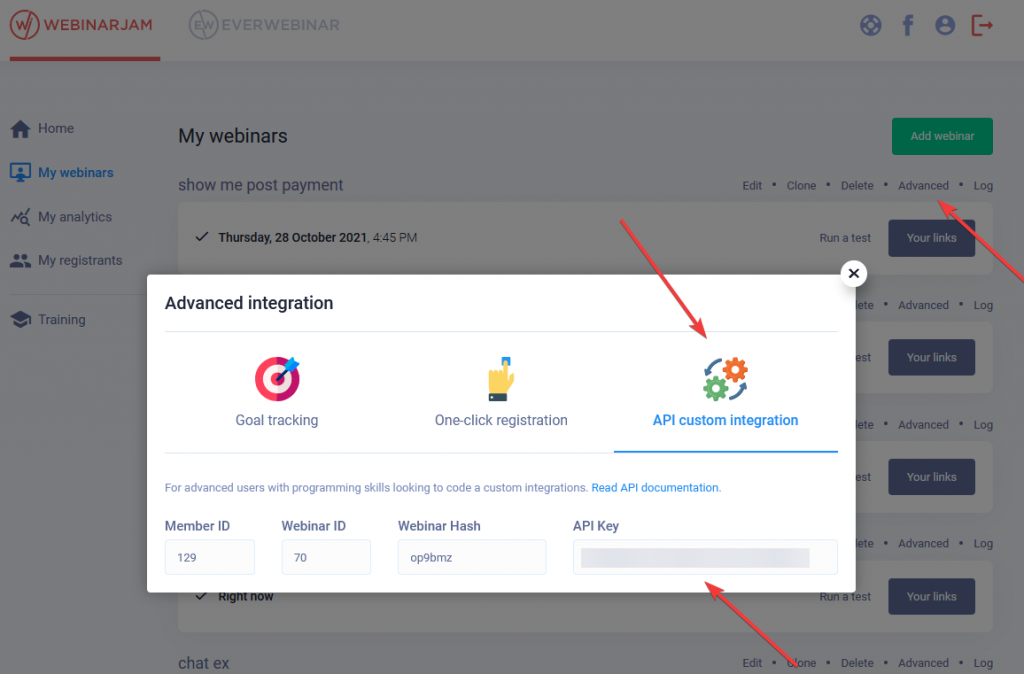
A WebinarJam API key is required to connect your WebinarJam and Zapier accounts. If you are not already approved to use the WebinarJam / EverWebinar API, apply for a key. The key is found in your main webinar dashboard, under the Advanced link for any webinar. The API key is a global value, so it is the same for every event in your account.

Copy the API key from your WebinarJam profile

The editor will prompt you to sign in to connect a WebinarJam / EverWebinar account, or select one that is already connected.

If you select Sign In, a popup appears to authorize the access request. Enter your WebinarJam API key in the field to authorize access.
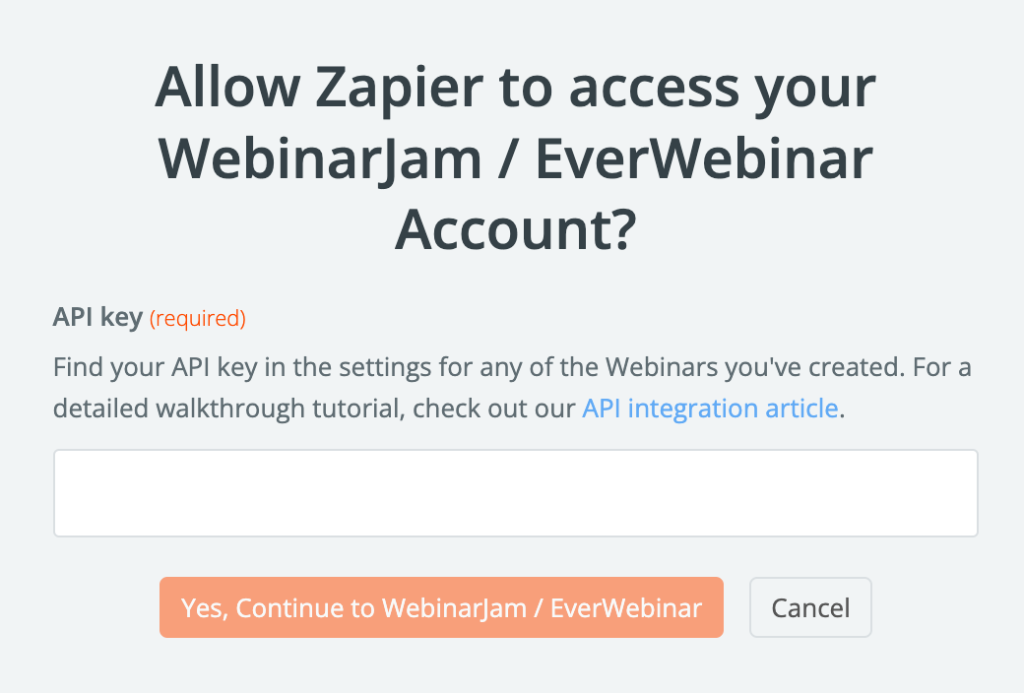
API key to authorize access

Complete the Zap

Use Zapier’s editor to finish setting up and testing the Zap.

The API connection gives Zapier access to your WebinarJam / EverWebinar account so the editor can display your webinars in the configuration process. Choose the webinar you want the Zap to trigger from and configure the actions for the destination application as desired.

When the setup is complete, turn the Zap ON by using the toggle in the editor or your Zapier dashboard.

Toggle Zap on or off


Test the Integration

As with any complex configuration, it is best to test your Zap with a demo webinar to make sure it works as expected before a live event.

Twilio

This article is for WebinarJam and EverWebinar.

Integrate with Twilio to send SMS and phone call reminders for your webinars.

For example, you can send a reminder for your webinar to your participants: a “Last minute” reminder which will be sent out 15 minutes before your webinar starts.

You Will Need:

  • A Twilio account
  • The Twilio Account SID and Auth Token
  • A Twilio phone number

Set Up Twilio

  1. Go to Twilio and log in or create a new account.
    • Trial accounts allow message sending to verified numbers in specific countries only.
  2. In the account Console, click Get a phone number or go to Phone Numbers > Manage to create one.
    • Important: Verify the phone number if required. Unverified phone numbers cannot be used to send notifications.

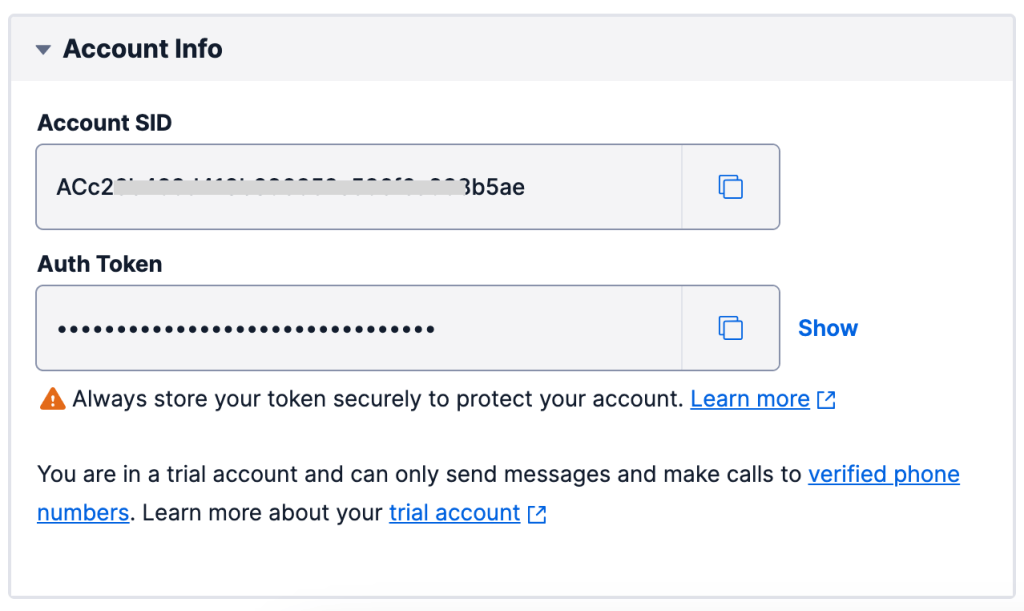
In the account Console, get the information you need to integrate with your webinars:

  • Account SID
  • Auth Token
  • Twilio phone number appears in this module when the number is created

Twilio account SID and auth token


Integrate Twilio

Connect Twilio with your account to enable SMS and voice messaging reminders for your webinars.

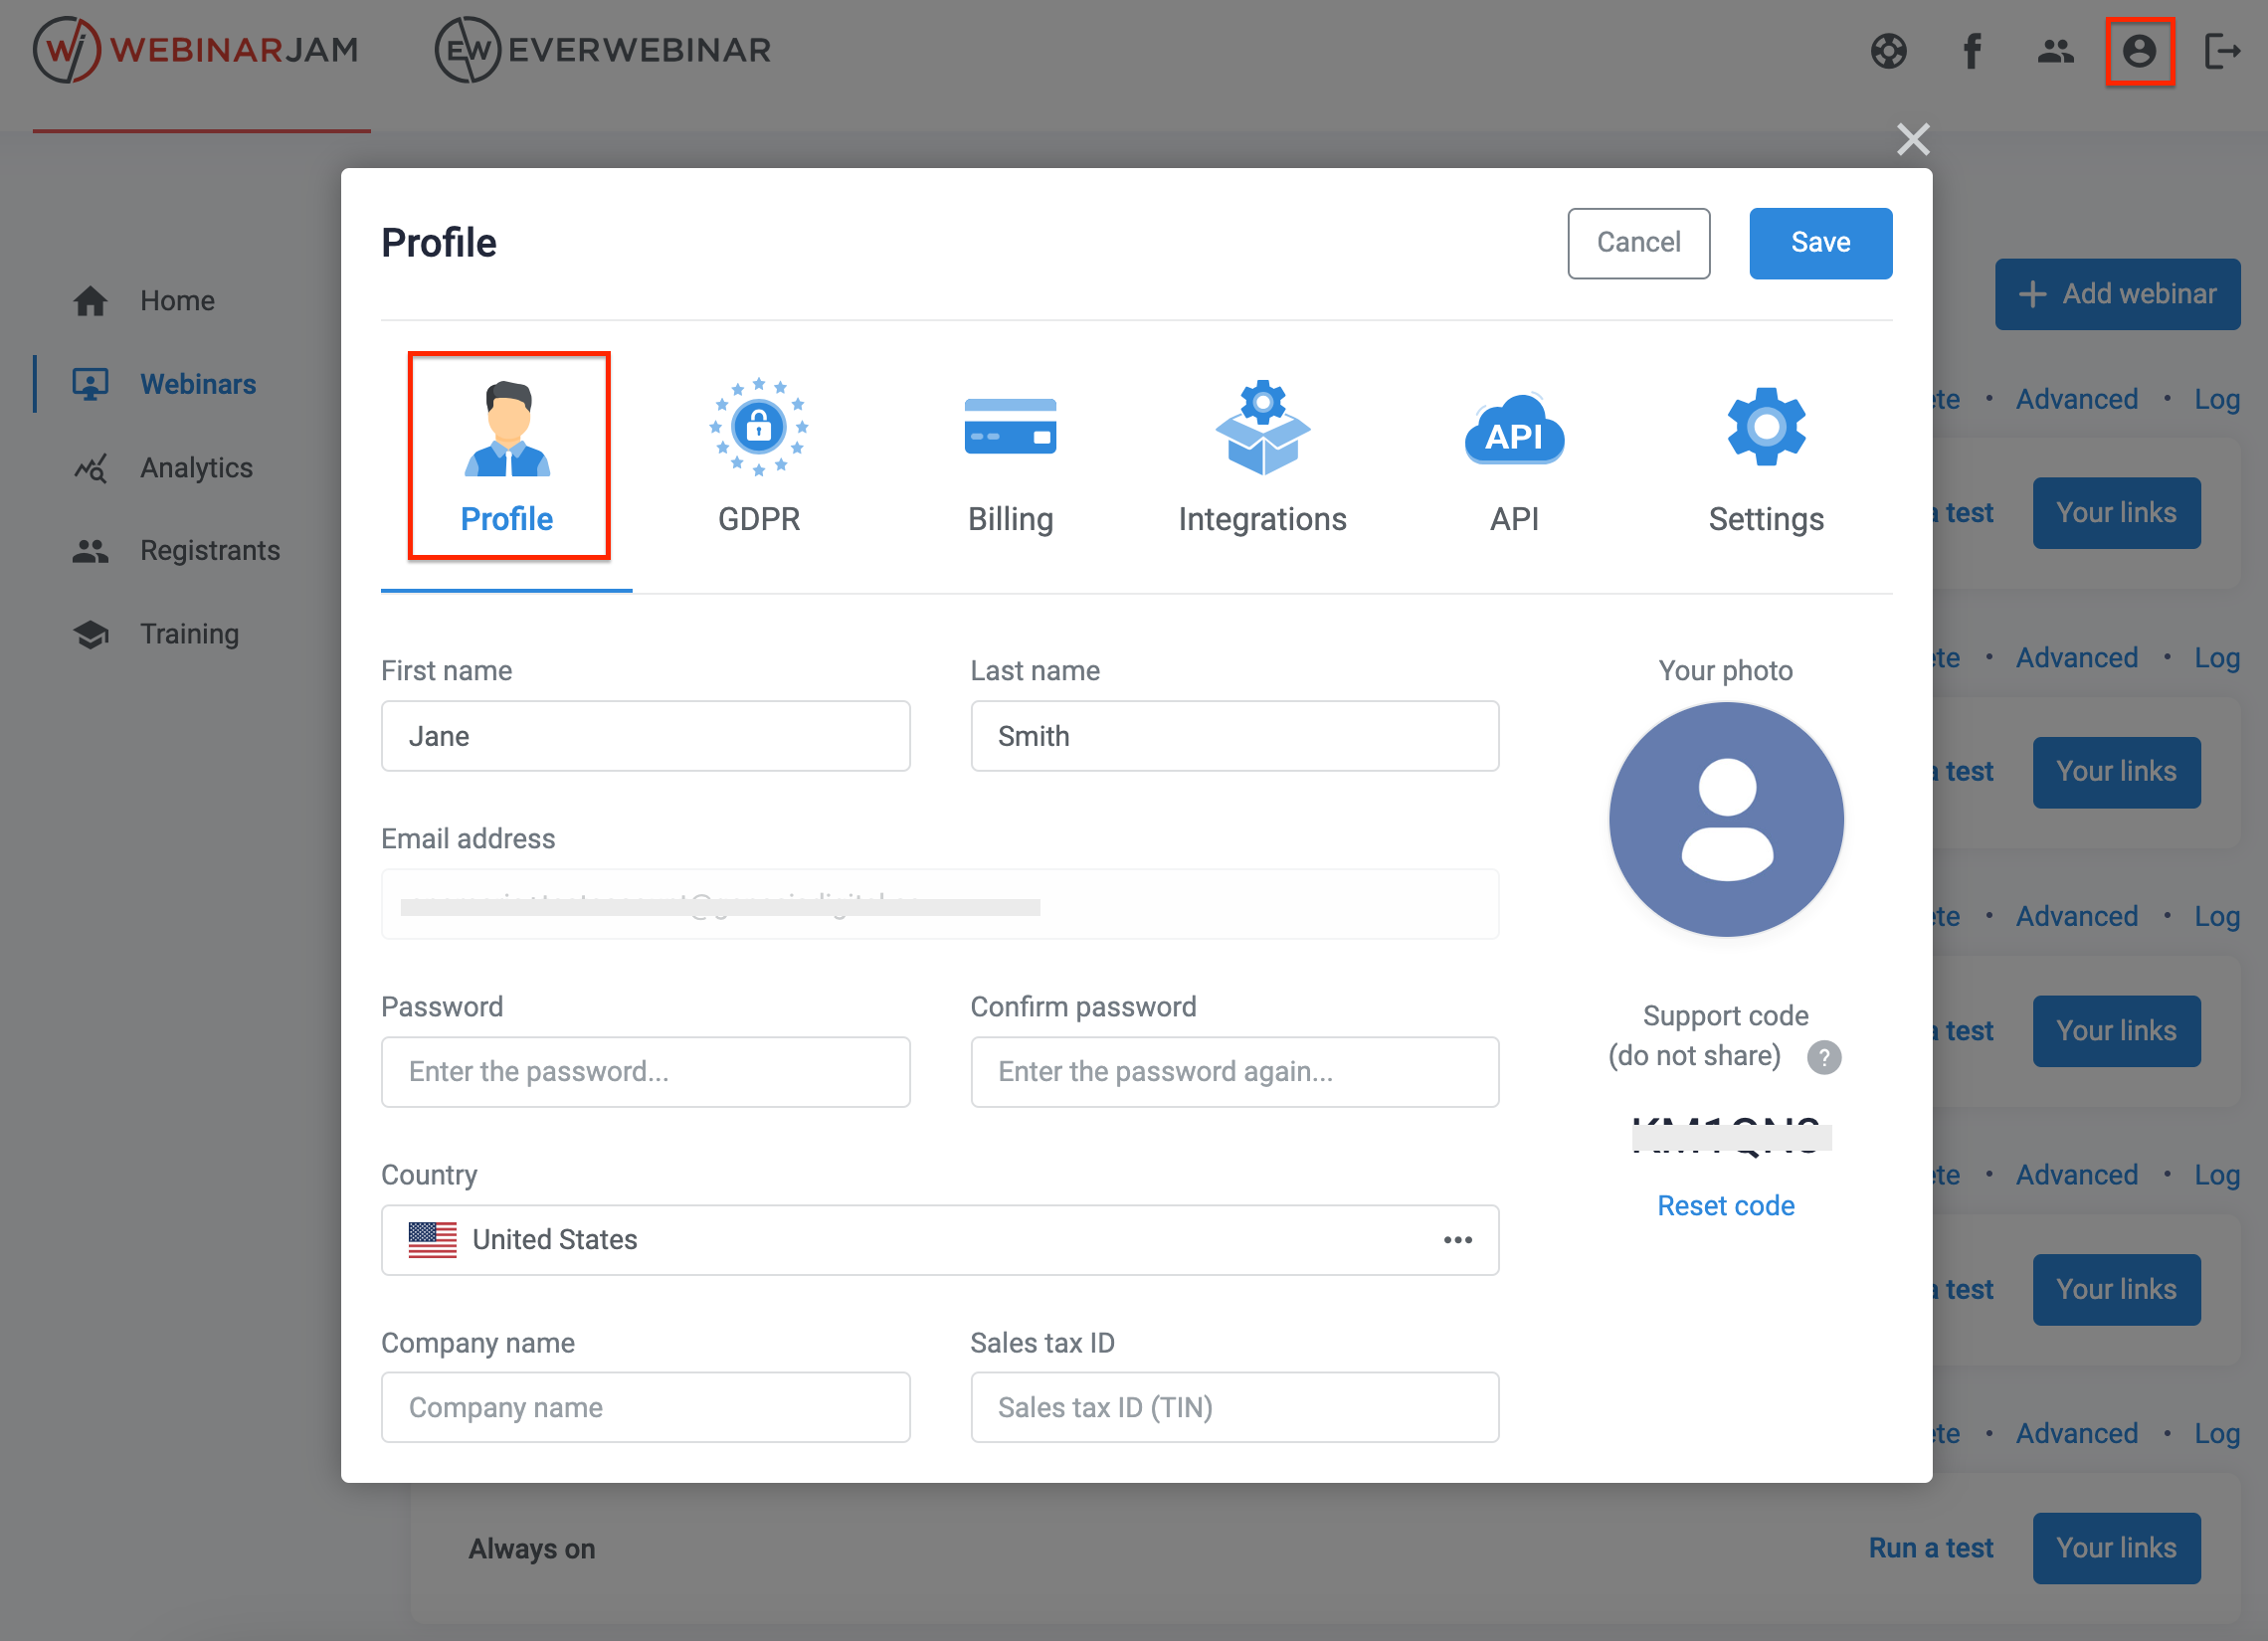
  1. Go to Profile > Integrations
  2. Click SMS Gateways
  3. Enter your Twilio account credentials:
    • Account SID
    • Auth Token
    • Twilio Phone Number (do not include dashes in the phone number)
  4. Click Connect to add the account

Send a test SMS to verify that the credentials are correct. Enter a valid phone number and press Send Test SMS.

To remove the integration or link to a different Twilio account, click the reset link below the Connected status indicator.

Learn how to use Twilio with WebinarJam and EverWebinar


Troubleshoot Twilio Sending

Countries outside of the United States

If you are in a country outside of the United States, you may need to enable global permissions and the country or number range to which you want to send SMS messages. Twilio has global permissions to protect your account from abuse.

  • In your Twilio account, look for SMS Geo Permissions

My registrants don’t receive messages

If the Twilio message log says your messages were sent, the delivery failure may be due to the phone provider. Providers may block certain types of messages or numbers to protect their customers from spam.

If you just created your Twilio account, you may need to confirm your account. If you need help, contact the Twilio support team.

Custom confirmation page

This article is for WebinarJam and EverWebinar.

Enable Custom Confirmation Page

When a person registers for your webinar, choose to direct them to a default confirmation page or a custom page.

To use a custom confirmation page:

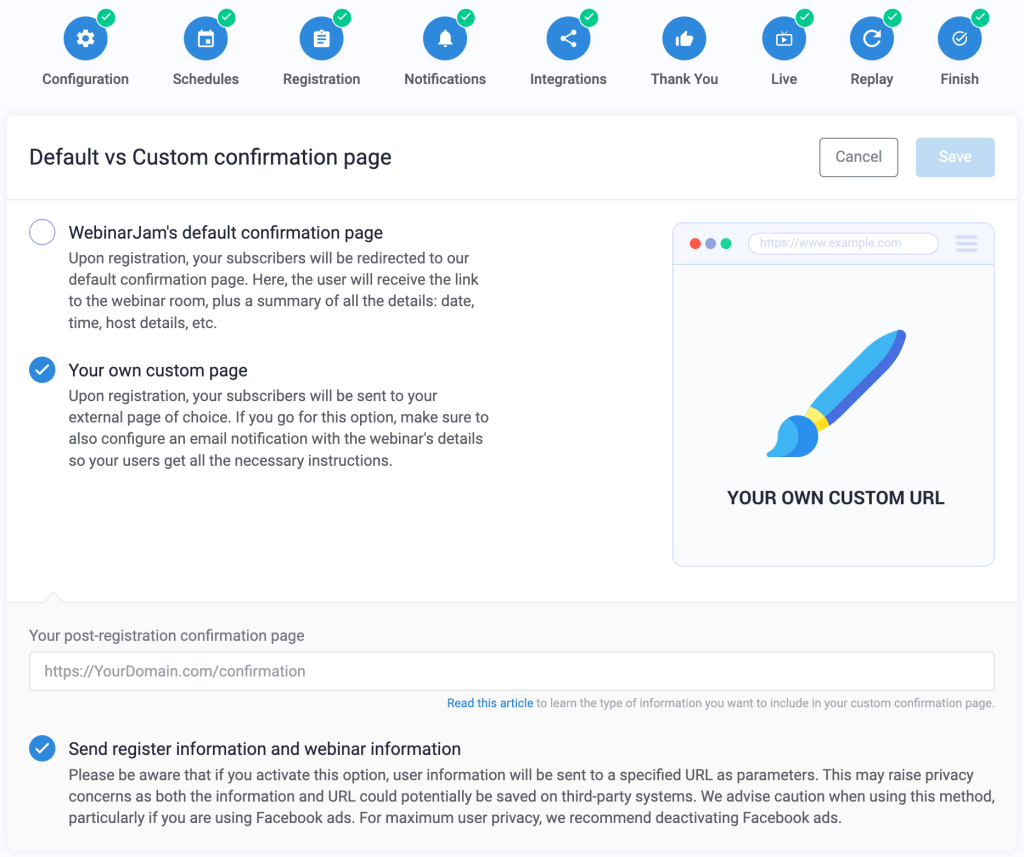
  1. Go to the Thank You step in the webinar configuration wizard
  2. Open the Default vs Custom confirmation page module and select Your own custom page
  3. Enter the link to your custom page in the Post-regisration confirmation page field
    • Turn Send register information and webinar information on or off. This option is ON by default.

Thank you page - Custom page URL


Send Registration and Webinar Information

If the registration confirmation page is hosted outside the WebinarJam/EverWebinar system, some registration information can be passed as parameters in the URL if you want to display them on the external page. This is optional.

To enable this, make sure Send register information and webinar information is turned ON at the Thank You page step of the webinar configuration.

Important: Using the registration data sent in the URL string requires Javascript coding knowledge. URL parameters allow advanced users with programming skills to customize a confirmation page. Learn more from this SitePoint article.

Registration URL Parameters

Parameters Example (Decoded) Description
wj_lead_first_name John Data entered in the First name registration form field.
wj_lead_last_name Smith Data entered in the Last name registration form field (if collected).
wj_lead_email [email protected] Data entered in the Email address registration form field.
wj_lead_phone_country_code +1 Country code selected in the registration form (if collected).
wj_lead_phone_number 1234567890 Data entered in the Phone number registration form field (if collected).
wj_lead_unique_link_live_room UNIQUE Returns a unique system-generated access link for the registrant.
wj_room_password UNIQUE An alphanumeric password for the webinar room (if enabled in the webinar configuration). IMPORTANT: The password is passed in plain text.
wj_next_event_date Monday, 31 August 2020 Event date displayed as Day, DD MMMM YYYY.
wj_next_event_time 1:45 AM Event time displayed as HH:MM AM/PM. The time displayed will match the standard format used in the country represented by the flag in the webinar’s language selection.
wj_next_event_timezone Pacific Time (US and Canada) GMT-7 Time zone displayed as location and GMT.
wj_event_ts 1598863500 Event Unix timestamp.
wj_event_tz America/Los_Angeles Time zone displayed as TZ identifier.

Take Note

  • Parameters containing personal data (ie, wj_lead_first_name, wj_lead_last_name, wj_lead_email, wj_lead_phone_country_code, and wj_lead_phone_number) are sent only if Send register information and webinar information is turned on in the webinar configuration.
  • Parameters are passed to the custom confirmation page automatically. No additional configuration is required.
  • Parameters are passed every time, even if they are empty.
    • Exception: The password parameter is generated only if password protection is enabled in the webinar configuration.
  • Parameters are UTF-8 encoded and must be decoded for display on a page. Example: email@domain.com will be passed as email%40domain.com.

URL Example

The URL is made up of two parts:

  • Base URL: https://www.domain.com/YOUR-PAGE
  • Parameters: ?wj_lead_first_name=John&wj_lead_last_name=&wj_lead_email=johnsmith%40domain.com […]

The parameters portion of the URL begins with ? and individual parameters are separated by &.

  • Parameters in the following example are shown in blue, with their values in red
  • Example shows data sent by a registration form that only asked for first name and email address. Note how some parameters carry no value because the fields were not requested in the registration form.
https://www.domain.com/YOUR-PAGE?wj_lead_email=johnsmith%40domain.com&wj_lead_first_name=John&wj_lead_last_name=&wj_lead_phone_country_code=&wj_lead_phone_number=&wj_room_password=&wj_lead_unique_link_live_room=https%3A%2F%2Fevent.webinarjam.com%2Fgo%2Flive%2F12%2F0g02hkd4m8vy&wj_event_ts=1598863500&wj_event_tz=America%2FLos_Angeles&wj_next_event_date=Monday%2C+31+August+2020&wj_next_event_time=1%3A45+AM&wj_next_event_timezone=Pacific+Time+%28US+and+Canada%29+GMT+-7
Important: This code is provided as an example only. Always build a new URL with the parameters needed for your own use.

Activate Confirmation Email Message

If you turn off Send register information and webinar information or choose NOT to include custom parameters in the confirmation page, make sure the confirmation email at the Notifications step is active.

The confirmation email sends registrants a unique link to the webinar room and a reminder of the event’s date and time.

External video hosting

This article is for WebinarJam and EverWebinar.

External video files are used by your webinar in two ways:

  • EverWebinar automated video source (Required)
  • WebinarJam live video injections (Optional)

Take Note

  • Supported video file formats are MP4 and MOV
  • Video must be hosted on a cloud-based server
  • Ideal video resolution for a webinar is 720p at 30 frames per second to balance good streaming quality and fast loading

Related resource: Optimize video for streaming


Video Hosting

Host your video on a compatible streaming service:

  • YouTube
  • Vimeo direct MP4 links (available on Pro, Business, Premium, Standard, Advanced, or Enterprise plans)
  • Amazon S3 or a similar file-hosting solution
    • Similar solutions must offer a direct MP4 playback URL for the hosted video.


YouTube

YouTube is a free video hosting option that is compatible with WebinarJam.

Important: YouTube’s legal terms and conditions do not allow the removal of the YouTube logo or video player controls. This means that it is not possible to restrict the playback controls in an EverWebinar event and videos hosted on YouTube will always show their logo in the lower right corner of the playback window.

To use a YouTube-hosted file for your webinar:

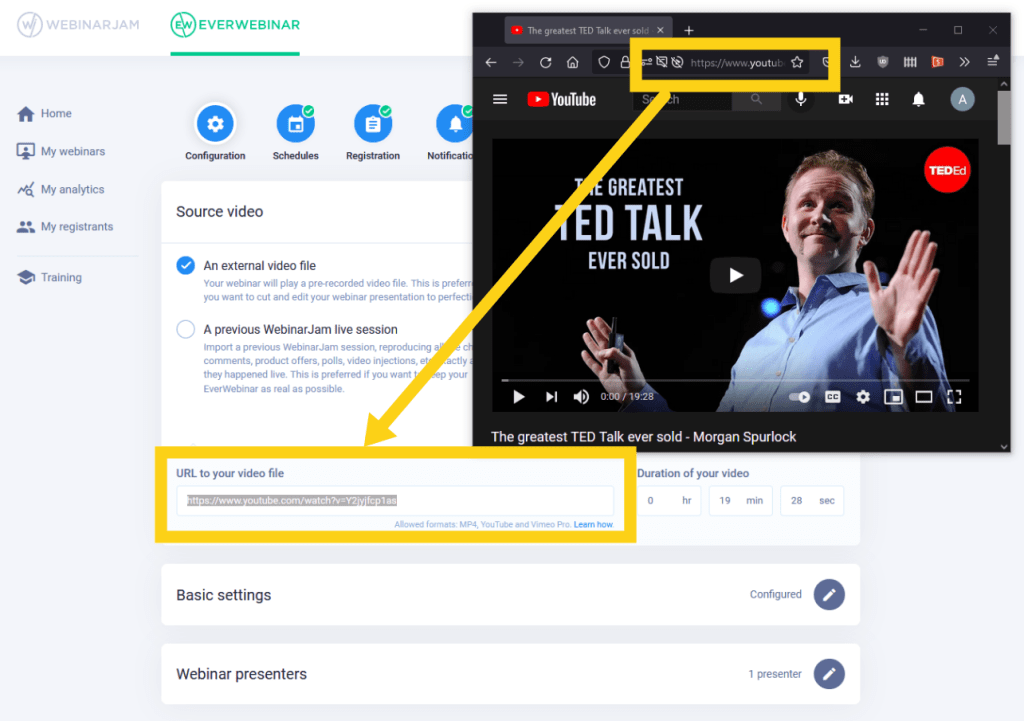
  1. Visit the dedicated page for your video on the YouTube website
  2. Copy the YouTube page URL and paste it into the WebinarJam or EverWebinar configuration
    • Note: The “share” link for the YouTube video will not work. You must use the full page URL.

YouTube-hosted EverWebinar source file


Vimeo

Vimeo direct link sharing is available on Pro, Business, Premium, Standard, Advanced, or Enterprise plans.

Direct links to a Vimeo-hosted video allow MP4 playback with logo removal and the ability for EverWebinar to override the native playback controls.

Access Vimeo links:

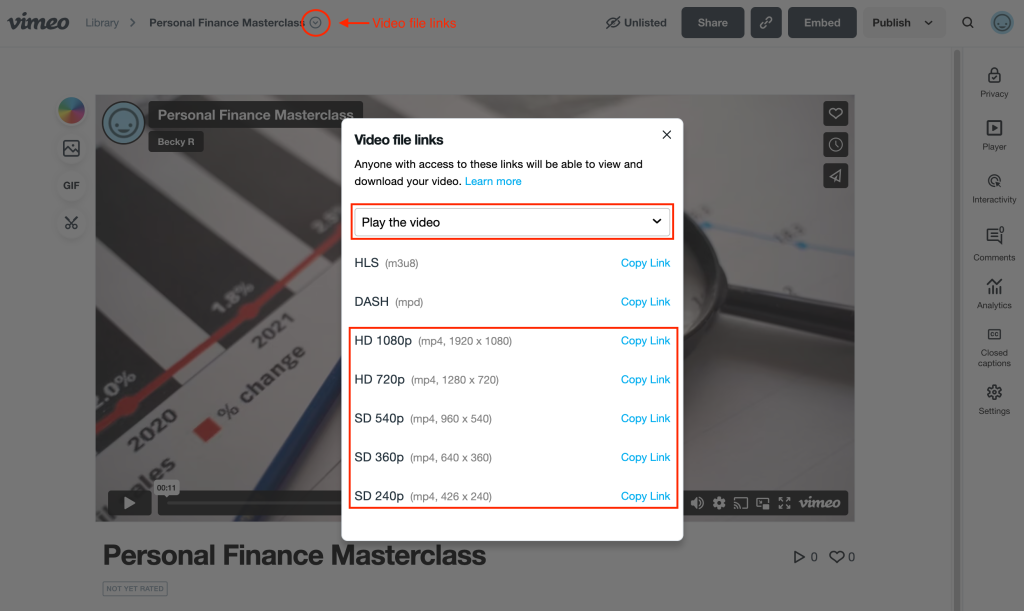
From the video links pop-up:

  1. Select “Play the video” from the dropdown menu

  2. Choose one of the MP4 options and click “Copy link” (the HLS and DASH formats are not compatible with WebinarJam)

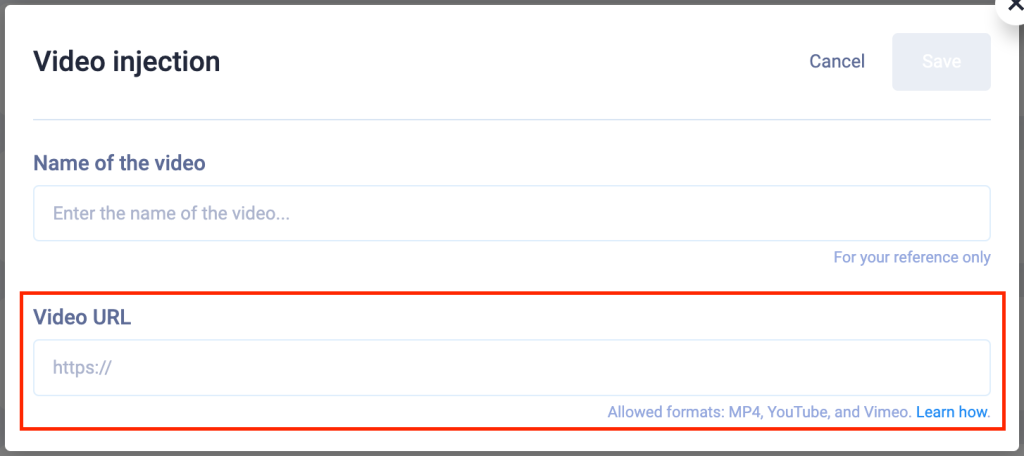
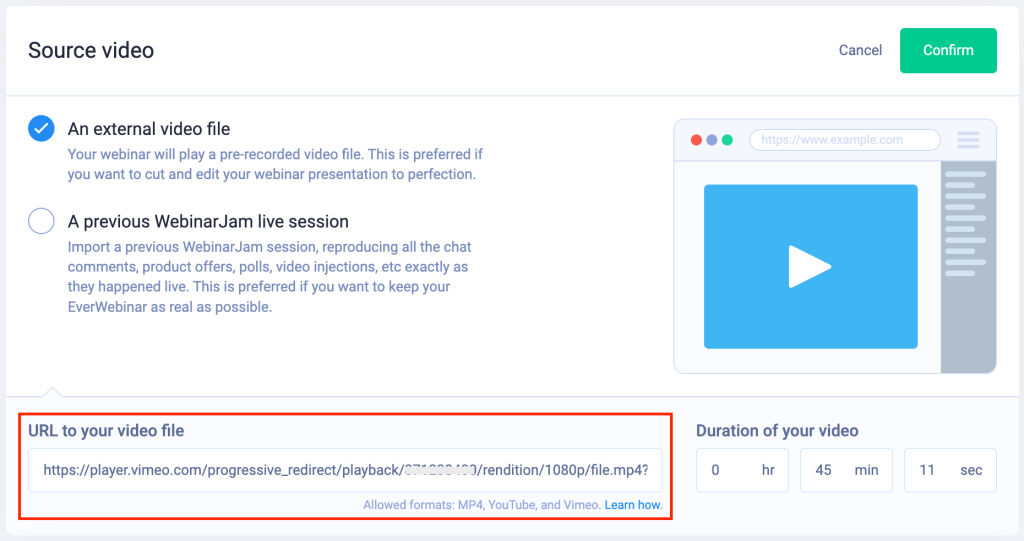
  3. Paste the link into the WebinarJam video injection field or as an EverWebinar source video and Save.

    Select the Vimeo file quality you want to use

Note: When selecting a video link from the menu shown above, choose your preferred playback quality.

Use as a WebinarJam video injection at the Live step of the webinar configuration:

WebinarJam video injection module

Use as an EverWebinar external source file:

EverWebinar external source file configuration


Amazon S3

To use a video hosted on Amazon S3 with WebinarJam or EverWebinar:

  • Set video file permissions to “public”
  • Copy the video’s MP4 file path to paste into the WebinarJam or EverWebinar configuration

Upload the video file to Amazon S3 and use Actions > Make public to change the permissions:

Get the Object URL for the MP4 file:

Amazon S3 Notes

Some visitors may experience buffering with Amazon S3 video streaming.

To improve streaming performance, host your video on Amazon S3 and stream it via Amazon’s CloudFront.

  1. Convert the S3 video file URL into a CloudFront URL to use it in your webinar configuration.
  2. Paste CloudFront URL into your WebinarJam or EverWebinar configuration to use it as a source file.

One-click registration link

This article is for WebinarJam and EverWebinar. 

One-Click Registration

One-click registration allows people to click a link to sign up for a webinar if they are already on your mailing list.

The benefits of using one-click registration include:

  • Reduced sign-up friction, making it more likely that people will register.
  • Integration with your autoresponder, so you can apply tags or fire automation based on the link click.
  • Ability to bypass the registration page, register a subscriber to the webinar in the background, and forward the user straight to the Thank You page to get an access link for the event.

Take Note

  • An API key is required to use one-click registration. If you are not already approved to use the API, apply for a key.
    • Access to the API is not available for trial accounts. To access an API key, upgrade to a paid plan if needed.
  • The configured one-click registration link must be sent in an email from your autoresponder to contacts that already exist in the autoresponder. The registration will not work in any other context.
  • One-click registration can not be used for EverWebinar Just-in-Time or Instant Replay. On-demand session types do not have a session ID for use in the URL parameters.
  • This article refers to shortcodes, dynamic variables, and merge fields. These all refer to the same thing: a piece of code from your autoresponder that is dynamically replaced by an email subscriber’s unique information.
IMPORTANT: To maintain compliance with anti-spam regulations, one-click registration may only be used with well-reputed autoreponders using the method described in this article. Any other use or abuse of the link is forbidden and may result in the termination of your account.

Get the One-click Registration Link

In Webinars, find the webinar you want a registration link for:

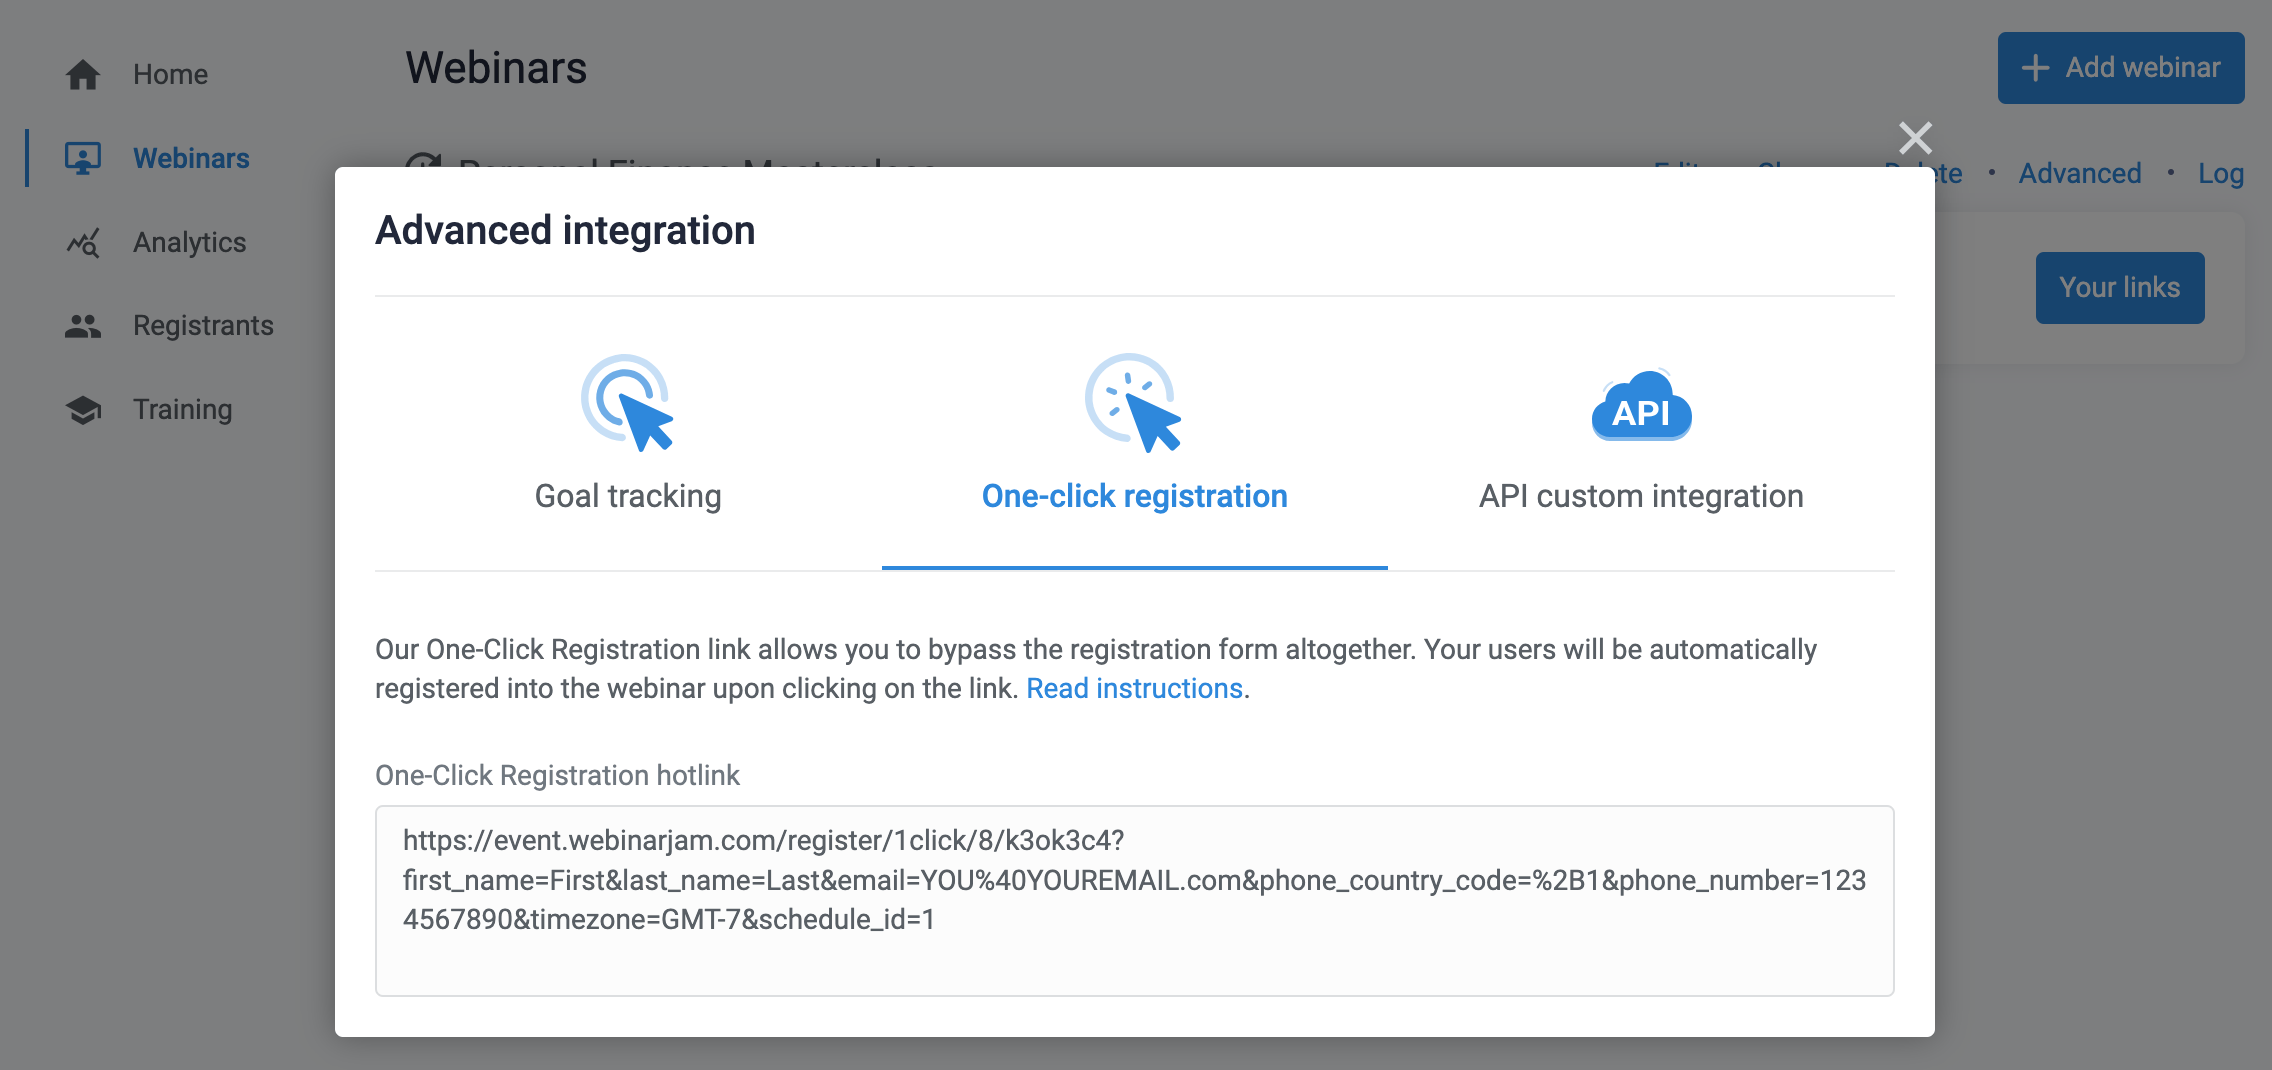
  1. Click Advanced above the event module, then One-click registration
  2. Copy the registration URL into a separate window where it can be edited
    • A plain text editor is recommended to avoid any unwanted formatting

Notice that some information is URL-encoded: %40 in place of ‘@’ and %2B in place of ‘+’.

Advanced menu dialogue with the one-click registration link


One-Click URL Parameters

The one-click registration link uses URL parameters to capture a subscriber’s information and register them for your webinar.

Your default one-click link will look similar to this:

Example of one-click registration parameters

The URL is made up of two parts:

  • Base URL: https://event.webinarjam.com/register/1click/8/UNIQUE
  • Parameters: ?first_name=First&last_name=Last&email=YOU%40YOUREMAIL.com […]

The parameters portion of the URL begins with ? and individual parameters are separated by &.

Parameters Default (Replace) Description
first_name * First Dynamic variable from your autoresponder that will populate the first name of a subscribed lead.
last_name Last Dynamic variable from your autoresponder that will populate the last name of a subscribed lead.
email * YOU%40YOUREMAIL.com Dynamic variable from your autoresponder that will populate the email address of a subscribed lead.
phone_country_code %2B1 Dynamic variable from your autoresponder that will populate the phone country code of a subscribed lead.
phone_number 1234567890 Dynamic variable from your autoresponder that will populate the phone number of a subscribed lead.
timezone GMT-7 Dynamic variable from your autoresponder that will populate the timezone of a subscribed lead. The timezone parameter is only required for EverWebinar events configured to take place “under the user’s own time zone”. If that is how you’ve configured your webinar, you must enter the time zone in GMT terms (example: GMT-7, GMT+7, GMT-2, etc).
schedule_id * 1 The schedule_id is the Session number for the webinar session. Get the schedule ID from the Schedules > Webinar schedule step of the webinar configuration wizard.**

* Required fields

** EverWebinar Just-in-Time and Instant Replay sessions do not have session IDs. One-click registration cannot be used for these event types.


Configure the One-Click Link

Important: Registration fields that are required in your webinar settings must have a matching parameter in the one-click registration link in order for the attendee’s information to populate correctly. Parameters for information that is not required for registration can be removed from the URL.

Using the table provided in this article, identify the parameters that represent information you want to collect for registration to your webinar.

  • Remove any parameters you do not need.
  • Replace the default value of each remaining parameter with a shortcode or variable from your autoresponder that matches the type of information the parameter calls for.
    • The terminology for this type of code varies depending on the autoresponder you use. This type of field is typically found in email editors or builders and may be called something like: shortcode, variable, merge field, merge tags, etc.

Modification rules:

  • The section of parameters that follows the base URL must begin with the ? character. DO NOT remove the ?.
  • Individual parameters must be separated by a single & character. After modifying the link, double check to make sure every parameter is separated by a & and there a no doubles left by mistake: &&

Modified URL Examples

Examples shown using Kartra dynamic variables as the value for each parameter. Replace the defaults with the correct format from your own autoresponder.

First name and email address only:

  • https://event.webinarjam.com/register/1click/16/74qn4cw?first_name={first_name}&email={email_address}&schedule_id=1

First name, email address, and phone number only:

  • https://event.webinarjam.com/register/1click/16/74qn4cw?first_name={first_name}&email={email_address}&phone_country_code={phone_country_code}&phone_number={phone}&schedule_id=1

Get the Schedule ID

The schedule_id parameter is the Session number for each webinar session. Get the schedule ID from the Schedules > Webinar schedule step of the webinar configuration wizard.

Session numbers are the schedule ID number

In the example above, if your one-click link includes “schedule_id=2”, then the user will be registered for the webinar scheduled for 2024-07-19 at 12:00 PM Central Time (US and Canada).

Important: If your schedule is configured as a series of events (multiple sessions or recurring series of sessions), the end user will be registered for all webinars in the series.


Autoresponder Field Variables

Use the following reference as a guide to common autoresponder shortcodes and field variables.

Important: Always check your autoresponder for your specific shortcodes. This guide is provided as a courtesy only and may not match the current features offered by your autoresponder.

Active Campaign

  • first_name=%FIRSTNAME%
  • last_name=%LASTNAME%
  • email=%EMAIL%

Learn more about personalization tags from Active Campaign: Personalization Tags

Kartra

  • first_name={first_name}
  • last_name={last_name}
  • email={email_address}
  • phone_country_code={phone_country_code}
  • phone_number={phone}

AWeber

  • first_name={!name} or firstname={!firstname}
  • last_name={!lastname}
  • email={!email}

Learn more about variables from AWeber: What can I personalize in my messages?

ClickFunnels

  • first_name=#FIRST#
  • last_name=#LAST#
  • email=#EMAIL#
  • phone_number=#PHONE#

Learn more about merge tags from ClickFunnels: Email Merge Tags For ClickFunnels Emails

GetResponse

  • first_name=[[name]] or firstname=[[firstname]]
  • last_name=[[lastname]]
  • email=[[email]]

Learn more about personalization from GetResponse: How to personalize my emails?

iContact

  • first_name=[fname]
  • last_name=[lname]
  • email=[email]

Learn more about merge fields from iContact: Merge Fields – Inserting Standard and Custom Field Data Into Messages

InfusionSoft / Keap

Make sure to follow the InfusionSoft Instructions on MergeFields. You should see:

  • first_name=~Contact.FirstName~
  • email=~Contact.Email~

Learn more about merge fields from Keap: Merge Field Defaults Explained

MailChimp

  • first_name=*|FNAME|*
  • last_name=*|LNAME|*
  • email=*|EMAIL|*

Learn more about merge tags from MailChimp: All the Merge Tags Cheat Sheet

Ontraport

  • first_name=[firstname]
  • email=[email]

Learn more about merge fields from Ontraport: Set up and use merge fields

Charge a fee for registration

This article is for WebinarJam and EverWebinar.
Important: A third-party payment checkout is needed to collect payments from registrants. The paid registration function of your webinar configuration redirects registrants to the third-party checkout to complete their payment. WebinarJam and EverWebinar do not process payments.

Enable Paid Registration

In your webinar configuration, go to the Registration step:

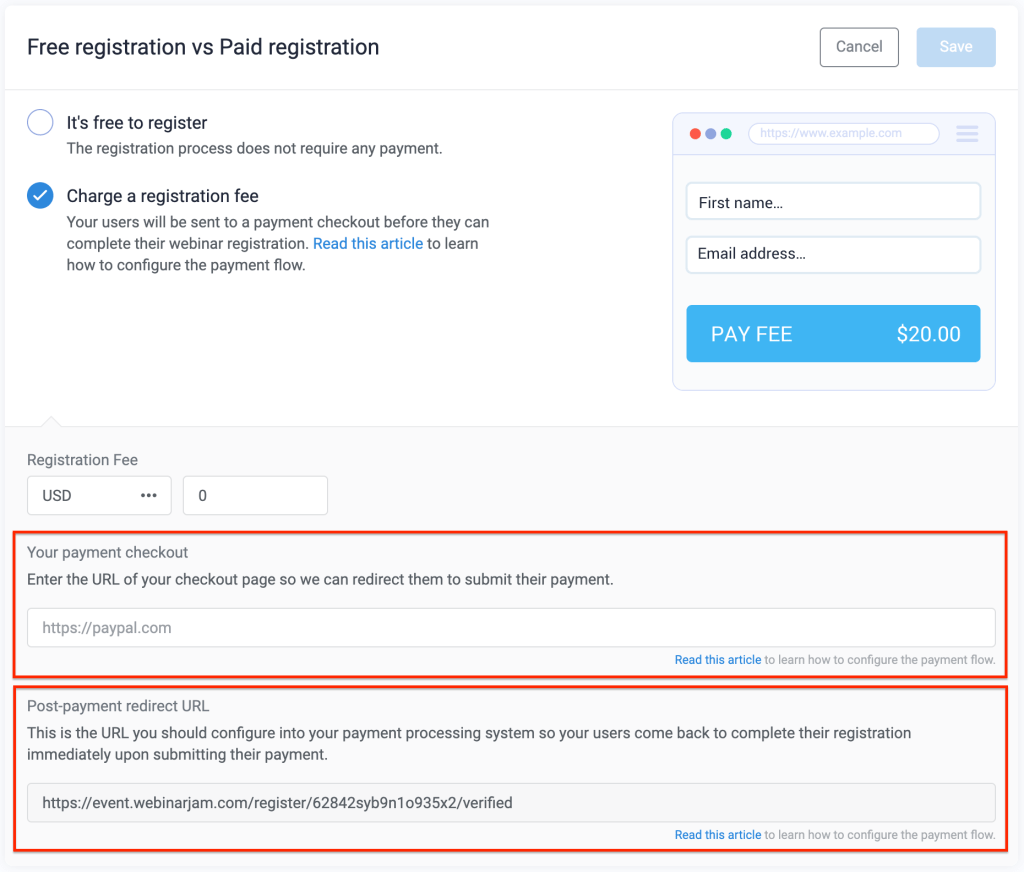
  1. Open the Free registration vs Paid registration module
  2. Click Charge a registration fee

Configure a paid registration funnel

  1. Enter the amount of the fee (for analytics tracking) and the URL of a third-party checkout page where the customer can complete a payment.
  2. Copy the Post-Payment Redirect URL and set it as the payment success or “thank you” page in your third-party checkout configuration. With the post-payment URL in place, your third-party payment processor will redirect customers to the post-payment registration page to complete their registration for the webinar.
    • A “register” button appears on the post-payment registration page. The registrant must click the button and submit the registration form that pops up to complete their sign-up.

Troubleshooting and Tips

Incomplete Registration

If you receive payment for a webinar but no new registrant, the customer did not complete their registration. To resolve this, copy and send the Post-Payment Redirect URL to the customer. This will take them straight to the registration page without having to complete the checkout again.

Skip the Registration Payment

To allow free registration to one specific user, copy and share the Post-Payment Redirect URL with the user. Anyone with this URL will go straight to the registration page without completing a payment, so share it carefully.

Charging with PayPal

Live: Slide Presentations

This article is for WebinarJam only.

Add a slide presentation to your webinar during the configuration process. During the live broadcast, the presentation is available in the live room menu to broadcast to your attendees with the click of a button.


Upload a slide presentation

Upload a slide presentation

Upload a presentation from your local computer:

  1. In the webinar setup, go to Live > Slide presentations
  2. Click Add new presentation
  3. Enter a display name for the file
  4. Click Upload the file to locate and add the presentation file
    • Accepted file formats: Microsoft PowerPoint (PPT, PPTX), Apple KeyNote (KEY), and PDF.

Important: Google Slide links or other cloud-based presentations cannot be added.

Uploading and encoding for your presentation can take up to 5 minutes to complete.


Benefits of uploading a presentation

You can use the screen share function to present the slides from your local the computer. However, uploading the presentation to the WebinarJam cloud server is recommended for two reasons:

  • Pre-loaded presentations are delivered by the WebinarJam servers instead of your local internet service. As a result, the image quality on pre-loaded slides is generally better, resulting in a smoother experience for your attendees.
  • Presentations uploaded to the live room can be shown using custom animations and transitions.

Optimize presentation files

Smaller files load faster and more reliably for attendees so everyone can see your content smoothly, regardless of their internet connection speed.

The maximum file size for an uploaded presentation is 80MB. If your file is over 80MB, the resolution of the images inside the slides may be too high, or there may be media injections (such as video) that should be removed.

Optimization and troubleshooting tips:

  • Always save images and slides at a maximum resolution of 720p to optimize them for live-streaming
  • Split the presentation in two if it’s too large to upload
  • If you have trouble uploading a PowerPoint or Keynote file:
    • Look for video or audio media in the presentation that can be removed
    • Export the presentation to a PDF with each slide on a separate page. Optimize the PDF to create a smaller file.

Learn more about using slide presentations in the Live Room

Webinar notifications

This article is for WebinarJam and EverWebinar.

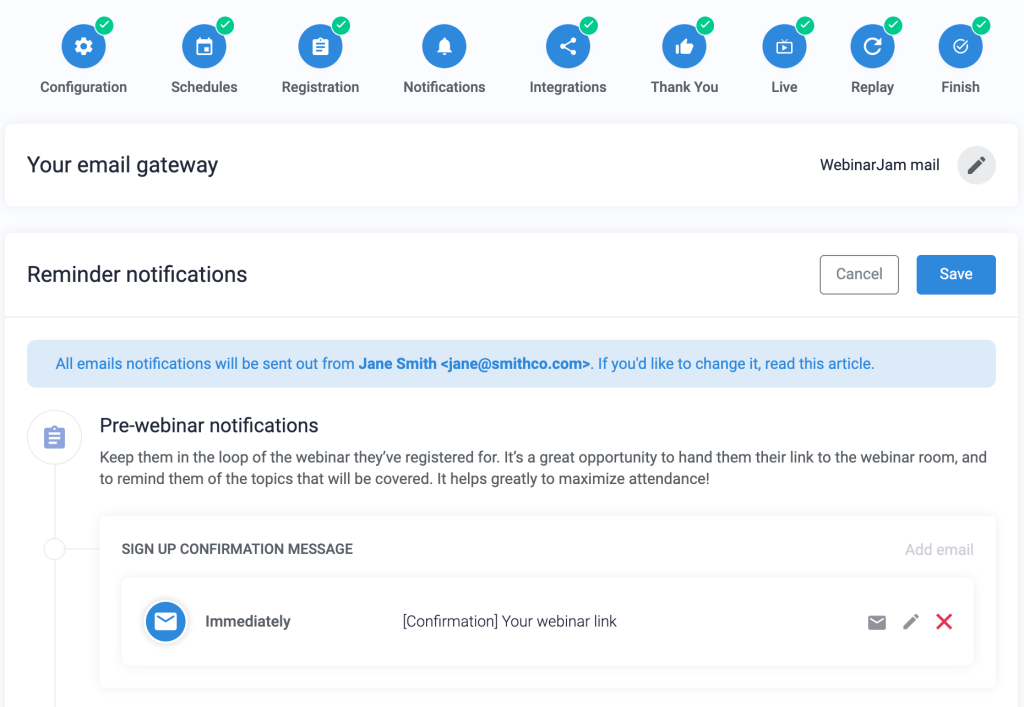
Webinar notification emails are sent automatically to the people who register for your events. Add up to 10 notifications before and 10 notifications after the webinar.

Send a confirmation message immediately after registration

Pre-webinar notifications:

  • Signup Confirmation Message: Sent when a person registers. ON by default.
  • Pre-webinar reminders: Sent before the webinar (configure timing in the settings).
  • Last-minute reminder: Sent 15 minutes before the webinar. ON by default.

Post-webinar notifications:

  • Post-webinar follow-ups: Turn on to automatically send a replay to all registrants after the event. Configure recipient conditions and timing in the settings.
Add or Edit Notifications

  1. Open a webinar and go to Notifications > Reminder notifications
  2. To edit an existing email: Click the pencil icon on any email module to edit it
    • Click the envelope icon to send yourself a test copy of the email
    • Click the X to delete the email (Warning: This cannot be reversed)
  3. To add a new email: Click Add email to add a pre-webinar reminder or post-webinar follow-up email
    • Use the post-reminder follow-up to automatically send registrants a replay of the webinar
  4. Customize the email in the pop-up editor window
  5. Save the email editor and complete the Notification step of the wizard

Customize Notifications

  • Pre-webinar notifications are sent to ALL registrants.
  • Post-webinar notifications can be segmented to send to all or some registrants based on behavior conditions.

Shortcodes

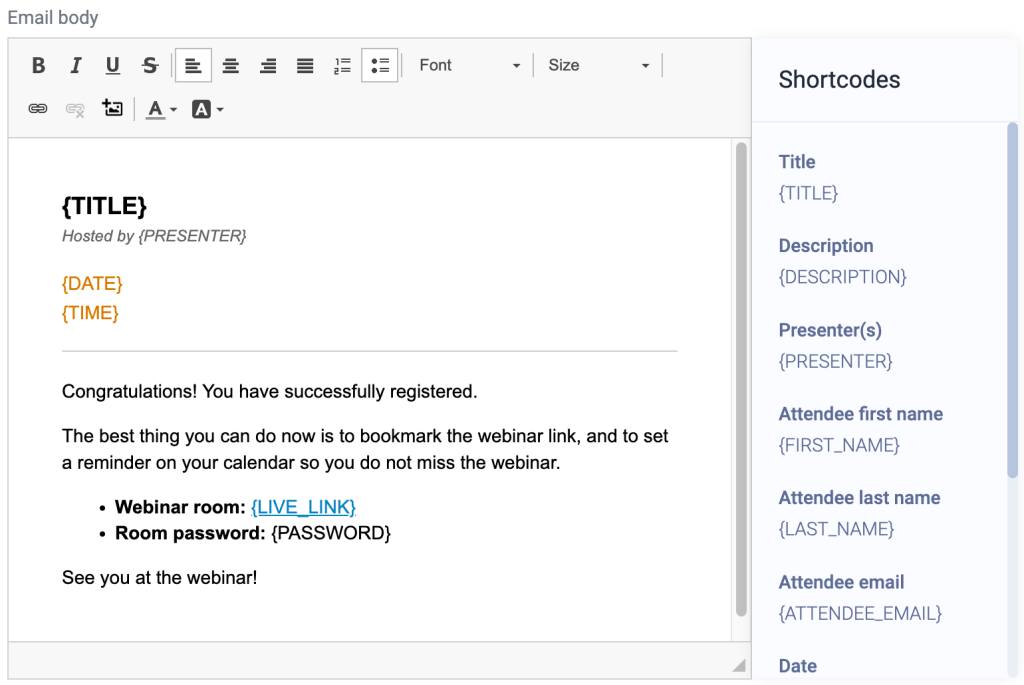
Add unique information about your webinar to the email using shortcodes. These dynamic content codes are contained in {curly_brackets}.

Notification email editor

Shortcodes are automatically replaced with the code’s corresponding value when the email is sent. For example, {first_name} might become John in the recipient’s inbox.

Notification shortcodes:

  • {TITLE} – Title of your webinar
  • {DESCRIPTION} – Description of your webinar
  • {PRESENTER} – List of the host and presenters for the webinar
  • {FIRST_NAME} – Email recipient’s first name
  • {LAST_NAME} – Email recipient’s last name
  • {ATTENDEE_EMAIL} – Email recipient’s email address
  • {DATE} – Date of the upcoming webinar
  • {TIME} – Broadcast time of the upcoming session
  • {LIVE_LINK} – Unique live room URL for the registrant to attend the webinar
  • {PASSWORD} – Password to enter the room (if password protection is enabled in the webinar settings)

Important: Shortcodes are a type of web code. They must be used exactly as provided in the interface, or the system cannot read them and display the correct information.

Adding a Link

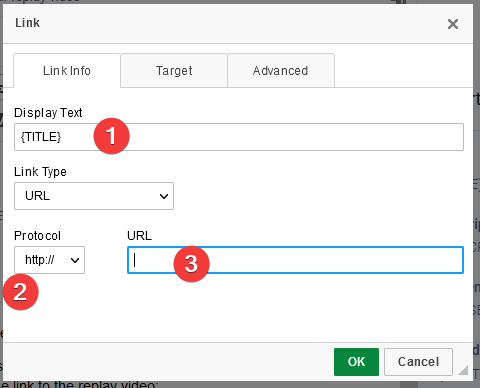
To create a link with the {LIVE_LINK} shortcode:

  1. Highlight the text you want to turn into a link
  2. Click the hyperlink icon in the editor menu
  3. In the window that pops up, you will find the text you highlighted
    • Choose the protocol <other>
    • Enter the shortcode {LIVE_LINK} in the URL field
  4. Click OK to save the link

Pre-webinar reminder timing

Set reminder timing

Define the timing for a pre-webinar reminder in the email editor. The send time is relative to the scheduled start time of the webinar (set in the Schedules step of the webinar wizard).

NOTE: If someone registers for your webinar after a notification is scheduled to be sent, the new registrant will not receive that email. For example, if an email is configured to be sent 24 hours before the webinar and someone registers 3 hours before, they will not receive that email.

Post-webinar follow-ups

Important:

  • Always add at least one post-webinar follow-up for each webinar if you want to automatically send a replay after the event.
  • Post-webinar follow-up send time is relative to the scheduled start time of the webinar, NOT the time the webinar ends.

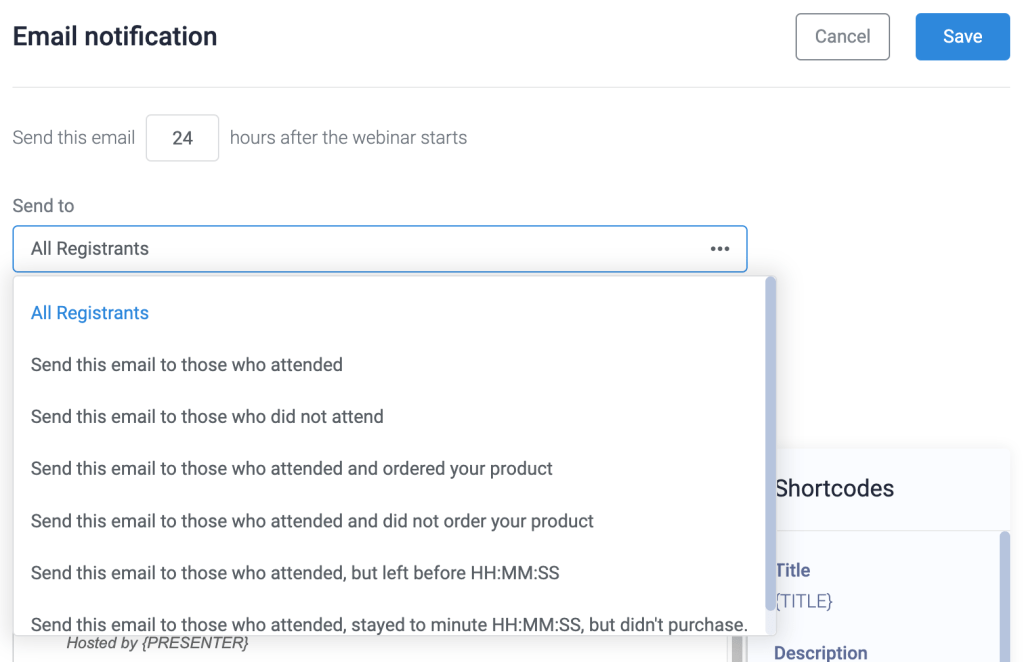
Use a recipient filter in post-webinar follow-ups to send messages at a particular time based on each attendee’s behavior.

Follow-up email recipient filters

Send to:

  • All registrants
  • Those who did or did not attend
  • Those who attended and did or did not order your product
  • Those who attended but left before a particular time
  • Those who attended, stayed to a particular time, and did not purchase

Important: If you choose to send only to those who did or did not purchase your product, the sales goal tracking code must be embedded in the sales funnel. Without the tracking code, WebinarJam cannot determine who purchased a product.

Test Email

At the bottom of the email editor window, send yourself a test email to ensure the formatting and message look good in your email inbox. Test emails can only be sent to the account email address.

Note: Shortcodes do not work in test emails because there needs to be registrant data for a given shortcode to use, and a test only collects the email address. If you send yourself a test email, the shortcodes will not be replaced.

To test the shortcodes, register for your webinar as an attendee to view live versions of the email notifications. Register through the “Run a test” registration page link to keep your live event analytics clean.

YouTube Live

This article is for WebinarJam only.

Configuration step of the setup wizard

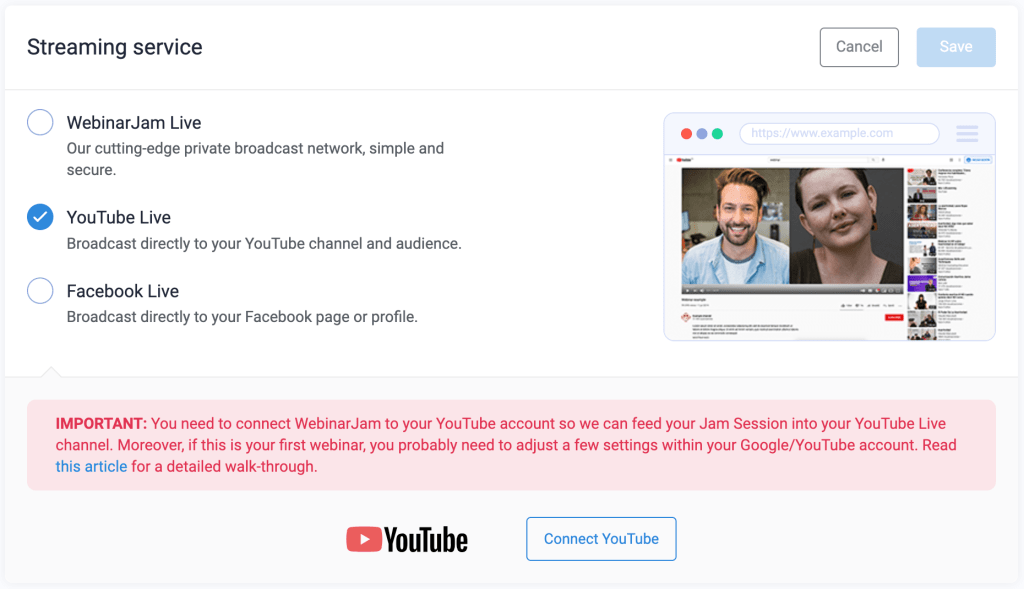
Choose YouTube Live as the streaming service for a live webinar to broadcast directly to a YouTube channel.

YouTube live broadcast streaming

Important Notes:

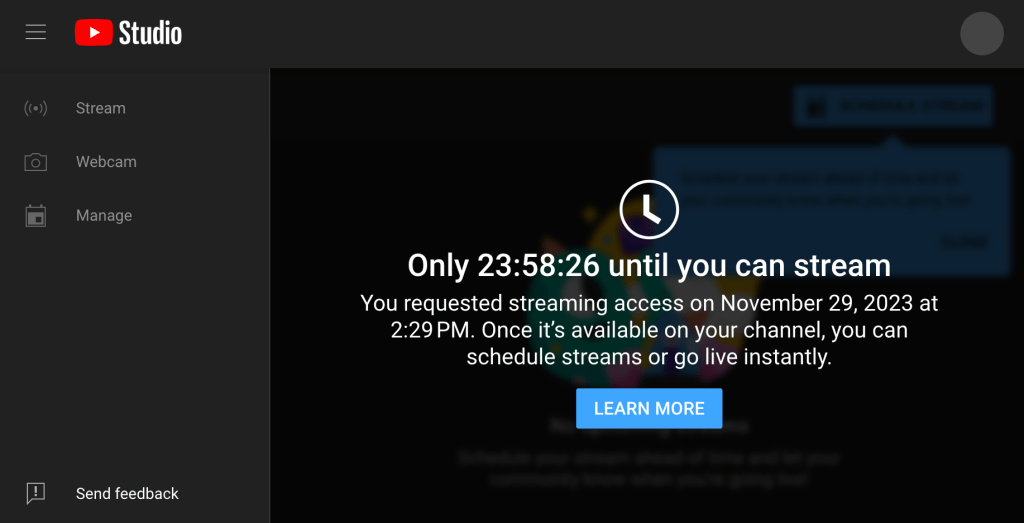
  • You must apply for live streaming in YouTube and wait 24 hours for the application to be approved before you can connect YouTube as an integrated streaming service in your webinar settings. If you are not approved for live streaming, the connection in WebinarJam will fail.
  • Webinars set to stream through YouTube Live are automatically posted in the connected YouTube channel. To restrict viewing permissions to only subscribers and those with a direct link, follow the instructions in this article to post live uploads as “Unlisted.”
  • Elements configured at the Live step of the webinar wizard are exclusive to the WebinarJam live room. Attendees who watch the webinar from your YouTube channel will not see any deployed polls, offers, etc.

Configure YouTube Settings

Login to the YouTube account where you want to run your live stream. Double-check to make sure you are not logged into any other Google services that could confuse the setup.

Set channel features

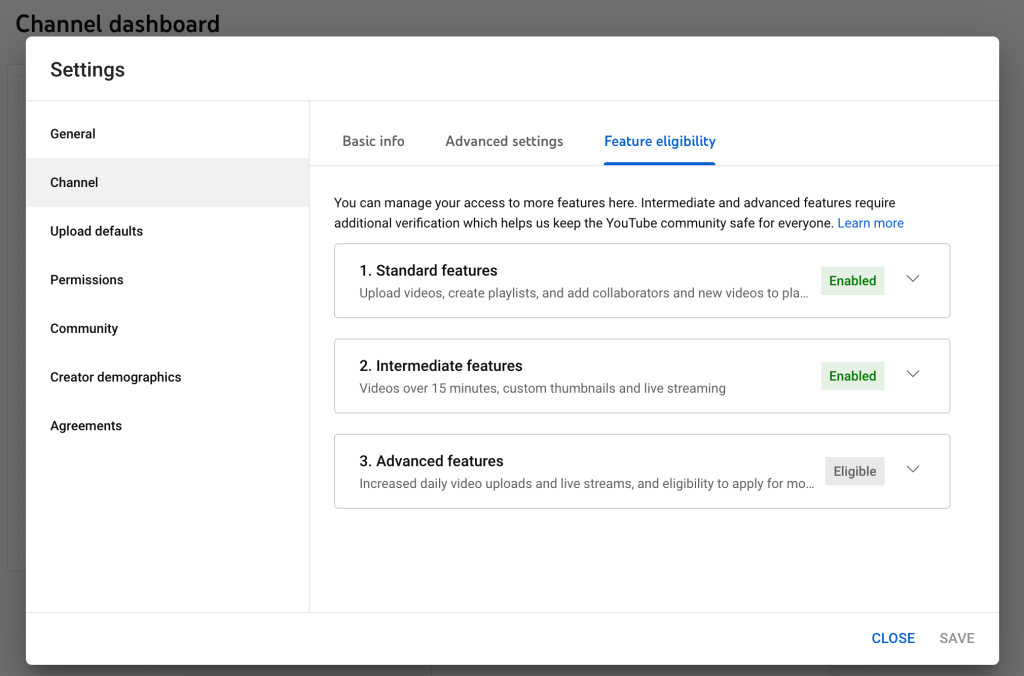
  1. Go to YouTube > Settings
  2. Click Channel and Feature eligibility
  3. Enable Standard features and Intermediate features

Enable YouTube settings for live streaming

Set upload defaults

Live webinars broadcasted using YouTube Live are automatically published to your YouTube channel. As soon as the event begins, it is listed in your YouTube channel and can be watched live. When it ends, the video is saved as recorded content in the channel.

Change the default upload visibility to restrict the availability of live streams:

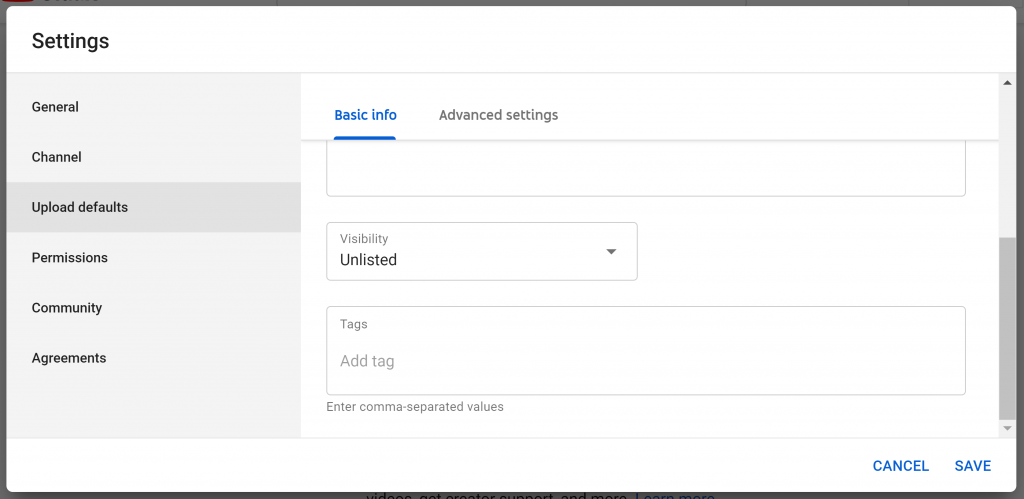
  1. In Settings, go to Upload defaults
  2. Select Unlisted in the Visibility drop-down to prevent all video uploads (recorded and live) from being listed in YouTube search or suggested content.
    • This setting impacts the default only. Visibility can be customized for each individual upload as well, letting you post public and restricted content.

Request live streaming access

  1. Go to YouTube
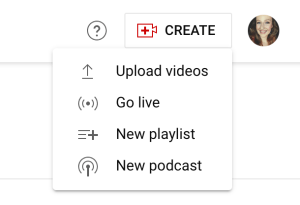
  2. From the top right, click Create and then Go live
    Go live in your YouTube channel
  3. If you haven’t already, follow the steps to verify your channel
    • Starting your first live stream may take up to 24 hours

Wait for live streaming approval to complete

Learn more about getting started with live streaming.


Connect WebinarJam to YouTube

Important: Your YouTube channel must be approved for live streaming before continuing.

In your WebinarJam account, open a webinar for editing:

  1. In the Configuration step of a webinar setup, open the Streaming service module
  2. Choose YouTube Live and click Connect YouTube
  3. Login to Google from the pop-up window
    • If your browser is already logged in to an account, you will immediately see an access authorization from WebinarJam Live.
  4. When authorization is complete, a YouTube connected message appears with the connected account address below
    • Click Reset to remove the connection if needed.

YouTube connected


Test the Webinar

  1. Clone the webinar to test the YouTube Live streaming service
  2. Launch the WebinarJam live room as the webinar host presenter
  3. Go Live to start the broadcast
  4. In another browser, enter the room as an attendee
    • If you see the broadcast video from both user views, the configuration is correct

Note: The YouTube logo will display in the lower right corner of the webinar broadcast video. This cannot be removed.


Troubleshooting

Playback on other websites has been disabled by the video owner

If the live room shows the error, “Watch this video on YouTube. Playback on other websites has been disabled by the video owner,” your YouTube account is not properly configured.

Change channels

Confirm that you are using the same channel as you have your webinar content on. You may need to associate this channel with your main Google account.

Contact YouTube Support

If you perform all of the above steps and are still getting the video embed error, please contact the YouTube support team for more help.

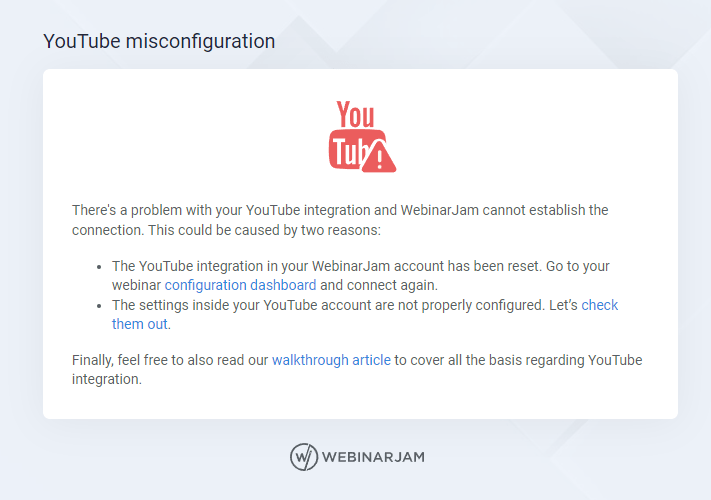
YouTube misconfiguration

If you see the error, “YouTube misconfiguration” while accessing your WebinarJam live room, something in the YouTube connection is not correct.

YouTube misconfiguration error

Check your connection

Open the webinar wizard and go to the Streaming service setting. Make sure you are logged into the same YouTube account that is displayed on the Connect YouTube screen. Your account email will appear in small writing below the YouTube icon.

Check your settings

Review this article to ensure that the YouTube account settings are correct. After making any necessary updates, go back to your webinar presenter’s link and try to launch the live room again.

EverWebinar Chat CSV formatting

This article is for EverWebinar.

Upload a CSV file to quickly add many lines of chat messages to an EverWebinar event.
In the webinar configuration wizard:

  1. Go to the Live step
  2. Open the Live chat box module and click Enable live chat
  3. Configure the chat options to create the ideal attendee experience
  4. At the bottom of the module, click Import from CSV to upload a file with multiple chat lines
    • Alternatively, enter chat lines one at a time using the fields in the setup wizard
Pro tip: Download the chat file from a WebinarJam live event and upload it. The WebinarJam CSV is correctly formatted for import into EverWebinar.

CSV Formatting

Resource: Download a CSV Chat Template

CSV file must contain only 7 columns containing chat message values. Each row in the CSV file represents a new chat message.

  • Hour: Number between 00 and 07
  • Minute: Number between 00 and 59
  • Second: Number between 00 and 59
  • Name: Name of the person
  • Role: Admin or Attendee
  • Message: The actual chat comment
  • Mode:
    • If role is Attendee: Chat, Question, or Answer
    • If role is Admin: Chat, Question, Answer, Highlighted, or Tip

Example of the correct format:

When the spreadsheet is complete, export or save it as a CSV file with UTF-8 encoding before uploading to EverWebinar.


Maximum Chat Lines

The maximum number of pre-loaded chat lines is 5,000, or 1 MB for a CSV file upload. This limit ensures a good experience for attendees by preventing high demands on the webinar room to load the chat.

In a custom chat file, do not exceed 5,000 lines or 1 MB in file size.

If WebinarJam live is used as the source file for the EverWebinar, the system will not auto-import a chat file that exceeds 5,000 lines. You will see an error message informing you that the chat was not imported.

To resolve this and get a usable chat file:

  • Go back to WebinarJam and download the chat history for the live webinar you imported.
  • Open the downloaded CSV file and manually delete chat lines until there are less than 5,000 lines. Save the file and confirm that it’s under 1 MB (delete more lines if needed).
  • Go back to EverWebinar and the Live step of the wizard. Upload the new CSV file as described in this article.
Pro tip: If you activate the “Save real comments” option, real chat lines will be added to the EverWebinar session until it reaches the limit of 5,000 lines of chat. Any additional lines will be ignored.

Registration embed code

This article is for WebinarJam and EverWebinar.

Use a code snippet to embed your webinar registration form on an external web page. The embed code lets you turn any page into a custom registration page.

Embedded code requires basic HTML and CSS coding skills and access to the source code of the page where you want to put it.

Get Embed Code

In WebinarJam or EverWebinar:

  1. Look for the webinar you want to start promoting registration for
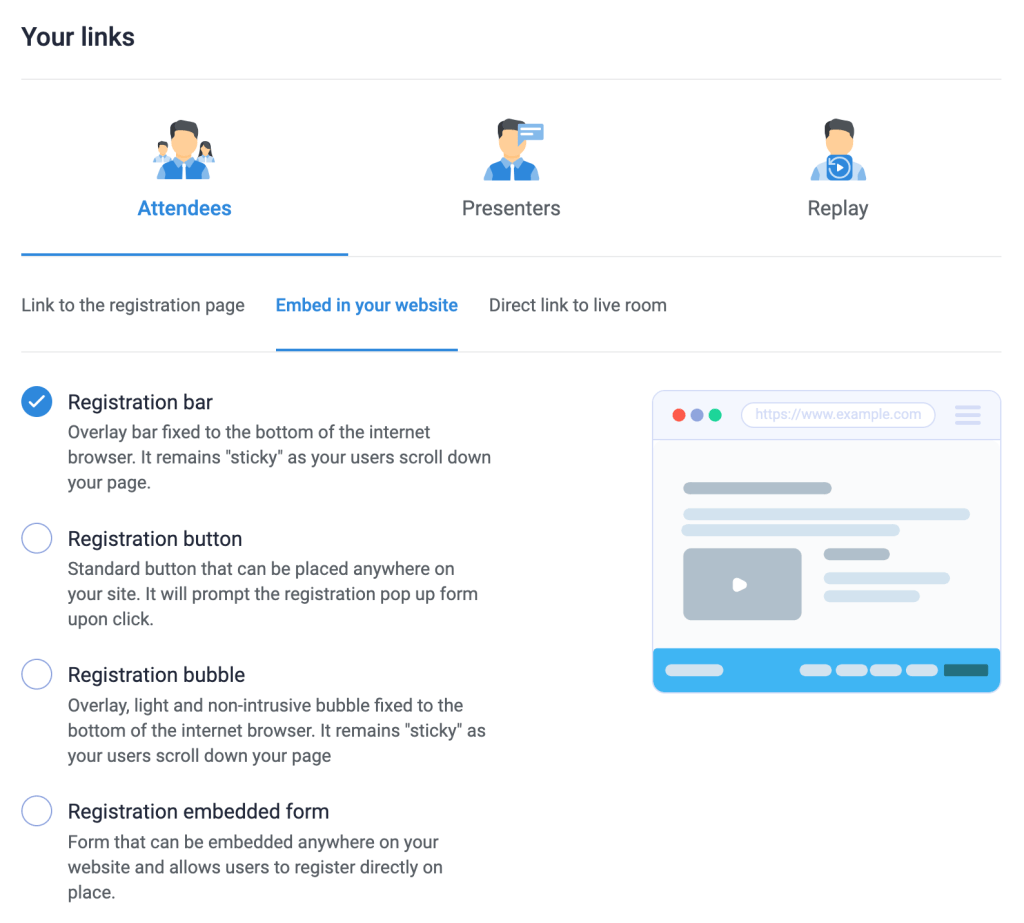
  2. Click Your links
  3. Under Attendees, click Embed in your website
  4. Choose a format for the embedded element:
    1. Floating bar with pop-up form
    2. Static button with pop-up form
    3. Floating bubble pop-over with pop-up form
    4. Static in-line form
  5. Copy the code snippet below the customization options for each element type to get the embed code

IMPORTANT: Embed only one registration code in your external page. Multiple snippets in the same page can cause a conflict in the code.

Registration embed code elements


Customize Embed Elements

Registration bar

The registration bar is a floating page footer with a countdown timer. The form to collect a registrant’s information is triggered with a button click. The bar stays sticky at the bottom of your page even as it scrolls.

  • Customize the description and button text, the bar and button color, and the style of the pop-up registration form.

Registration button

The registration button triggers a registration form pop-up on click. Insert the button code anywhere in the page content where you what to prompt a prospect to sign up.

  • Customize the button text, color, size, shape, border, and shadow. Select a style for the pop-up registration form.

Registration bubble

The registration bubble is a floating icon and pop-over window that appear in the bottom corner of the page that can be closed and reopened. The pop-over contains information about the webinar and a button to register. Clicking the button opens the registration form.

The registration bubble code contains parameters that can be used to customize the appearance of the pop-over.

Custom Style Parameters

Style parameters are separated in the embed code by an ampersand (&) character. For example:

Customize embed code parameters

Modify the code to edit each parameter according to your preferred styling.

Style Element Parameter Default Value Custom Value Guide
Button Text buttonText Register Text
Button Color buttonBgColor #29b6f6 Hex code for preferred color, URL-encoded
Button Opacity buttonBgOpacity 0.95 (95%) Decimal value between 0 and 1 to set opacity percentage
Bar Color barBgColor #ffffff Hex code for preferred color, URL-encoded
Bar Opacity barBgOpacity  1 (100%) Decimal value between 0 and 1 to set opacity percentage
Pop-up Form Style formTemplate  2 Template ID. Enter a template ID: 2, 4, 6, 8
Pop-up Form Color formColor  1 Color variation ID. Enter a variation ID: 1, 2, 3, 4, 5, 6

Registration embedded form

The registration form is a simple opt-in form that appears directly in the page without a pop-up.

Customize the style of the embedded registration form with parameters:

Style Element Parameter Default Value Custom Value Guide
Button Text formButtonText Register Text
Accent Color (Button and “Convert to another timezone” text) formAccentColor #29b6f6 Hex code for preferred color, URL-encoded
Accent Opacity(Button and “Convert to another timezone” text) formAccentOpacity 0.95 (95%) Decimal value between 0 and 1 to set opacity percentage
Background Color formBgColor #ffffff Hex code for preferred color, URL-encoded
Background Opacity formBgOpacity  1 (100%) Decimal value between 0 and 1 to set opacity percentage

Style Parameter Notes

  • All text, spaces and “#” symbols must be URL-encoded. For example, the # symbol is %23, a blank space is +, etc.

Mailing through your autoresponder

This article is for WebinarJam and EverWebinar.

Send webinar notifications and reminders with an integrated autoresponder platform for additional control over email branding, styling, and scheduling. This is an alternative to using the built-in WebinarJam email builder.


Create Custom Fields

In the webinar configuration, you will need to match values from the webinar with custom fields in your autoresponder. This step is required so your autoresponder can include custom information in the emails sent for your event.
In your autoresponder, create six custom contact fields:

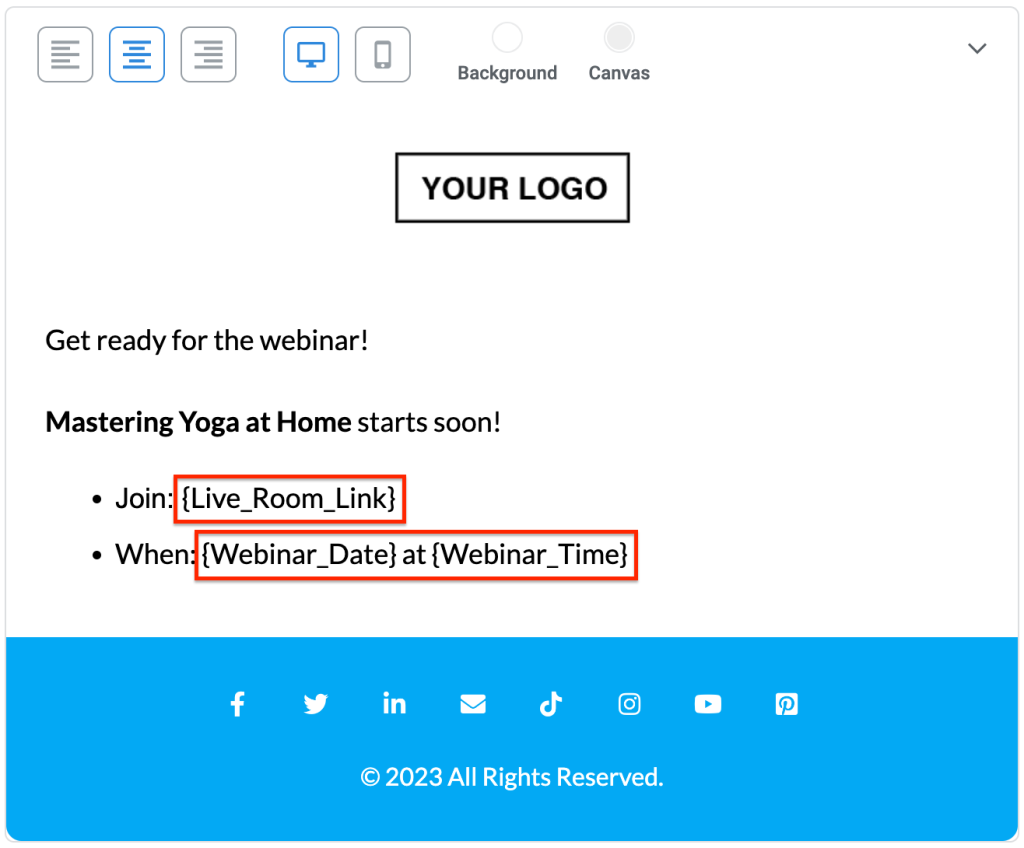
  • Live_Room_Link
  • Replay_Room_Link
  • Webinar_Date
  • Webinar_Time
  • User_Timezone (Required if registered time shows in User’s own time zone)
  • Room_Password (Required if the webinar room is password protected)

NOTE: Select text input as the custom field type for all values. Alternate types like drop-down, multi-select, or date-validated fields will not work.

What are custom fields?

Every autoresponder or CRM comes with standard contact data fields: first name, email address, phone number, etc.

Custom fields let you collect additional data that is specific to your market or usage. These fields are often used to personalize email marketing by injecting data into a message that is specific to an individual recipient. This is the function that your autoresponder will use to send unique details about a webinar to your registrants.
Pro tip:

If you run multiple events that are closely scheduled, consider creating unique custom fields for each event:

  • Live_Room_Link_1
  • Live_Room_Link_2
  • Replay_Room_Link_1
  • Replay_Room_Link_2

If an previous attendee registers for another webinar, the custom field values are overwritten in your autoresponder with the details from the most recent registration. If there is no overlap in the webinars’ email notification scheduling, multiple sets of custom fields are not needed.


Configure Your Webinar

To enable the integrated autoresponder or CRM:

  1. In WebinarJam
  2. Open a webinar and go to Notifications > Your Email Gateway
  3. Select Your own autoresponder
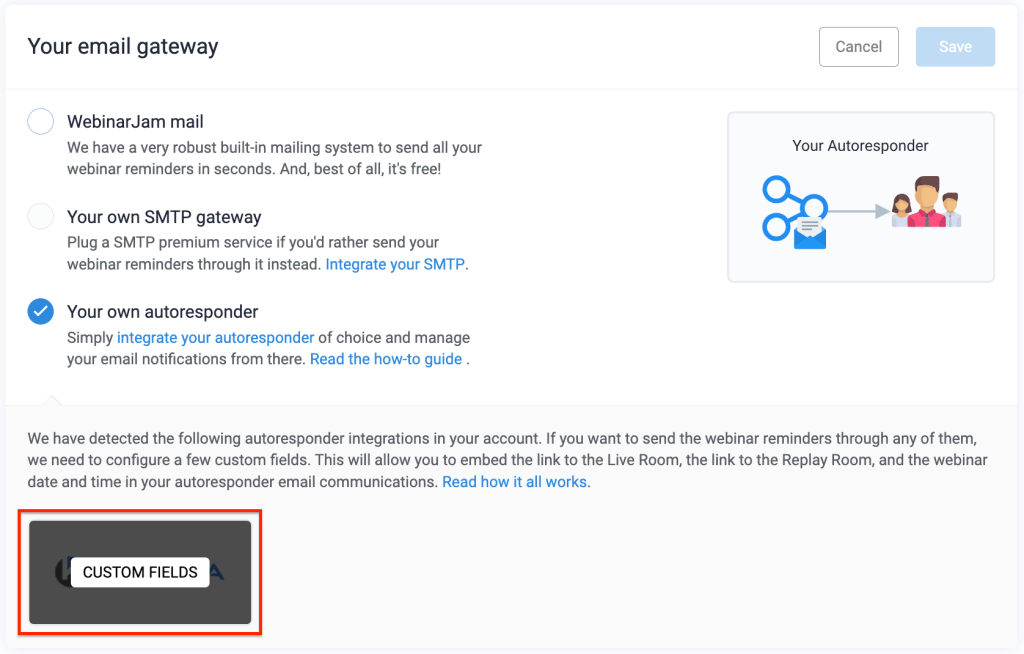
  4. All integrated autoresponders will appear below. Hover over your preferred application and click Custom Fields.

Select autoresponder in the email gateway settings

IMPORTANT: Due to limitations in their APIs, Maropost and Constant Contact are not supported for this feature.

Match Custom Fields

Match the details of your webinar to the custom fields created in your autoresponder.

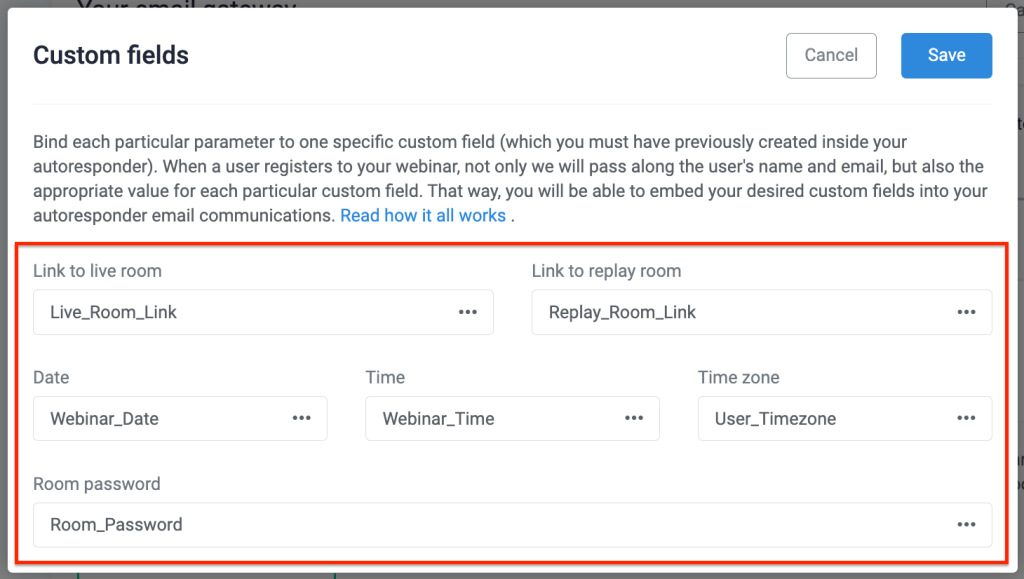
Custom field matching

In the Custom fields pop-up:

  1. Click each field in the window to access a list of custom fields from your autoresponder
  2. Select the option from the drop-down that corresponds with each field value
  3. Save Custom fields and the Email Gateway module to complete the webinar setup

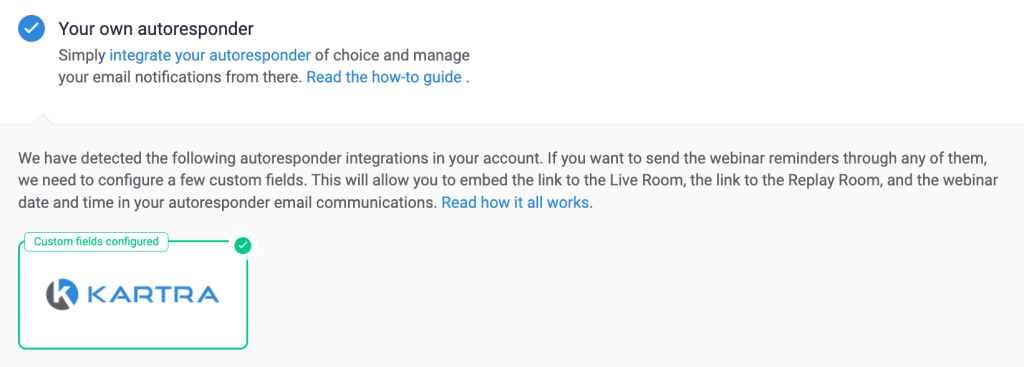
Custom field configuration successful

CRITICAL: Custom fields linked in a webinar configuration must remain active to work. If a field is deleted or changed, go back to the webinar configuration and update the custom fields portion of the integration.


Test the Integration

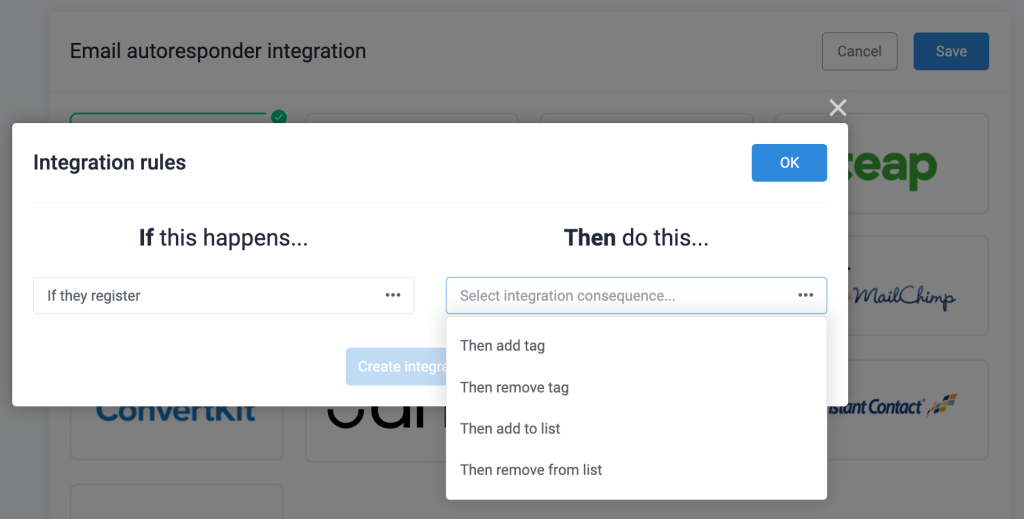
Test the autoresponder integration with an automation rule triggered by registration.

In the webinar configuration

  1. Go to Integrations > Email autoresponder integration
  2. Click the autoresponder tile to add or edit integration rules
  3. Select a trigger and action for the rule
    • Example: IF they register, THEN add to list

Autoresponder integration rules

In your autoresponder

  1. Create an email for webinar registrants that will send in response to the automation action configured at the previous step
    • Example: An email that sends when a contact is added to the list specified in the rule
  2. In the email body, use the webinar custom fields to insert information about the event (example in the following image)Kartra email builder with custom field variables

Test the registration flow

  1. Use the registration page link for the webinar to register with a valid email address
    • If all previous steps were completed correctly, this should trigger the integration rule and send you an email with the details of the webinar.
  2. Check your autoresponder:
    • Do the custom fields appear in your test contact with webinar details in them?
    • Is the contact subscribed to the list specified in your automation rule?
  3. Check your email inbox:
    • Did you receive the webinar notification?
    • Are the correct webinar details displayed?

If the details are correct in your autoresponder and the email, the setup is complete. Use the custom field variables with the webinar information to create more notifications, a replay follow-up, and any custom funnel designs that are possible in your autoresponder.

Sales tracking code

This article is for WebinarJam and EverWebinar.

Track sales that occur during a webinar by installing a tracking code at the final step of a purchase funnel. The tracking code allows WebinarJam to receive information about a sale from a customer who clicked an offer button in your event. Visit your webinar analytics to see tracked sales.
You will need:

  • A fully configured webinar with at least one product offer
    • Important: Sales tracking is not retroactive. If the webinar has already run by the time this code is installed, no goal information will be tracked.
  • Access to the source code in the final confirmation page of your purchase funnel

Two events are required to record a sale in the webinar analytics:

  1. A person in your webinar clicks the button for a product offer. This adds a tracking cookie to their browser.
  2. They complete a purchase and end up on the page where your goal-tracking code is installed.

The browser cookie and the tracking code together trigger a message to WebinarJam that registers a sale.


Goal Tracking Code

In Webinars, find the webinar you want to track.

  1. Click Advanced > Goal tracking
  2. Copy the offer code

Advanced goal tracking window

Pro tips:

  • Tracking codes are generated when an offer is configured in the webinar. If there is no offer, the tab will be empty.
  • Unique tracking codes are generated for each offer configured. Copy the code and set up tracking for each offer separately.

Configure the Tracking Code

The goal tracking code contains two customizable parameters:

  • Price: price=0.00
  • Currency: currency=USD

Modify “0.00” in the price parameter to reflect the amount collected in an individual sale. For example, if your product is $40, modify the price parameter to: “price=40.00“.

Note: The goal tracking code is designed to record price values for one-time payments. If your pricing model involves a recurring subscription (example $19.00 per month) or a payment plan (example 3 payments of $99), enter a value for the price parameter according to your preference.

Modify “USD” in the currency parameter to reflect the actual purchase currency for your product. Supported currencies include:

USD, EUR, GBP, YEN, CAD, AUS, CHF, NZD, INR, BRL, DKK, NOK, SEK, TRY, PLN, CZK, RUB, LEU, BGN, HUF, LTL, ILS, ZAR, HKD, RSD, MYR

If the currency parameter is left blank or contains a value unrecognized by the WebinarJam system, sales analytics default to USD.


Embed the Tracking Code

Embed the sales goal tracking code directly in the checkout confirmation page, where a customer is redirected immediately after completing a payment.

  1. Open the confirmation page source code
  2. Scroll to the very bottom of the source code and locate the </body> tag
  3. Paste the goal tracking code immediately before the </body> tag
    • Pro tip: If your page was created in an application with a visual builder and no clear access to the source code, look for a setting where you can put code in a “footer” field for the page. This option may be found in a tracking or SEO section. If a field is available, paste the goal tracking code in the footer of the page.
  4. Save and publish the page

When a customer visits the confirmation page after clicking a product offer button in your webinar, the tracking code is triggered to send a notice back to WebinarJam. The webinar analytics will register a new sale and add its value to the total revenue generated by the event.

Critical Notes:

  • Browser cookies are used to identify attendees when they click a product offer in your webinar room and complete a purchase. This allows a visit to the confirmation page to be attributed correctly to customers who came from your webinar.
    • Sales collected in any other way, such as through a link pasted in the chat, are not tracked by WebinarJam.
  • Cookies are also used to differentiate between sales from the live room and those from the replay room.
  • Suppose a webinar attendee blocks third-party cookies in their browser. In that case, their activity will not be tracked through the purchase process. In this scenario, you may see sales from the event in your checkout system that do not appear in the webinar analytics.

Review Sales Analytics

After the event, check the analytics to see revenue and other monetization metrics.

  1. Go to Analytics
  2. Select a webinar and session from the drop-down fields
  3. Scroll down to Monetization to review:
    • Registration fees (if you charged a fee to attend the webinar)
    • Sales from the live room
    • Sales from the replay room
Pro tip: Review the webinar’s attendee log to see sales attributed to specific attendees.

Your own SMTP gateway

This article is for WebinarJam and EverWebinar.

WebinarJam Mail is included with your subscription to deliver notifications and reminders configured for your webinars. If you prefer, integrate a third-party SMTP service to manage your mail.

Note: API-based connections are required to track email analytics such as email opens, clicks, bounces, etc.

Configure Your Webinar

To enable the integrated SMTP service:

  1. Open a webinar and go to Notifications > Your Email Gateway
  2. Select Your own SMTP gateway
  3. Save the module

Repeat this process for any additional webinars you want to update. Each time you create a new webinar, select the integrated SMTP service if preferred.

Email Send-from and Reply-to

Emails sent through the integrated SMTP will be sent from the “Sender Email” address specified in the integration connection settings. The sender address will be used as the send-from and reply-to address for all notifications.

Integration sender name

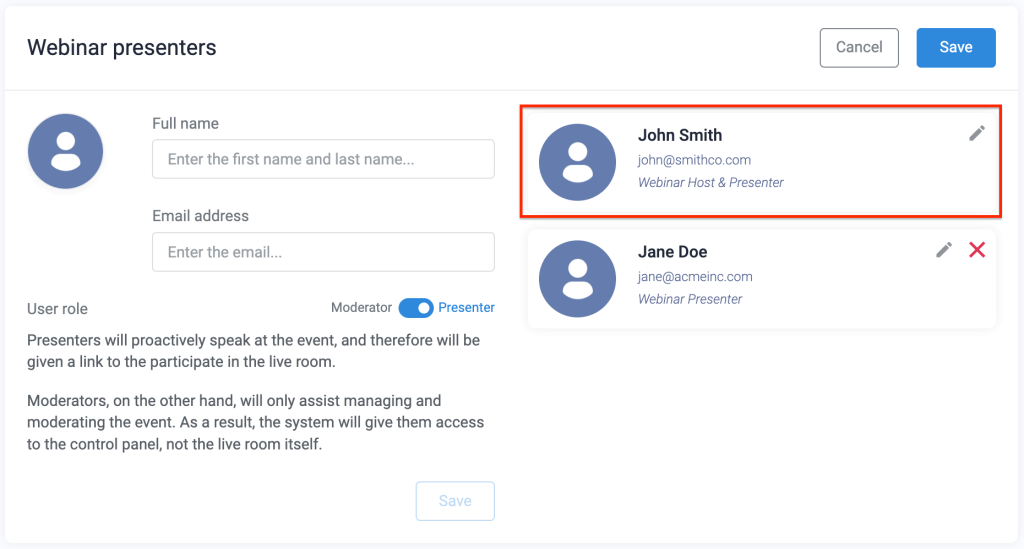
The name registrants will see as the sender for notifications is the webinar host’s full name. The host is set in the webinar configuration wizard, under Configuration > Webinar presenters.

Test the Integration

Note that WebinarJam/EverWebinar cannot check the status of your SMTP account or the validity of the API credentials provided.

To ensure the deliverability of your webinar notifications, provide a valid API key and keep the integrated SMTP account active. The WebinarJam server will send an outbound API request to your integrated provider using the API credentials provided and ask them to deliver an email notification at the appropriate time.

The WebinarJam server does not receive notice of any failure to reach your SMTP service or deliver the messages. In the event of delivery failure, the emails will not be resent, and you will not be notified. Always run a few tests to ensure your configuration is correctly set up.

Customize notification sender details

This article is for both WebinarJam and EverWebinar.

Send notification emails before and after a webinar so registrants automatically receive reminders and a copy of the replay.

By default, notifications are sent from the webinar host’s full name and email address. When a registrant receives a notification, the message in their inbox will be “from” the host.

To edit the notification sender details:

Configuration step of the setup wizard

  1. Open a webinar and go to Configuration > Webinar presenters
  2. Click the pencil icon on the host module
  3. Update the full name and email address in the contact fields
  4. Click Save and Save again to close the module

The webinar host and presenters

Emails from the preceding example will be sent from John Smith <[email protected]>

DKIM not configured warning

A warning message appears if the Webinar Host & Presenter’s email address uses a custom domain that has not been authenticated with DKIM records in the domain settings. Learn how to authenticate your sender domains.

Do not check the box to bypass DKIM security without understanding the impact. Learn more about the DKIM missing error.

IMPORTANT: If the webinar host has a free email address (such as Gmail, Hotmail, Yahoo, etc), the sender email address is converted to [email protected]. For example, if the webinar host is Joe Smith <[email protected]>, email reminders will be sent out as Joe Smith <[email protected]>. This is done to improve deliverability and reduce the likelihood that your messages will end up in spam.

Facebook Live

This article is for WebinarJam only.

Important: Facebook Live has changed

As of Monday, April 22, 2024, Meta removed Facebook Group API support for all third-party services including WebinarJam. As of this date, WebinarJam events using Facebook Live as the broadcasting service will no longer stream to Facebook Groups.

Please take action immediately and update any events that are scheduled to broadcast to a Group using Facebook Live on or after April 22, 2024. You can change your streaming service to WebinarJam Live, YouTube Live, or update your Facebook Live connection to stream to a Page instead of a Group.

Configuration step of the setup wizard

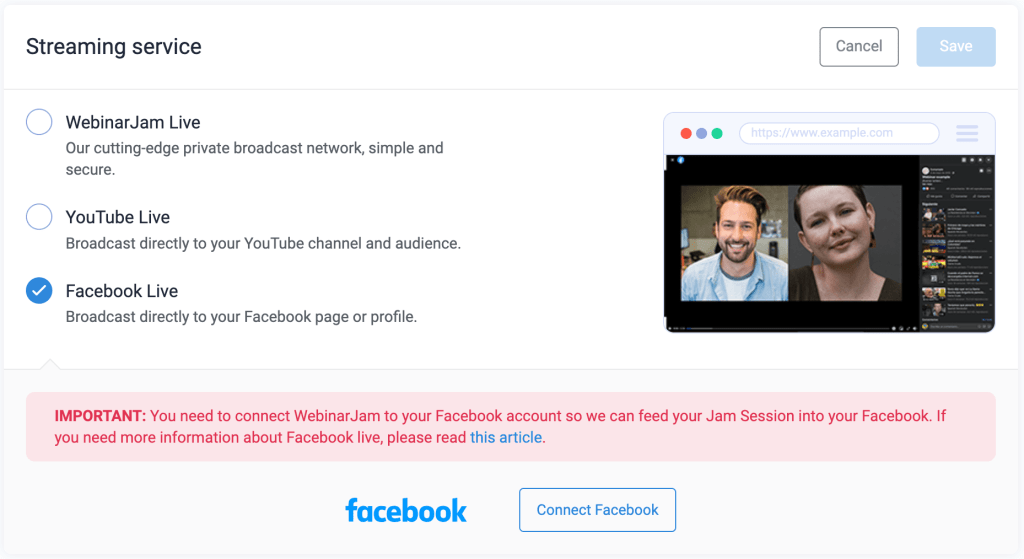
Choose Facebook Live as the streaming service for a live webinar to broadcast directly to a Facebook page or profile.

Facebook Live selection for webinar streaming

Important:

  • Webinars set to stream through Facebook Live will be automatically posted on the chosen Facebook Page. Depending on your privacy settings, this could make the event publicly accessible.
  • Elements configured at the Live step of the webinar wizard are exclusive to the WebinarJam live room. Attendees who watch the webinar from your Facebook page will not see any deployed polls, offers, etc.

Connect to Facebook

  1. In the Configuration step of a webinar setup, open the Streaming service module
  2. Choose Facebook Live and click Connect Facebook
  3. Login to Facebook from the pop-up window. If your browser is already logged in to an account, you will immediately see an access authorization from WebinarJam Live

Authorize a WebinarJam Live connection with Facebook

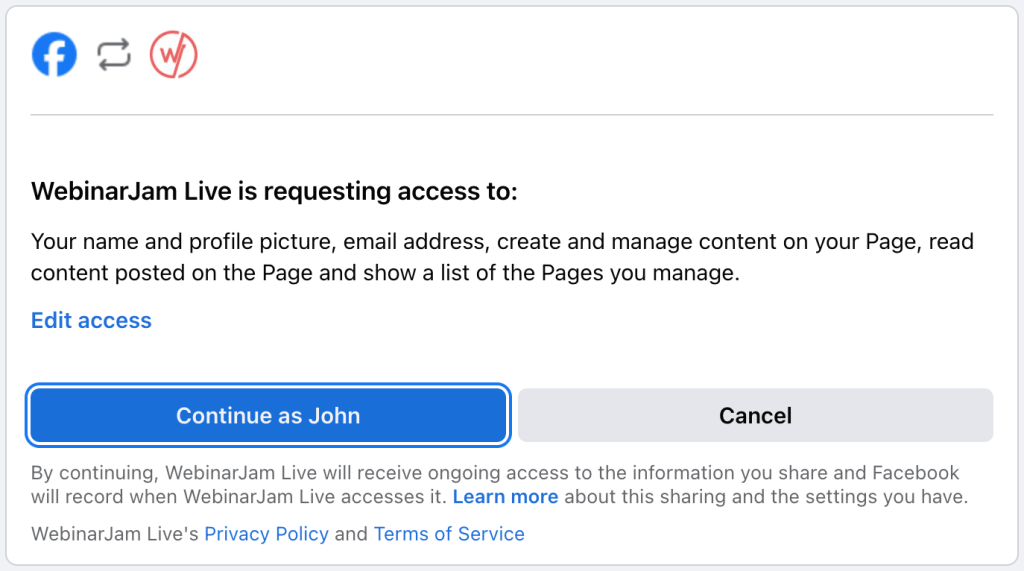
  1. In the Facebook window, click Edit access to choose the pages where you want to broadcast webinar events
    • Important: Depending on page permissions your account may not be authorized to post videos!  If possible, check your permissions before continuing.
    • Click Continue as [Name]
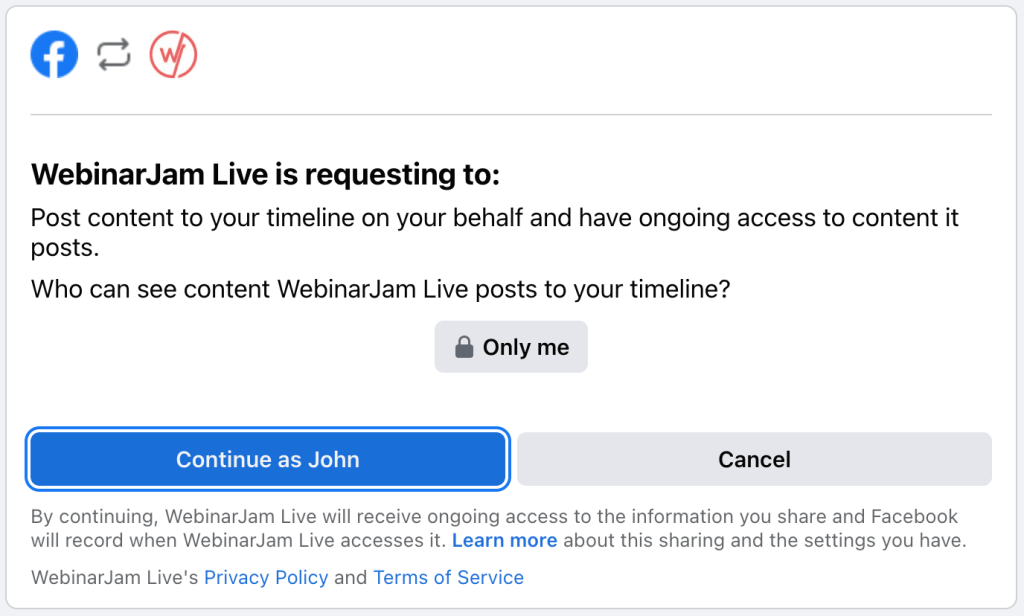
  2. On the next screen, choose who can see WebinarJam live posts in your Facebook timeline

Choose the privacy and visibility for your posts in Facebook

    • If you are testing, choose Only me to restrict post visibility so only you can see broadcasted events
    • Change this to a larger public user selection before going live with your first event
  1. Click Continue as [Name] to complete the Facebook setup
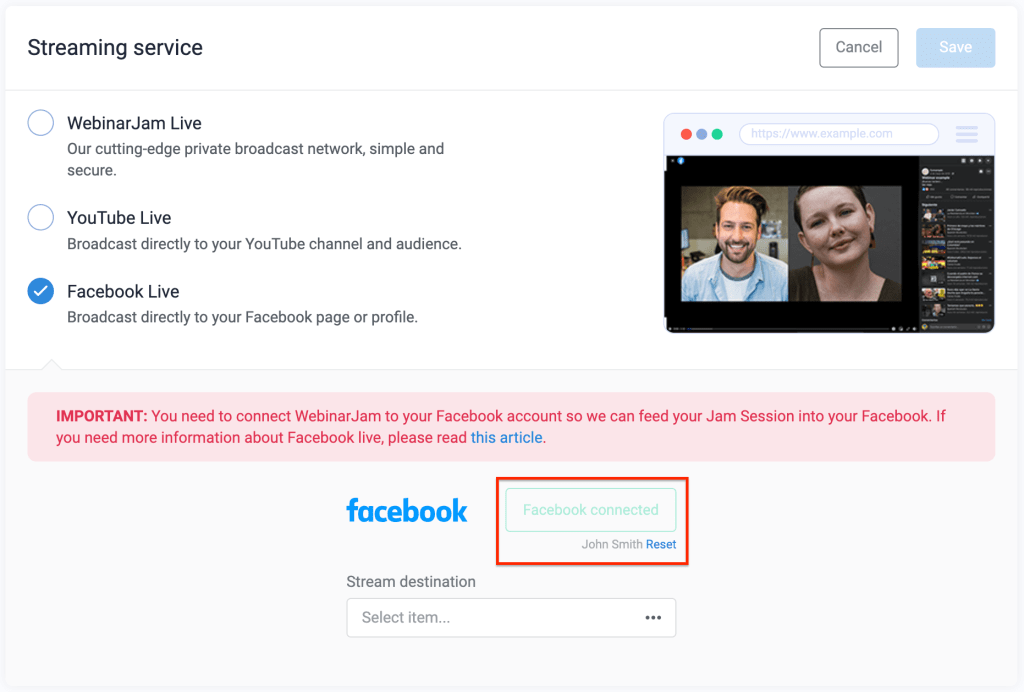
  2. When the connection is complete, a green “Facebook connected” status appears in the webinar setup

Facebook connection successful

    • Click Reset to remove the connected Facebook account from the webinar settings
  1. Select the Stream destination for your broadcast from the drop-down

Edit Facebook visibility or connection

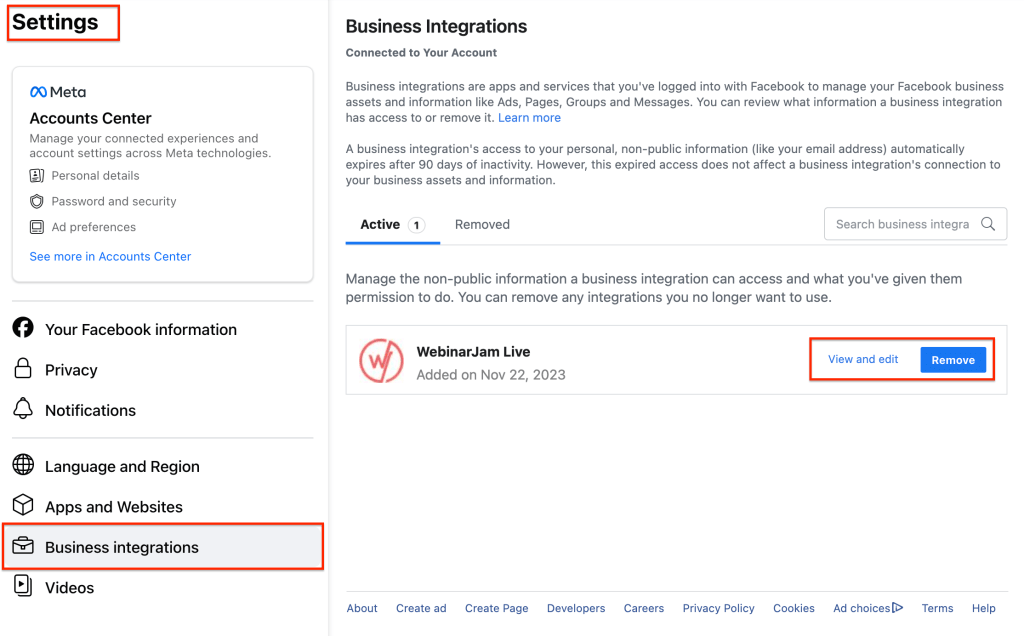
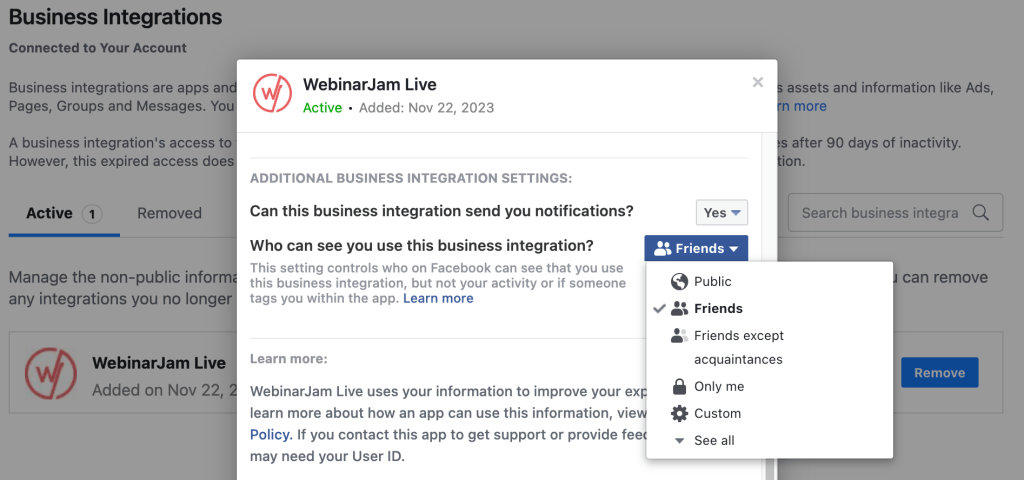
To update the WebinarJam Live connection and settings in Facebook, login to your Facebook account and go to Settings > Business Integrations.

Facebook business integrations controls

To revoke access permission between WebinarJam and Facebook, click Remove. Learn more about disconnecting a business integration from Facebook.

Important: Disconnecting the Facebook account may impact any other webinars that are configured to broadcast to the same account. Double check the configuration for all webinars configured with Facebook Live after resetting a connection to make sure there are no unintended interuptions.

To change the visibility of WebinarJam posts, click View and edit.

Change the visibility of WebinarJam posts

Test a Facebook Live webinar

  1. Launch an event from your WebinarJam account and use the go live button in the room to start broadcasting.
    • Check your privacy! Your test will appear in the destination page according to the visibility set in Facebook.
  2. Go to the page in Facebook where the event is configured to broadcast to confirm that the stream is active.
Important: Using Run a test to test an event with Facebook Live broadcasting may be visible to visitors on your Facebook page. To run a private test in any mode, change the post visibility in Facebook to a private setting before you start the test.

© 2024 WebinarJam All Rights Reserved