Webinar notifications
This article is for WebinarJam and EverWebinar.
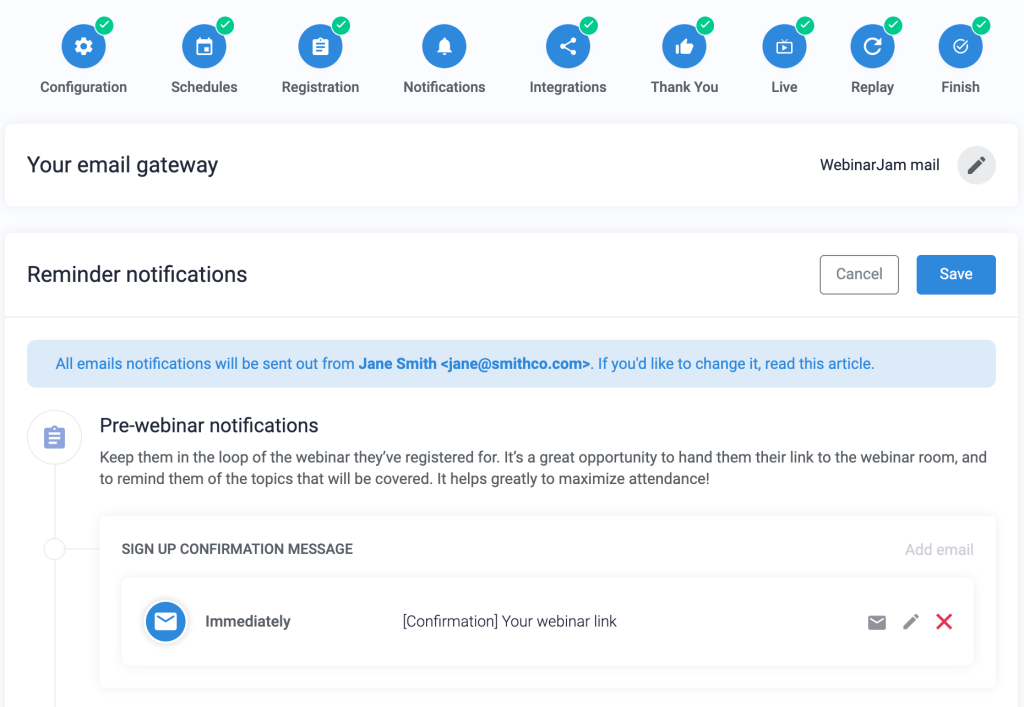
Webinar notification emails are sent automatically to the people who register for your events. Add up to 10 notifications before and 10 notifications after the webinar.

Pre-webinar notifications:
- Signup Confirmation Message: Sent when a person registers. ON by default.
- Pre-webinar reminders: Sent before the webinar (configure timing in the settings).
- Last-minute reminder: Sent 15 minutes before the webinar. ON by default.
Post-webinar notifications:
- Post-webinar follow-ups: Turn on to automatically send a replay to all registrants after the event. Configure recipient conditions and timing in the settings.
Add or Edit Notifications
- Open a webinar and go to Notifications > Reminder notifications
- To edit an existing email: Click the pencil icon on any email module to edit it
- Click the envelope icon to send yourself a test copy of the email
- Click the X to delete the email (Warning: This cannot be reversed)
- To add a new email: Click Add email to add a pre-webinar reminder or post-webinar follow-up email
- Use the post-reminder follow-up to automatically send registrants a replay of the webinar
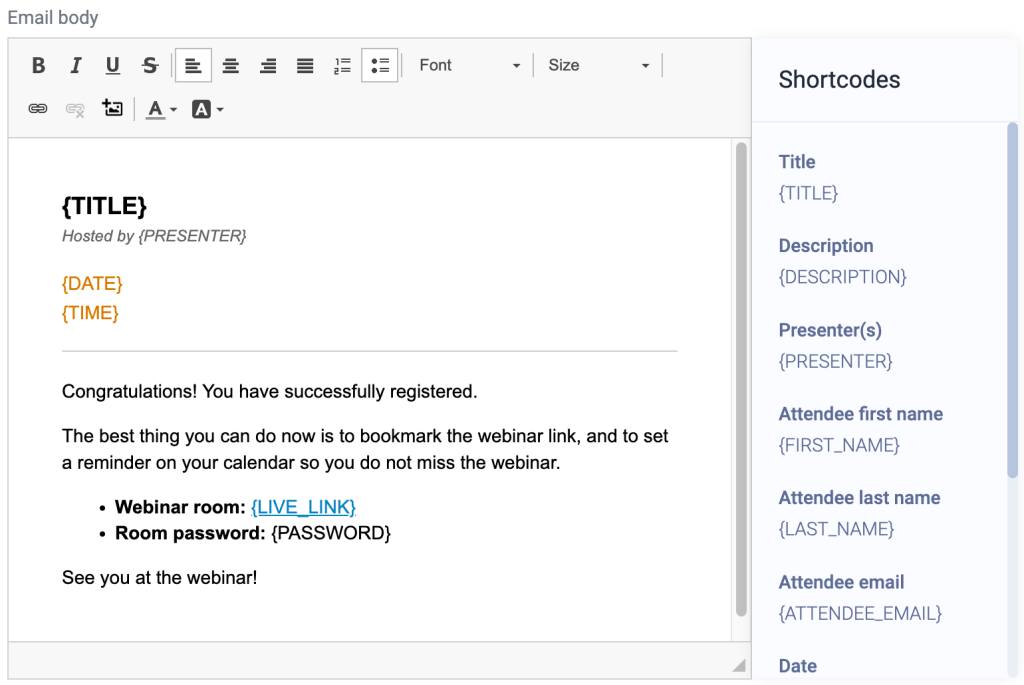
- Customize the email in the pop-up editor window
- Save the email editor and complete the Notification step of the wizard
Customize Notifications
- Pre-webinar notifications are sent to ALL registrants.
- Post-webinar notifications can be segmented to send to all or some registrants based on behavior conditions.
Shortcodes
Add unique information about your webinar to the email using shortcodes. These dynamic content codes are contained in {curly_brackets}.

Shortcodes are automatically replaced with the code’s corresponding value when the email is sent. For example, {first_name} might become John in the recipient’s inbox.
Notification shortcodes:
-
{TITLE} – Title of your webinar
-
{DESCRIPTION} – Description of your webinar
-
{PRESENTER} – List of the host and presenters for the webinar
-
{FIRST_NAME} – Email recipient’s first name
-
{LAST_NAME} – Email recipient’s last name
-
{ATTENDEE_EMAIL} – Email recipient’s email address
-
{DATE} – Date of the upcoming webinar
-
{TIME} – Broadcast time of the upcoming session
-
{LIVE_LINK} – Unique live room URL for the registrant to attend the webinar
-
{PASSWORD} – Password to enter the room (if password protection is enabled in the webinar settings)
Important: Shortcodes are a type of web code. They must be used exactly as provided in the interface, or the system cannot read them and display the correct information.
Adding a Link
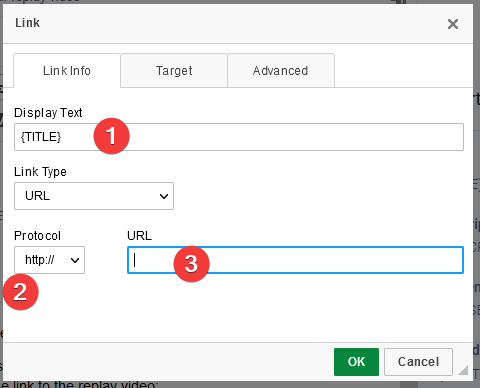
To create a link with the {LIVE_LINK} shortcode:
- Highlight the text you want to turn into a link
- Click the hyperlink icon in the editor menu
- In the window that pops up, you will find the text you highlighted
- Choose the protocol <other>
- Enter the shortcode {LIVE_LINK} in the URL field
- Click OK to save the link

Pre-webinar reminder timing

Define the timing for a pre-webinar reminder in the email editor. The send time is relative to the scheduled start time of the webinar (set in the Schedules step of the webinar wizard).
NOTE: If someone registers for your webinar after a notification is scheduled to be sent, the new registrant will not receive that email. For example, if an email is configured to be sent 24 hours before the webinar and someone registers 3 hours before, they will not receive that email.
Post-webinar follow-ups
Important:
- Always add at least one post-webinar follow-up for each webinar if you want to automatically send a replay after the event.
- Post-webinar follow-up send time is relative to the scheduled start time of the webinar, NOT the time the webinar ends.
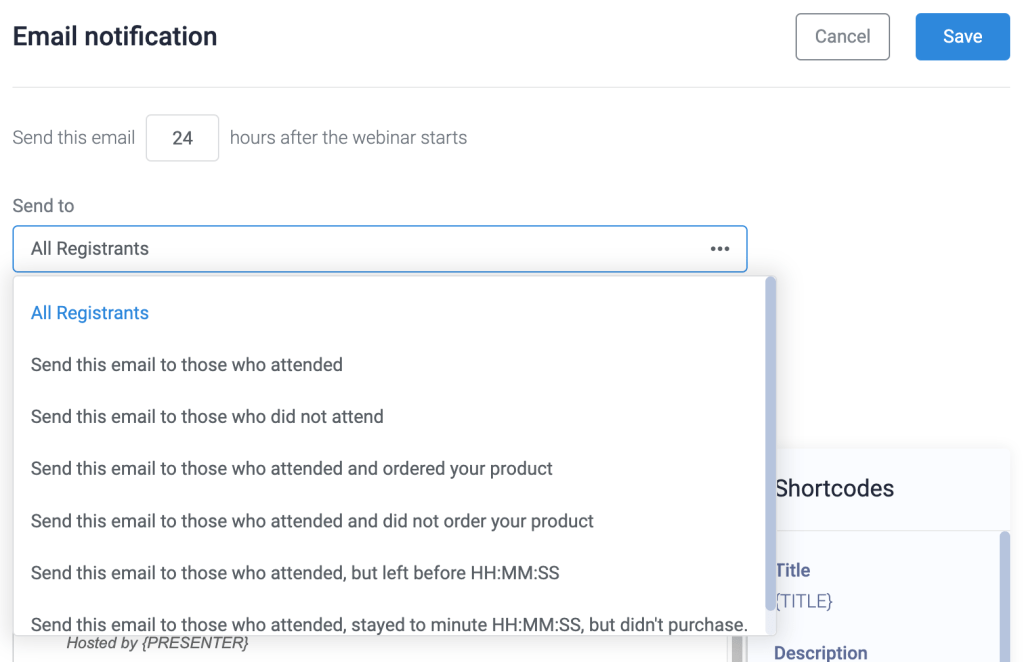
Use a recipient filter in post-webinar follow-ups to send messages at a particular time based on each attendee’s behavior.

Send to:
- All registrants
- Those who did or did not attend
- Those who attended and did or did not order your product
- Those who attended but left before a particular time
- Those who attended, stayed to a particular time, and did not purchase
Important: If you choose to send only to those who did or did not purchase your product, the sales goal tracking code must be embedded in the sales funnel. Without the tracking code, WebinarJam cannot determine who purchased a product.
Test Email
At the bottom of the email editor window, send yourself a test email to ensure the formatting and message look good in your email inbox. Test emails can only be sent to the account email address.
Note: Shortcodes do not work in test emails because there needs to be registrant data for a given shortcode to use, and a test only collects the email address. If you send yourself a test email, the shortcodes will not be replaced.
To test the shortcodes, register for your webinar as an attendee to view live versions of the email notifications. Register through the “Run a test” registration page link to keep your live event analytics clean.
