Google Tag Manager is a free service provided by Google that organizes tracking codes and other tags in a single container. This allows you to place the container code on your website once and maintain its contents from a Google dashboard.
In this article, you will learn how to create a Google Tag Manager account, add a Meta Pixel code to it, and publish the Tag container.
Create a Tag Manager Account
Follow the instructions from Google Support documentation to create a Tag Manager account and a container for your webinar pages.
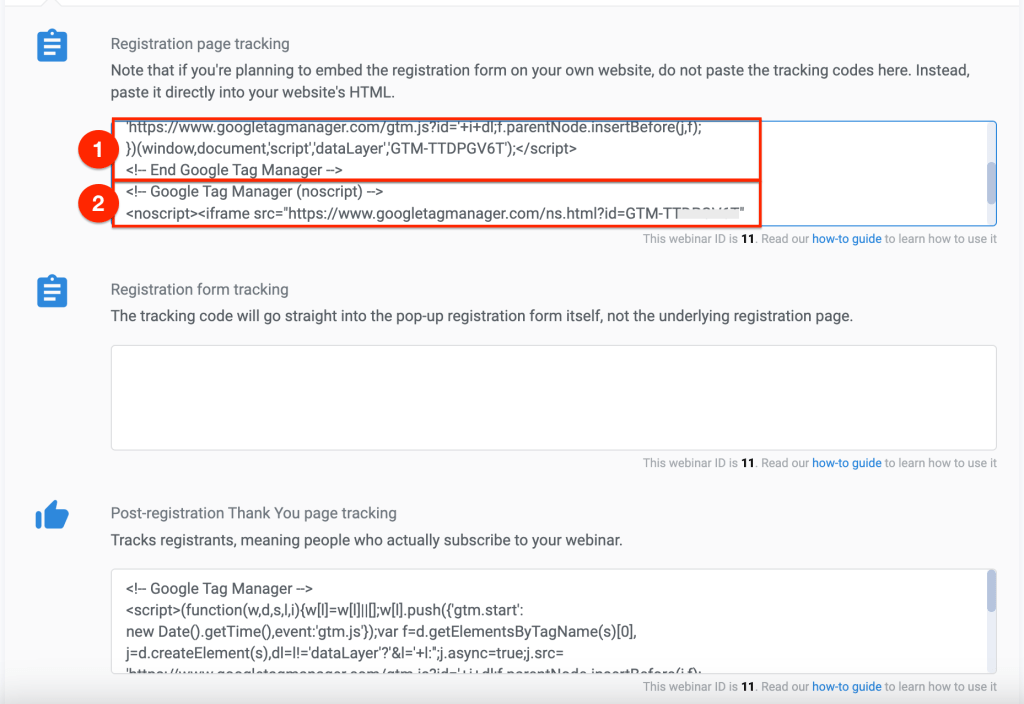
When the setup is complete, Tag Manager provides you with two code snippets. (See the following example)
Close the Install window with no further action.
Create a Trigger
In the Tag Manager workspace, go to Triggers > New
Click anywhere in the configuration module to edit the trigger
Choose trigger type. For this tutorial, select Page View> Page View.
Configure Page URL Event
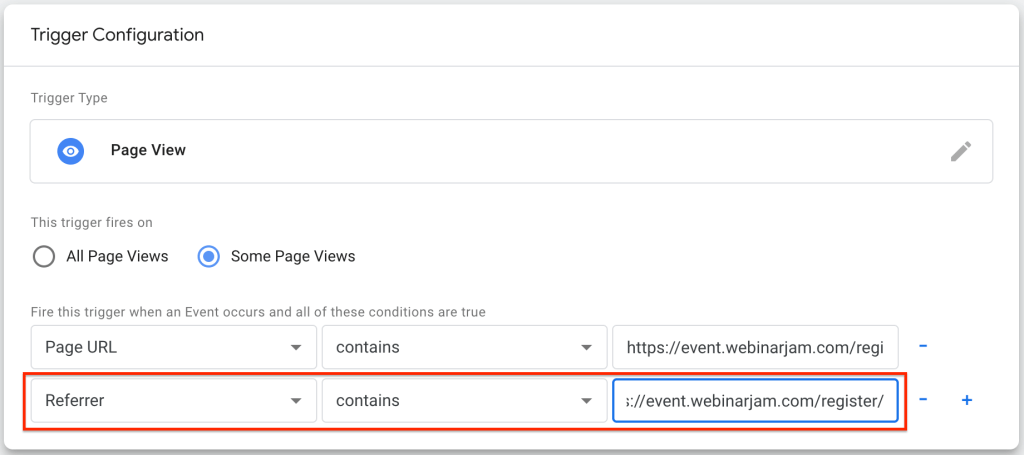
Select This trigger fires onSome Page Views
Select Page URL > contains from the trigger conditions drop-down fields
Enter https://event.webinarjam.com/registration/thank-you/ in the final condition field
Click the plus icon on the right to add a second rule
Important: The URL specified is correct for both WebinarJam and EverWebinar events. Both applications generate page links at event.webinarjam.com.
Configure Referrer Event
Add a second event in the same Trigger Configuration window:
Select Referrer > contains from the trigger conditions drop-down fields
Enter https://event.webinarjam.com/register/ in the final condition field
Name and save the trigger
Important: The URL specified is correct for both WebinarJam and EverWebinar events. Both applications generate page links at event.webinarjam.com.
Add a Tag to the Container
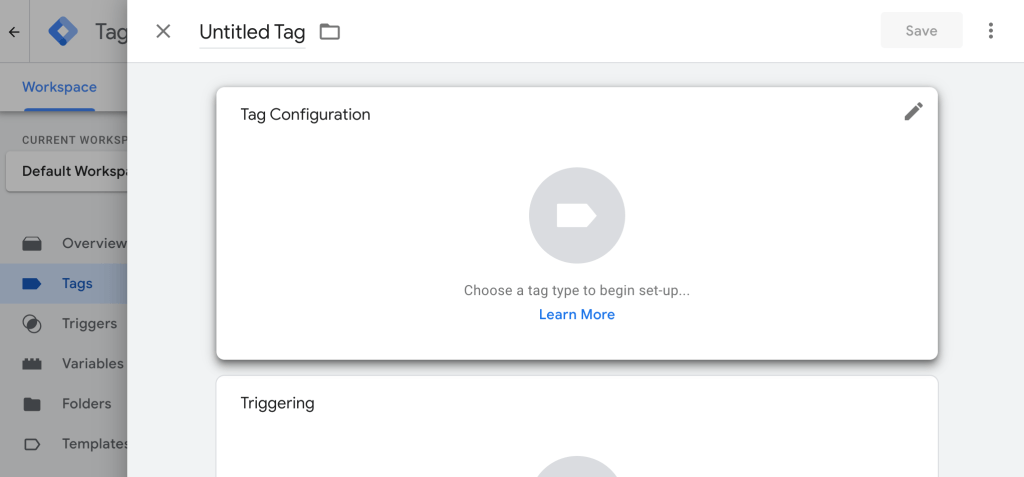
In the Tag Manager workspace, go to Tags > New
Click anywhere in the Tag Configuration box to edit the tag
Choose Custom HTML as the tag type
Paste a Meta Pixel or other tracking code into the HTML frame
Pro tip: Meta Pixel code is used in this example, but this process is the same to add any other tag or custom HTML you wish to manage in the Google Tag Manager.
In the same Custom HTML window, click Advanced Settings
From the Tag firing options drop-down, select Once per page
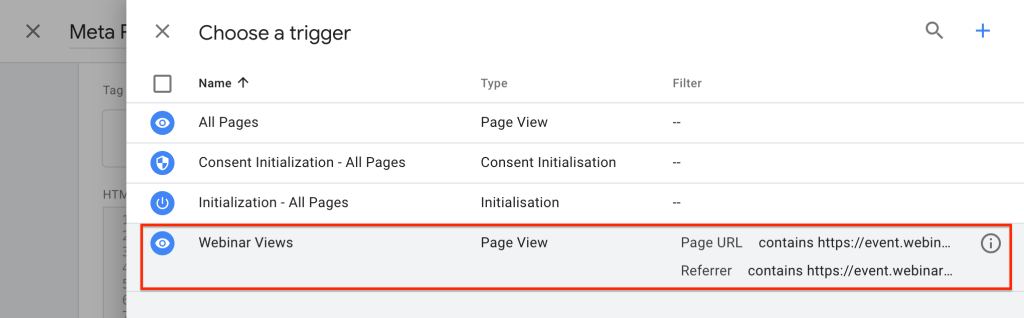
Click anywhere in the Triggering box to select a trigger
Choose the Page View trigger created earlier in this tutorial
Name and save the trigger
Publish Container
To complete the setup and publish your changes, click Submit in the upper right corner of the Google Workspace
Track sales that occur during a webinar by installing a tracking code at the final step of a purchase funnel. The tracking code allows WebinarJam to receive information about a sale from a customer who clicked an offer button in your event. Visit your webinar analytics to see tracked sales.
You will need:
A fully configured webinar with at least one product offer
Important: Sales tracking is not retroactive. If the webinar has already run by the time this code is installed, no goal information will be tracked.
Access to the source code in the final confirmation page of your purchase funnel
Two events are required to record a sale in the webinar analytics:
A person in your webinar clicks the button for a product offer. This adds a tracking cookie to their browser.
They complete a purchase and end up on the page where your goal-tracking code is installed.
The browser cookie and the tracking code together trigger a message to WebinarJam that registers a sale.
Goal Tracking Code
In Webinars, find the webinar you want to track.
Click Advanced > Goal tracking
Copy the offer code
Pro tips:
Tracking codes are generated when an offer is configured in the webinar. If there is no offer, the tab will be empty.
Unique tracking codes are generated for each offer configured. Copy the code and set up tracking for each offer separately.
Configure the Tracking Code
The goal tracking code contains two customizable parameters:
Price: price=0.00
Currency: currency=USD
Modify “0.00” in the price parameter to reflect the amount collected in an individual sale. For example, if your product is $40, modify the price parameter to: “price=40.00“.
Note: The goal tracking code is designed to record price values for one-time payments. If your pricing model involves a recurring subscription (example $19.00 per month) or a payment plan (example 3 payments of $99), enter a value for the price parameter according to your preference.
Modify “USD” in the currency parameter to reflect the actual purchase currency for your product. Supported currencies include:
If the currency parameter is left blank or contains a value unrecognized by the WebinarJam system, sales analytics default to USD.
Embed the Tracking Code
Embed the sales goal tracking code directly in the checkout confirmation page, where a customer is redirected immediately after completing a payment.
Open the confirmation page source code
Scroll to the very bottom of the source code and locate the </body> tag
Paste the goal tracking code immediately before the </body> tag
Pro tip: If your page was created in an application with a visual builder and no clear access to the source code, look for a setting where you can put code in a “footer” field for the page. This option may be found in a tracking or SEO section. If a field is available, paste the goal tracking code in the footer of the page.
Save and publish the page
When a customer visits the confirmation page after clicking a product offer button in your webinar, the tracking code is triggered to send a notice back to WebinarJam. The webinar analytics will register a new sale and add its value to the total revenue generated by the event.
Critical Notes:
Browser cookies are used to identify attendees when they click a product offer in your webinar room and complete a purchase. This allows a visit to the confirmation page to be attributed correctly to customers who came from your webinar.
Sales collected in any other way, such as through a link pasted in the chat, are not tracked by WebinarJam.
Cookies are also used to differentiate between sales from the live room and those from the replay room.
Suppose a webinar attendee blocks third-party cookies in their browser. In that case, their activity will not be tracked through the purchase process. In this scenario, you may see sales from the event in your checkout system that do not appear in the webinar analytics.
Review Sales Analytics
After the event, check the analytics to see revenue and other monetization metrics.
Go to Analytics
Select a webinar and session from the drop-down fields
Scroll down to Monetization to review:
Registration fees (if you charged a fee to attend the webinar)
Sales from the live room
Sales from the replay room
Pro tip: Review the webinar’s attendee log to see sales attributed to specific attendees.
This article applies to both WebinarJam and EverWebinar.
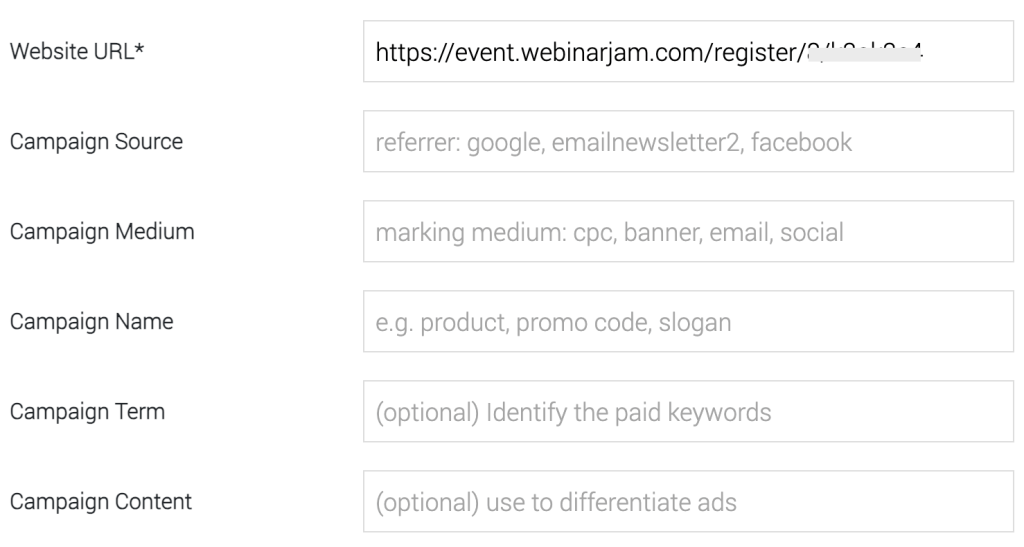
Registrant information for a WebinarJam and EverWebinar event includes UTM values to help you understand where your registrants come from if you promote the event on multiple platforms.
UTM parameters are codes added to the end of a URL to track website or ad traffic. They are commonly used in scenarios where you want to track where a visitor comes from and what they do, such as digital advertising.
Important: WebinarJam and EverWebinar URLs must be manually modified to add UTM parameters for each unique source. Your account will record the UTM values if they were used, but will not automatically generate links that include them.
Available UTM parameters
utm_source
Use to identify where the traffic is coming from, such as TikTok, Instagram, or any place you are serving ads.
utm_medium
Use to identify how the traffic is getting to you. This value could be something like “social,” “cpc,” “affiliate,” or “email,” and is useful to distinguish which medium is bringing you the most traffic or the highest quality traffic.
utm_campaign
Use to identify why the traffic is coming to you. It may be in response to a specific promotion or launch, etc.
utm_content
Use to differentiate between ads or to measure the click ratio between two links to a single destination that are in the same email.
utm_term
Use to specify ad keywords if your link is in use for a paid ad campaign.
For more information on UTM selection and use, there are many excellent marketing resources online that can help guide your strategy. Free UTM link builders can also be useful tools as you plan your campaigns.
Add UTM parameters to a webinar URL
Add UTM parameters to a registration link to track information about conversion sources.
In Webinars, find the webinar you want to track
Click Your links
In the Attendees tab, copy the Registration page link
Add UTM parameters to the end of the URL manually or with an online UTM builder tool
Repeat this for each place you will share the link (in emails, on social media, etc)
Share the modified registration link(s)
Attendees who register through the modified links will be stored in the webinar’s registrants list with a record of the UTM parameters that were in the link they clicked.
Click Build URL after adding all parameters to generate the final URL with UTM tracking capability.
Important Notes:
UTM values cannot be sent to WebinarJam with an API call.
If an attendee registers to the same event twice with the same email address, the UTM values captured the first time will be saved. Additional registrations will not overwrite existing UTM values.
Tracking codes from a 3rd-party service such as Meta or Google are added to your webinar pages in the setup wizard. You can add unique tracking codes to each page in the webinar funnel: registration page, thank you page, live room, and replay page.
To track page visits in Meta Events Manager, you will complete these steps:
Create a Meta pixel
Add the Meta pixel code to a WebinarJam or EverWebinar event configuration
Create Meta conversion events to define the activities you want Meta to track
You will need access to your WebinarJam account and your Meta Business Events Manager account.
Step 1: Create a Meta Pixel
Log in to Meta Events Manager and connect a data source to create a tracking pixel.
Enter your website URL or select “I don’t have a website”
Select “Do it yourself”
Select “Meta pixel only”
Select “Install code manually”
Copy the base code
Click through the remaining steps to complete the pixel setup. Go to the Pixel Overview without adding any events.
You will install events using code at the final step of this guide.
Step 2: Add the Meta pixel code to a webinar
Adding the pixel base code lets Meta receive information from your webinar pages. The Meta Events Manager cannot detect activity on any page without the meta base code.
Log in to WebinarJam or EverWebinar and find the webinar you want to track in the event dashboard.
Edit the webinar and go to the Integrations step of the wizard
Open 3rd party tracking systems for editing
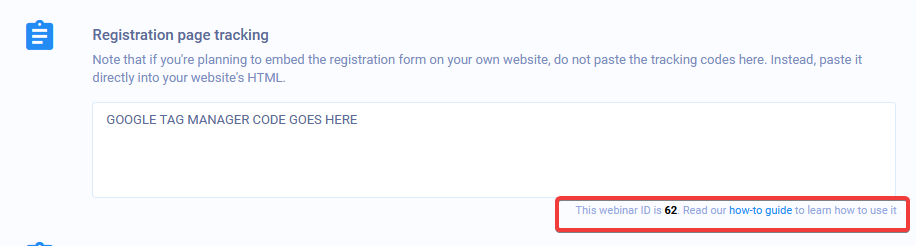
Paste the Meta base code in the field for each page you want to track
Important: Make a note of the webinar ID number below the tracking code field. The webinar ID will be used to set up tracking for post-registration page visits later in this guide.
Save the module and complete the setup wizard
Step 3: Define Meta Conversion Events
Setting up custom conversions tells Facebook what kind of activity you want it to detect on a page with the meta base code.
The configuration for your Custom Conversion varies slightly depending on whether you want to track registration page visits or a visit to a post-registration page (such as the thank you page, live room, or replay page).
Go to the Meta Events Manager to begin.
Track Registration Page Visits
Create a new Custom Conversion
Add a name for the conversion (example: Registration page visit)
Add a description if desired
Select the data source you just created to add the pixel code to your webinar
Under Rules, select URL equals
In the URL keywords field, paste the full URL of your webinar registration page
Find this under Your Links in your WebinarJam account
Click Create to save
Track Thank You, Live Room, and Replay Page Visits
Create a new Custom Conversion
Add a name for the conversion (example: Replay page visit)
Add a description if desired
Select the data source you just created to add the pixel code to your webinar
Under Rules, select URL contains
In the URL keywords field, paste a string containing ONLY the base URL and webinar ID for your event (see below for more information)
Click Create to save
How to find the correct value for URL keyword Rule
The URLs for the pages associated with a webinar consist of three different elements: the base URL, the Webinar ID, and an encrypted string.
The complete page URLs look something like this:
Thank you page: https://event.webinarjam.com/registration/thank-you/WEBINAR-ID/UNIQUE-ENCRYPTED
Live room: https://event.webinarjam.com/live/WEBINAR-ID/UNIQUE-ENCRYPTED
Base URL: event.webinarjam.com/registration/thank-you/
Webinar ID (numeric): XXXX
Encrypted string: YYYYYYYYYYYY (unique for each registrant)
Because the encrypted string is unique for each registrant, it cannot be used in any general-use tracking code. If a page URL is required for your setup, use the base URL and webinar ID only.
The webinar ID in found in the webinar wizard at the Integrations > 3rd party tracking systems step under each tracking code field.
In the example above, the webinar ID is 62.
For the webinar in the example above, the URLs will be:
Thank you page: https://event.webinarjam.com/registration/thank-you/62/UNIQUE-ENCRYPTED
Live room: https://event.webinarjam.com/live/62/UNIQUE-ENCRYPTED
When your links have been defined, create Custom Conversions for the pages you want to track with the Meta Pixel.
Configure the events to track any URL that contains the fixed part of your webinar URL. For example:
event.webinarjam.com/registration/thank-you/5/
Do not include the HTTPS:// or the placeholder for the encrypted string (“UNIQUE-ENCRYPTED“). Instead of entering the full URL, set the event to track any URL that “contains” just the fixed aspects of the page address.