WebinarJam and EverWebinar User Documentation Webinars for everyone!

Create DMARC record for domain authentication

This article is for WebinarJam and EverWebinar.

WebinarJam Mail is the sending service for both WebinarJam and EverWebinar events. Follow this series for all webinar event types.

This article is part of a series dedicated to helping you set up DKIM, SPF, and DMARC records to authenticate the custom domain email addresses you use to send emails with WebinarJam Mail.
What is DMARC? DMARC (Domain-based Message Authentication Reporting and Conformance) records tell mail servers what to do with emails that could not be verified as legitimate, based on a sorting policy that you define. They are published in the DNS settings for the domain.

Using this guide, create a DMARC policy to monitor DKIM and SPF alignment for your domain(s) and set up reporting so you stay informed. DMARC alignment refers to how closely a message From: header matches the sending domain specified by either DKIM or SPF.


Step 1: Identify Your Sender Domain(s)

Start by identifying the domain(s) you want to protect. Your domain is the part of your email address that comes after the ‘@’ symbol, such as yourcompany.com.

The person identified as the Webinar Host & Presenter is used as the sender for all notification emails for a particular event (the host is shown in the following image as “John Smith”).

To protect all the email domains you use for your webinars, look at the primary host information each time you create a new event. The email addresses associated with each host are the ones you must authenticate.

It is not necessary to authenticate the email domains for secondary presenters (ie, “Jane Doe” in the following image is a secondary presenter).
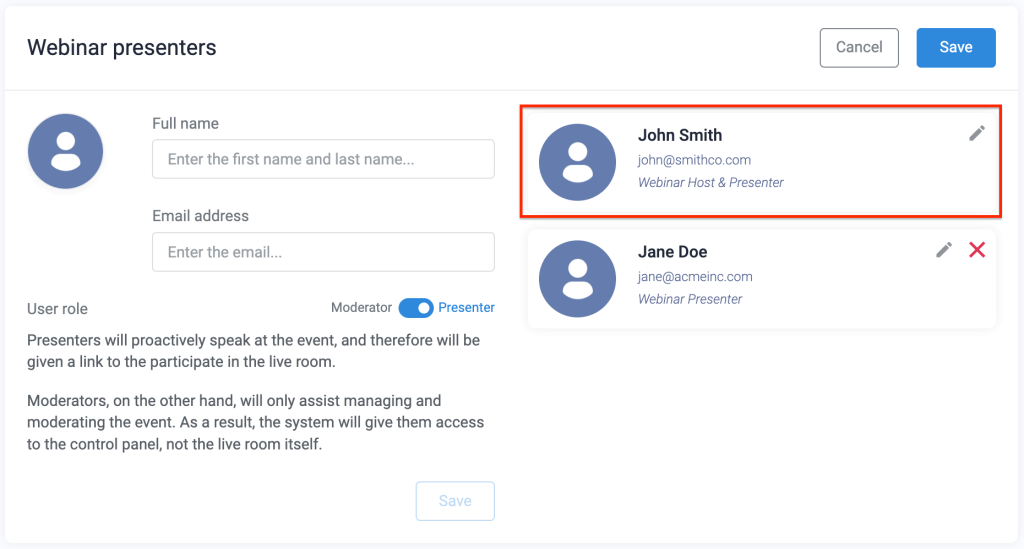
The webinar host and presenters
Example of the email sender settings in a webinar configuration

Remember: If you add different hosts with different email address domains to your webinars, DMARC records must be added to the DNS settings for each one.


Step 2: Login to Your Domain Host

Your DNS (Domain Name System) provider is where your domain’s settings are managed. Popular providers include GoDaddy, Namecheap, or Cloudflare, but there are many similar services your domain could be registered through.

Once logged in, find the DNS settings or management section of your account. Look for an option like “DNS Management” or “DNS Settings.”
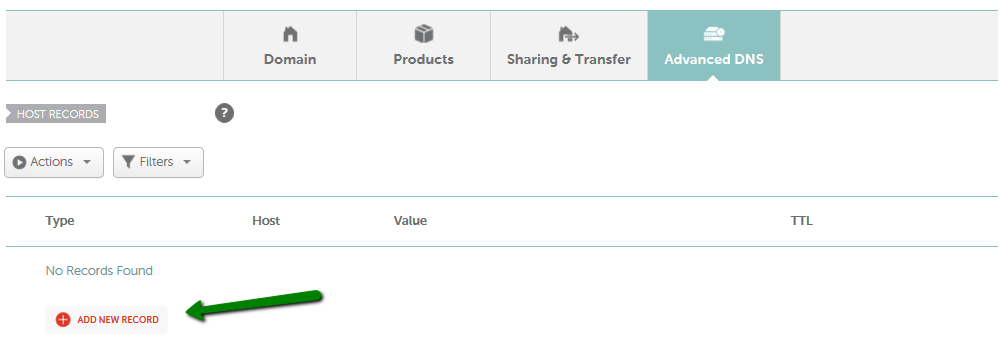
Namecheap advanced DNS settings
Example of Advanced DNS settings in Namecheap domain management
Source: How do I add TXT/SPF/DKIM/DMARC records for my domain?


Step 3: Create Your DMARC Record

Now, you’ll need to define the DMARC policy. A basic DMARC record includes the following components:

  • v=DMARC1: The DMARC version.
  • p=none: DMARC policy, example value set to “none.” This instructs mail servers to monitor emails but take no action if the sender cannot be authenticated.
  • rua=mailto:[email protected]: Specifies the email address where aggregate reports of mailing activity for the domain should be sent. In your record, replace “[email protected]” with the email address where you want to receive DMARC reports. The address must be located on the same domain as the DMARC record OR be issued by a DMARC monitoring service.

A finished DMARC record value with these components looks like this:

v=DMARC1; p=none; rua=mailto:[email protected];

Note: If you sign up for a DMARC monitoring service, most will generate a DMARC record for you. They will provide the exact record and instructions to add it to your DNS. Otherwise, you can create the record manually as shown above.

Understanding DMARC Policies

The DMARC policy is specified by ‘p=value’ in your record. The value dictates what should happen with a message that could not be verified with DKIM or SPF.

The policy is set to one of three values:

  • p=none: Deliver all mail, regardless of verification.
  • p=quarantine: Treat the message as suspicious and potentially spam.
  • p=reject: Do not deliver at all.

If you are new to sender verification, it’s best to take a cautious approach to your initial DMARC policy and set it to “none,” with a plan to increase the strictness.

As long as a valid RUA value is defined in your record, you will receive DMARC activity reports with information about the messages that pass or fail the verification process. With the help of a DMARC monitoring service to distill the reports, they can help you find legitimate services that need to be added to your SPF record and see if spoofers are currently using your domain.

As you learn more about how accurately your mail is being verified and delivered, you can increase the strictness of your DMARC policy to make it more secure.


Step 4: Publish Your DMARC Record

Create a TXT record for your domain and add the policy defined in the previous step.

  1. Go to the DNS Settings or DNS Management area.
  2. Locate the domain(s) you use to send email.
  3. Add a new TXT record to the domain and enter the DMARC details:
    • Host” or “Name”: _dmarc
    • Value” or “Content”: enter the DMARC record details you defined at the previous step.
DMARC record for a GoDaddy domain
Example of a DMARC TXT record in GoDaddy domain management

Note that the terminology you see in your account for the record fields can vary depending on your hosting service. If you’re not sure how to follow these steps in your DNS console, your domain host support will be able to help.

After publishing the DMARC record, wait about an hour for the changes to propagate through the internet.


Step 5: Test Your DMARC Record

Before testing the DMARC, make sure you also have valid DKIM or SPF records set up for your domain. Remember, DMARC works to validate and report on DKIM and SPF authentication, so all the pieces must be in place before you test.

If you have not configured and tested DKIM or SPF records yet, stop here and do that now:

When all your sender authentication records are complete, use a DMARC Record Check tool to confirm that the DMARC record is correct. Your domain host may provide one, or you can use an online service like DMARC Check Tool from MxToolBox. There are lots of free tools available online to help you test!


Step 6: Monitor and Analyze Reports

Sign up for a DMARC monitoring service and regularly check the mail server reports sent to the email address specified in your record’s rua tag.

The monitoring service will distill the information contained in each report into usable insights – without it, the XML reports can be difficult to understand. The information you get from the reports will help you review any email authentication failures and fine-tune your DMARC policy over time.

There are many services online that you can use to monitor DMARC reports. One example to get you started with a free monitoring tier is Valimail.

Create SPF record (integrated SMTP)

This article is for WebinarJam and EverWebinar.

Integrated SMTP Users Only

STOP: If you configured DKIM in your WebinarJam account in the previous step in this guide, SPF has already been provided for you. Skip this guide completely and do not add an additional SPF record.

If you are using an integrated SMTP service like MailGun or Postmark, however, you may need to add a separate SPF record. If that is the case, proceed with this guide.

This article is part of a series dedicated to helping you set up DKIM, SPF, and DMARC records to authenticate the custom domain email addresses you use to send emails with WebinarJam Mail.

What is SPF? An SPF (Sender Policy Framework) record is a list of services that are authorized to send mail on behalf of a specific domain. It is published in the DNS settings for the domain.

Before diving into the technicalities, let’s understand the basics. An SPF record is like a safelist for your emails, telling receiving mail servers that a particular server is allowed to send emails on behalf of your domain. This helps prevent cybercriminals from forging your email address and sending malicious emails.

Using this guide, add or update an SPF record for your domain to designate your integrated SMTP as a service authorized to send mail on your behalf.


Step 1: Identify Your Sender Domain(s)

Start by identifying the domain(s) you want to protect. Your domain is the part of your email address that comes after the ‘@’ symbol, such as yourcompany.com.

The person identified as the Webinar Host & Presenter is used as the sender for all notification emails for a particular event (the host is shown in the following image as “John Smith”).

To protect all the email domains you use for your webinars, look at the primary host information each time you create a new event. The email addresses associated with each host are the ones you must authenticate.

It is not necessary to authenticate the email domains for secondary presenters (ie, “Jane Doe” in the following image is a secondary presenter).

The webinar host and presenters
Example of the email sender settings in a webinar configuration

Remember: If you add different hosts with different email address domains to your webinars, SPF records must be added to the DNS settings for each one.


Step 2: Check for Existing SPF Records

In some cases, your domain may already have an SPF record in place. To check, you can use an online SPF record-checking tool or log in to your domain registrar account to review the DNS records that already exist. If you’re not sure how to understand the existing records, your domain provider’s support can help.

If there is no SPF record for your domain, you will need to create one. If there is already a record, you must edit the existing record instead. You can only have one SPF record per domain.


Step 3: Create Your SPF Record

If you don’t have an SPF record, it’s time to create one. The finished record will be added to your domain’s DNS (Domain Name System) settings. Contact your SMTP service to find out how to add their information to your SPF record. They may provide an IP address or a domain for you to include.

A basic SPF record looks like this:

v=spf1 include:samplesmtp.net ~all

Note: The domain “samplesmtp.net” is provided for demonstration only. Do not copy and paste that value into your own record.

Understanding the SPF Record

The syntax for an SPF record is made up of three parts:

  1. A version reference.
  2. A list of IP addresses and/or third-party includes authorized to deliver mail for the domain.
  3. A final mechanism to define the strictness of the authentication match.

Example of an SPF record value with multiple authorized senders. The parts are shown here in different colors to show their different functions:

v=spf1 ip4:1.2.3.4 include:samplesmtp.net ~all

This record has a version value of “spf1,” and specifies two approved senders for the domain: one by IP address and one by server domain. It ends with a soft fail final mechanism, meaning that any email message where the delivery server does not match the authorized values will be marked as spam.


Step 4: Publish Your SPF Record

Once you’ve created your SPF record, you need to publish it by updating your DNS settings. To do this, log in to the account where you manage your domain and locate your DNS management panel.

  1. Log into your DNS management console
  2. Locate the domain you use to send email
  3. Add a new TXT record to the domain and enter the SPF details:
    • Host: @
    • Value: Paste or type your SPF record in the Value or Content field. Get these details from your SMTP provider.
    • TTL: Default/Automatic
  4. Save the record to publish it
SPF record for a GoDaddy domain
Example of an SPF TXT record in GoDaddy domain management


Update an existing SPF Record

If you already have an SPF record for your sender domain, update the existing record instead of creating a new one. Having more than one SPF record will invalidate them all.

To add your SMTP service as an authorized sender to an existing record, simply add an include or IP address entry to the existing record. Contact your SMTP service to find out exactly what you need to add.

For example, if your current SPF record looks like this:

v=spf1 include:_spf.google.com ~all

This example allows mail sent via Google Workspace for your domain.

Add your provider as an additional reference::

v=spf1 include:_spf.google.com include:samplesmtp.net ~all

This example allows mail sent via both Google Workspace and a secondary provider (samplesmtp.net is an example only) for your domain.


Step 5: Test Your SPF Record

After publishing your SPF record, it’s a good idea to test it to ensure everything is working correctly. Online SPF record testing tools like Free SPF Record Checker can help you verify if your SPF record is correctly set up. (There are lots of options available! Find one or more than you like and test your record.)

Note that you might need to wait a little while before you can fully confirm that the record is set up correctly. The newly published SPF record may take up to 1 hour to propagate before appearing in the results of your checker tool.

Set up DKIM domain authentication

This article is for WebinarJam and EverWebinar.

WebinarJam Mail is the sending service for both WebinarJam and EverWebinar events. Follow this series for all webinar event types.

This article is part of a series dedicated to helping you set up DKIM, SPF, and DMARC records to authenticate the custom domain email addresses you use to send emails with WebinarJam Mail.
What is DKIM? DKIM (DomainKeys Identified Mail) is an email authentication method used to confirm that a message was sent by the domain attached as the sender. Think of it as a digital signature that cannot be forged. It is published in the DNS settings for the domain.

For your WebinarJam or EverWebinar events, you can use WebinarJam Mail as the default email gateway, integrate a third-party SMTP service, or use a combination of both. The location where you will start your domain authentication depends on which gateway(s) you use.

WebinarJam generates DKIM records for you, which you can then add to the DNS settings for your email domain. This creates the necessary connection that authorizes WebinarJam Mail to send emails from your domain.

Take Note

  • DKIM records are authentication keys used to prove that you own the domain you are using to send email.
  • When looking at your webinar configurations, look at the email address listed for the first presenter in your setup, the “Webinar Host & Presenter.” The host’s address is the sender domain that you need to authenticate.
  • If you change the host’s email address to one with a new domain or create new events in the future with different host addresses, you will need to complete the authentication process again to verify the new domain.
  • If your hosts’ emails are from more than one domain, each domain must be added to your WebinarJam account and authenticated separately.


WebinarJam Mail Authentication

Get DKIM records from your WebinarJam account to authenticate notifications and reminders sent with a custom sender domain.

Complete the DKIM configuration in two places:

In WebinarJam:

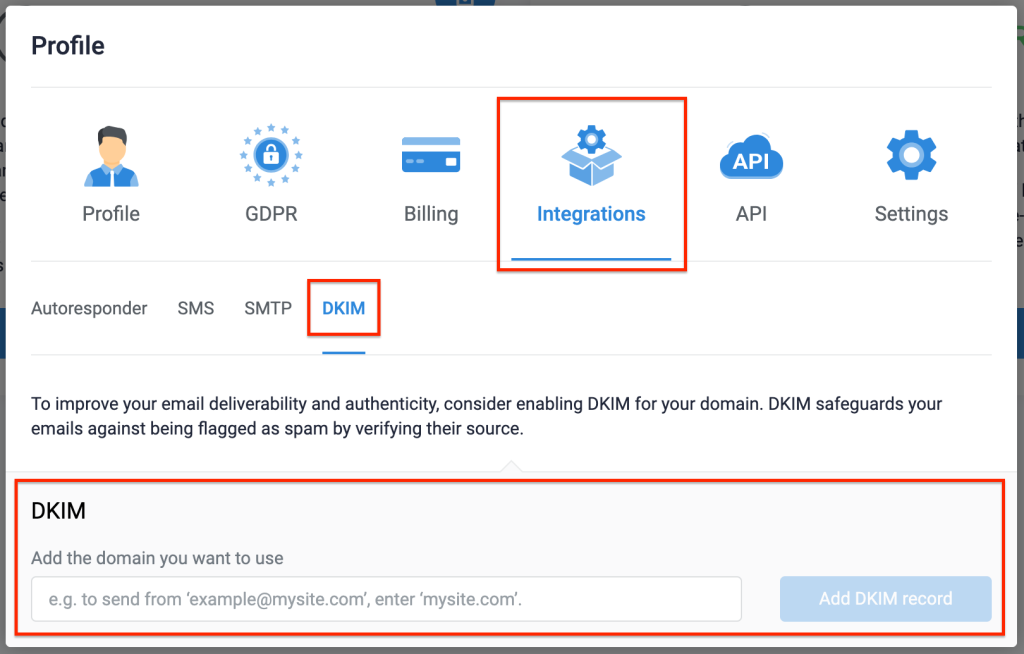
  1. Click the Profile icon in the top right corner of your account.
  2. Select Integrations, then DKIM.

Add a domain to your profile

  1. Enter your email sender domain in the DKIM field, formatted as yourdomain.com. Do not include “www” or any other characters.
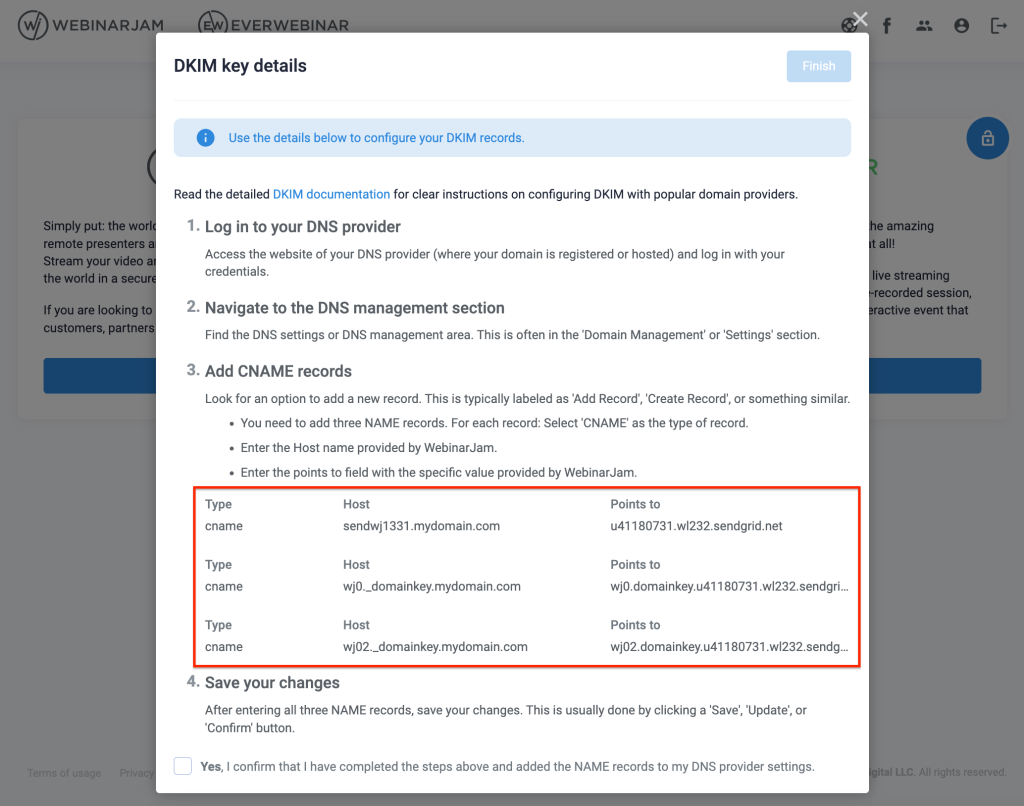
  2. Click Add DKIM record. The next screen includes configuration instructions and the auto-generated DKIM records for your account.

Example of DKIM CNAME records

  1. Log in to your domain registrar account to add and publish the CNAME records before closing the DKIM details screen.

In your domain registrar account:

  1. Go to the DNS Settings or DNS Management area.
  2. Locate the domain(s) you use to send email.
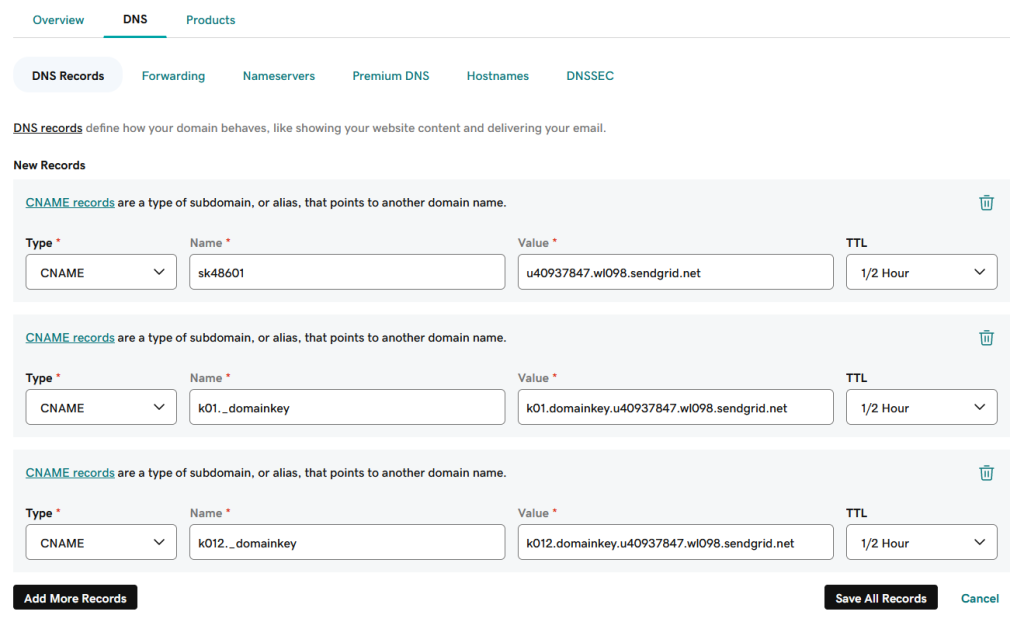
  3. Add a new CNAME record to the domain.
  4. Paste the “Host” and “Points to” values from the first record provided in WebinarJam into the corresponding fields for the new CNAME record.

Create three CNAME records for the DKIM details

  1. Repeat to create three total CNAME records with the details from your WebinarJam account.
    • NOTE: Some domain providers will allow you to paste the complete Host value provided by WebinarJam (ie, sk48601.yourdomain.com), and some will add the domain portion of the value for you. If the domain portion is added for you, you will only add the prefix portion of the auto-generated Host value in the field (ie, sk48601, as shown in the GoDaddy example image above). If you are not sure which method your domain provider requires, please contact their support for help.
  2. Save your DNS changes.

Go back to WebinarJam and click the confirmation checkbox at the bottom of the DKIM details window before clicking Finish.

Pro Tips

  • The interface and terminology for DNS settings will vary depending on what service you use to manage your domain.
  • When browsing your domain registrar’s knowledge base, search for help with adding domain records in the CNAME format.

Allow up to 48 hours for the DKIM record to be verified. While this is in process, the domain entry will display a yellow “Pending validation” status.

DKIM validation pending status

The displayed status will change based on whether the domain is validated:

  • Connected: The domain has been validated and DKIM records are successfully detected.
  • Error: The domain could not be validated. Check the error message for help.


Integrated SMTP Authentication

Third-party SMTP providers can be used to deliver notifications for your webinars instead of or in addition to WebinarJam Mail.

If you are exclusively using an integrated SMTP, no DKIM configuration is needed in WebinarJam.

Go to the help resources for your integrated SMTP to learn how to authenticate your sender domain for their service. The links below are provided for your convenience. For assistance with any of these processes, please contact the provider directly.

WebinarJam integration partners:

Email Sender Authentication

This article is for WebinarJam and EverWebinar.

WebinarJam Mail is the sending service for both WebinarJam and EverWebinar events. Follow this series for all webinar event types.

Authenticating an email sender domain means creating and publishing three types of DNS records: DKIM, SPF, and DMARC. This article series will teach you the basics of each record type and how to implement them. All three record types must be published for each domain you use to send email messages.

Email sender authentication protocols help prove the legitimacy of your email messages and increase the odds that your message will land in a recipient’s inbox.

Adding sender authentication to WebinarJam and EverWebinar ensures that the emails containing event notifications and reminders (confirming sign-up, providing access links, and sending replays) reach your registrants. This is important for maximizing attendance rates at your events, making authentication highly recommended to ensure registrants receive these notifications.

To authenticate an email sender domain for WebinarJam Mail, follow this checklist to add your email domains to your WebinarJam account and update your Domain Name System (DNS) records.

Important: If you use an integrated CRM to send notifications and reminders for your webinars, contact the CRM service to find out how to authenticate your domains for their platform.


Sender Authentication Checklist

1. Add a custom domain email to your webinar configuration

A custom domain email address adds legitimacy to your business communications and can improve your deliverability. Contact your domain provider to create an email address and then add it to the host details for your webinar at the first configuration step.

The custom sender domains entered for the primary host presenter in WebinarJam or EverWebinar are the ones you will authenticate through the rest of this list.

2. Add the business domain to your WebinarJam / EverWebinar account to create DKIM records

Connect your email sender domain(s) to WebinarJam / EverWebinar to generate DKIM records and start the authentication process.

3. Add the auto-generated DKIM records to your business domain DNS

Copy the DKIM records generated by your WebinarJam account and add them to your custom email DNS settings to complete the authentication loop between WebinarJam and your domain.

4. Add or update an SPF record to your business domain DNS (integrated SMTP users only)

Update the SPF record for your domain to designate WebinarJam as a service authorized to send mail on your behalf.

Important: If you use the default WebinarJam Mail service, the SPF reference is automatically provided as part of the DKIM records you set up in the previous step. Skip this step unless you use an integrated SMTP to send webinar notifications.

5. Add DMARC records to your business domain DNS

Add a DMARC policy to monitor DKIM and SPF alignment of messages sent with your domain and set up reporting so you stay informed.

6. Test your updates!

Use the tools provided in each resource linked in this article to test and check each piece of the authentication puzzle. There are lots of free and paid resources available online that can help you create, check, and monitor the authentication protocols for your email domains.

Important

Email sender authentication must be performed for each domain you use to send your emails (the email address listed for each primary presenter in a webinar). If you use new email address domains for webinar hosts in the future, this checklist must be completed again to authenticate the new domain(s).

© 2024 WebinarJam All Rights Reserved