WebinarJam and EverWebinar User Documentation Webinars for everyone!

Zapier

This article is for WebinarJam and EverWebinar.

Before Getting Started

  • An API key is required to allow Zapier to communicate with your account. If you are not already approved to use the WebinarJam / EverWebinar API, apply for a key.
  • Access to the API is not available for trial accounts. To access an API key for use with Zapier, upgrade to a paid plan if needed.

Overview

Zapier is a tool that lets you automate workflows between web applications that are otherwise unrelated. This article describes the process of creating automation between WebinarJam or EverWebinar and many third-party applications using Zapier.

Popular automations to try:

  • Send registrants to an autoresponder not in our integration list
  • Tag registrants in an autoresponder not in our integration list
  • Add new registrants to a Google Sheets Spreadsheet
  • Send yourself a notification when someone registers
  • Send registrants a survey or form for additional information
  • Add registrants to an SMS service for additional messaging
  • Create Trello boards for follow-up services
  • Create tasks with Project Management Programs
  • Create a purchase (for sending a free follow-up file)

Zapier Resources

Zapier is a third-party program and cannot be supported in-depth by the WebinarJam team. For detailed information about Zapier and how to set up your Zaps, refer to the Zapier knowledge base:


Start a Zap and Connect WebinarJam / EverWebinar

Before starting, review some basic concepts:

ONE TIME: Zapier does not have a mechanism to keep items in sync after the first time they run through a Zap. Think of Zapier like a one-way, one-time pipeline.

ONE TRIGGER: Zaps are triggered by a single event. If you want the same action to happen based on multiple triggers, create a separate Zap for each unique trigger.

NEW DATA ONLY: Zaps cannot see data that was created before your Zap was turned on. Zaps are triggered by events that happen after the Zap is turned on – in other words, by data that is newly added. To force Zapier to process data that existed before your Zap, refer to this article on bulk importing existing data into zaps.

Create a Zap

Log in to the Zapier dashboard and select your preferred creation method. This article describes the Classic process.

If not already selected, click Classic view in the dashboard to follow this article.
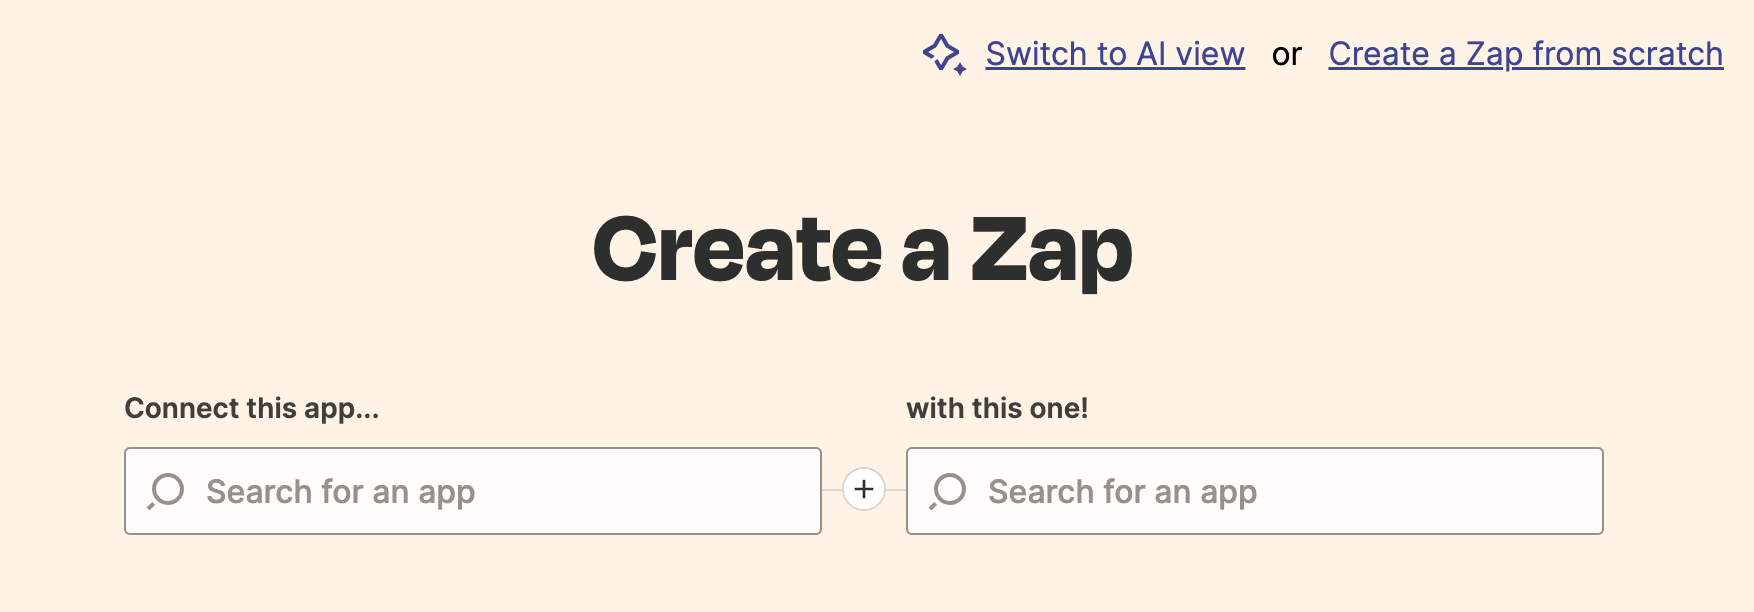
Zapier dashboard classic view

To set up a Zap, four parameters are defined:

1) Connect this app → 2) with this one!

3) When this happens → 4) then do this!

Zaps are IF/THEN automation rules. They create automatic processes that trigger when one event happens (IF) and initiate a follow-up action in response (THEN)

  1. Under Connect this app… search for WebinarJam / EverWebinar
  2. Under with this one! Search for the app where you want to send information
  3. Under When this happens… select a WebinarJam or EverWebinar event to trigger the Zap
  4. Under then do this! Select an action to occur in the destination app you selected

WebinarJam / EverWebinar Triggers

Available WebinarJam / EverWebinar triggers include:

Trigger Timing Description
New Live Attendee Immediate Triggers when a registrant joins a live webinar.
Registrant Joins Webinar After After session Triggers if a registrant was late for a live webinar.
Registrant Misses Webinar After session Triggers if a registrant missed the live webinar.
New Registration Immediate Triggers when a user registers for a webinar.
Registrant Attends Replay Immediate Triggers when a registrant joins the webinar replay.
Registrant Leaves Before After session Triggers if a registrant left the live webinar before a specific timestamp.
Registrant Purchases Immediate Triggers when a registrant buys a product during the live webinar. Dependent on active sales goal tracking.
Registrants Stays Until After session Triggers if a registrant stayed in a live webinar past a specific timestamp.


Go to Zapier’s app catalog for the most up-to-date list of available WebinarJam / EverWebinar triggers.

Important:

  • Certain triggers fire when the webinar session is over. If you want to trigger a zap before or during the event, use triggers that fire immediately instead.
  • Zaps are triggered by a single event. If you want the same follow-up action to happen based on multiple triggers, create a separate Zap for each unique trigger.
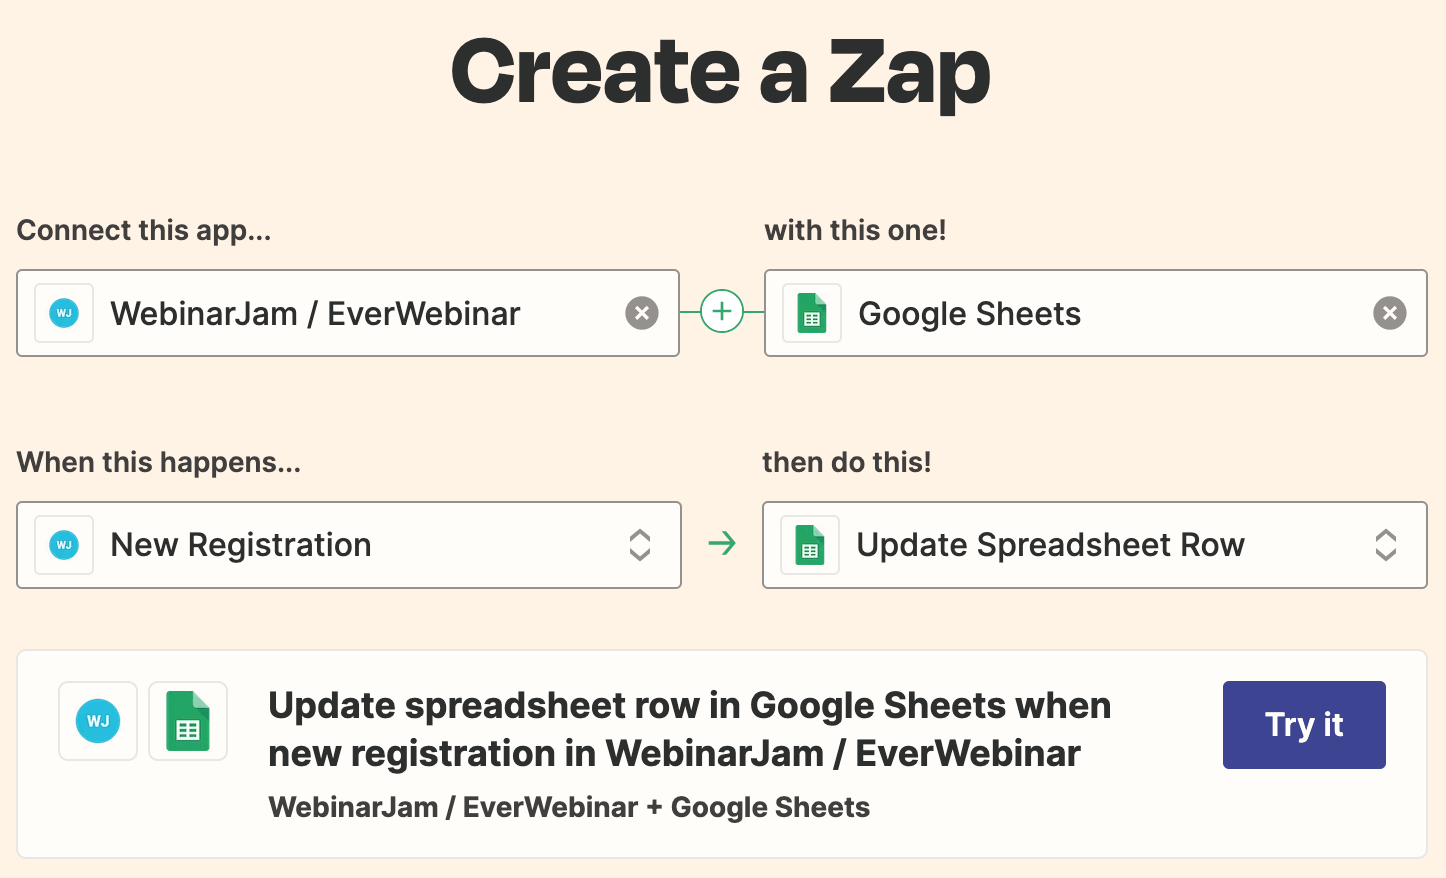
Zap example showing spreadsheet update when a new registration happens in WebinarJam
The example in the preceding image shows a Zap that connects WebinarJam or EverWebinar to Google Sheets

After defining the trigger and action for your new Zap, click Try It to enter the editor and complete the configuration.

Connect with WebinarJam

WebinarJam API key

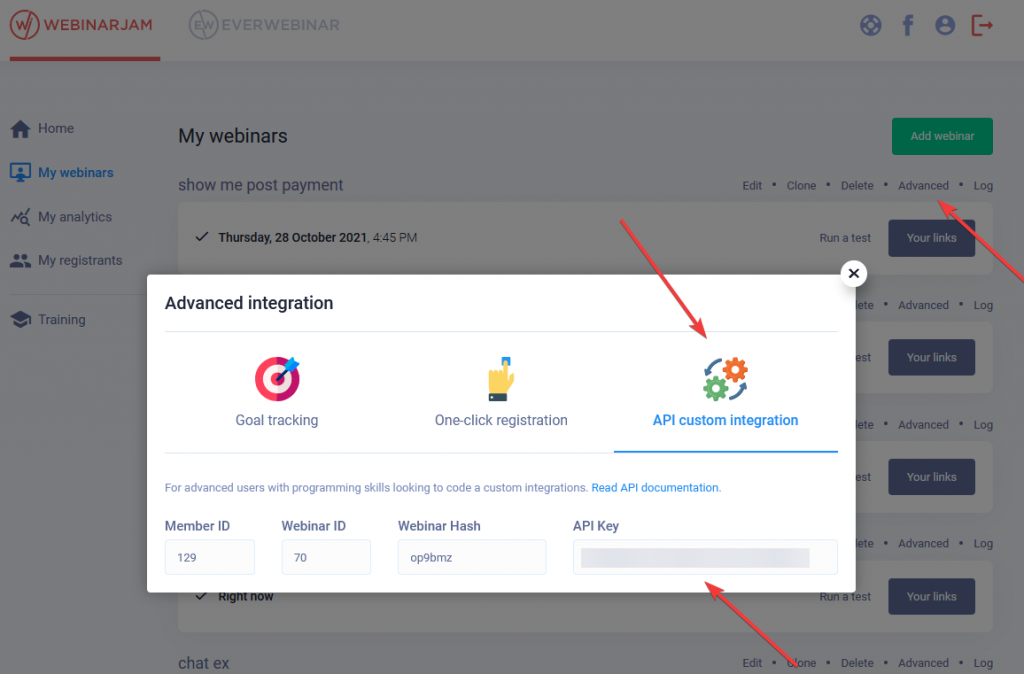
A WebinarJam API key is required to connect your WebinarJam and Zapier accounts. If you are not already approved to use the WebinarJam / EverWebinar API, apply for a key. The key is found in your main webinar dashboard, under the Advanced link for any webinar. The API key is a global value, so it is the same for every event in your account.

Copy the API key from your WebinarJam profile

The editor will prompt you to sign in to connect a WebinarJam / EverWebinar account, or select one that is already connected.

If you select Sign In, a popup appears to authorize the access request. Enter your WebinarJam API key in the field to authorize access.
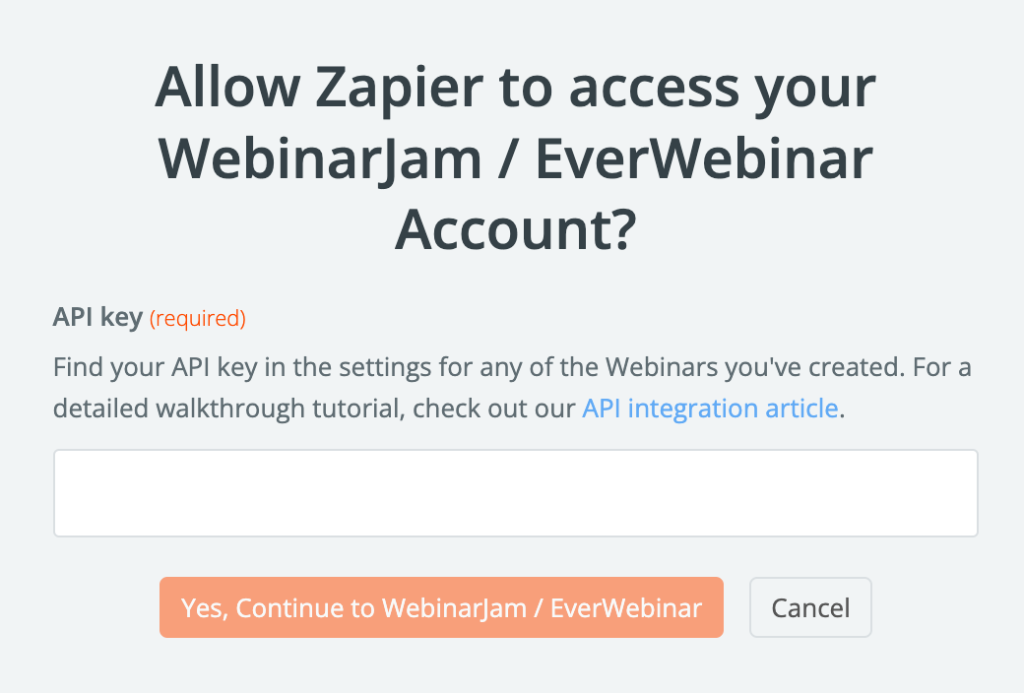
API key to authorize access

Complete the Zap

Use Zapier’s editor to finish setting up and testing the Zap.

The API connection gives Zapier access to your WebinarJam / EverWebinar account so the editor can display your webinars in the configuration process. Choose the webinar you want the Zap to trigger from and configure the actions for the destination application as desired.

When the setup is complete, turn the Zap ON by using the toggle in the editor or your Zapier dashboard.

Toggle Zap on or off


Test the Integration

As with any complex configuration, it is best to test your Zap with a demo webinar to make sure it works as expected before a live event.

Send a voice call reminder

This article is for WebinarJam and EverWebinar.

Send webinar reminders by text message or voice call with a Twilio SMS integration.

Important: Record an audio message with your reminder and upload it to the internet. To add the recording to your webinar reminders, you must be able to get a direct MP3 URL for the uploaded file.

Add a Voice Call Reminder

Open a WebinarJam or EverWebinar event for editing:

  1. Go to Notifications > Reminder notificationsAdd a voice call reminder
  2. Under Last minute notification, click Add call
    • Voice calls are not available for any other reminder or notification type
    • A reminder email is configured by default. To send only a voice call reminder, delete the email.
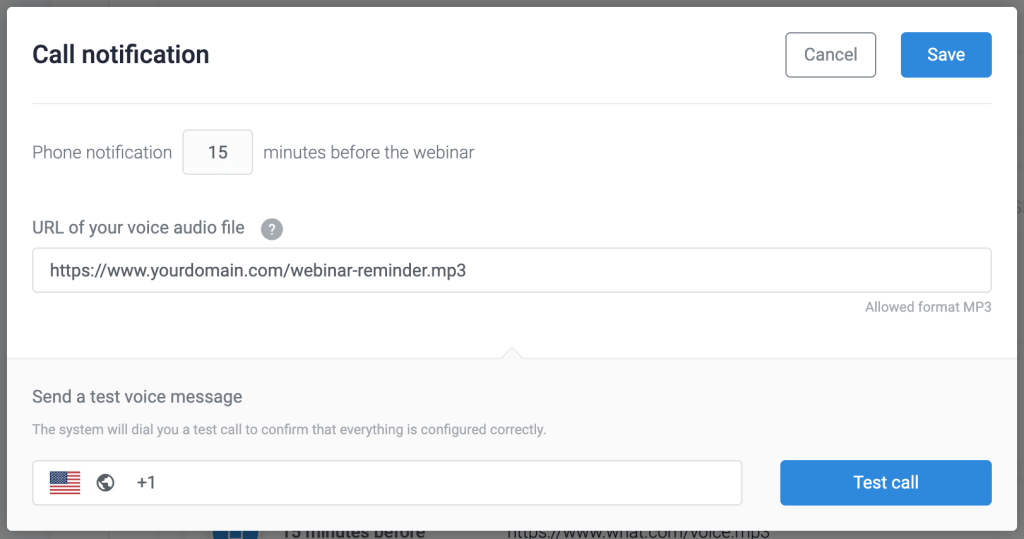
  3. Enter a direct URL to a hosted MP3 file with your voice reminder and Save

Add a voice recording URL

Pro Tips

  • Last minute notifications are sent 15 minutes before the scheduled webinar session. The timing cannot be changed.
  • Only one voice call reminder can be configured per webinar.
  • The audio file must be hosted on the internet and accessible via a direct MP3 URL.
  • Enter a phone number and click Test call to ensure that your integration is working correctly.

Learn more

Send an SMS reminder

This article is for WebinarJam and EverWebinar.

Send webinar reminders by text message or voice call with a Twilio SMS integration.


Add an SMS Reminder

Open a WebinarJam or EverWebinar event for editing:

  1. Go to Notifications > Reminder notificationsAdd SMS last minute reminder
  2. Under Last minute notification, click Add SMS
    • SMS is not available for any other reminder or notification type
    • A reminder email is configured by default. To send only an SMS reminder, delete the email.
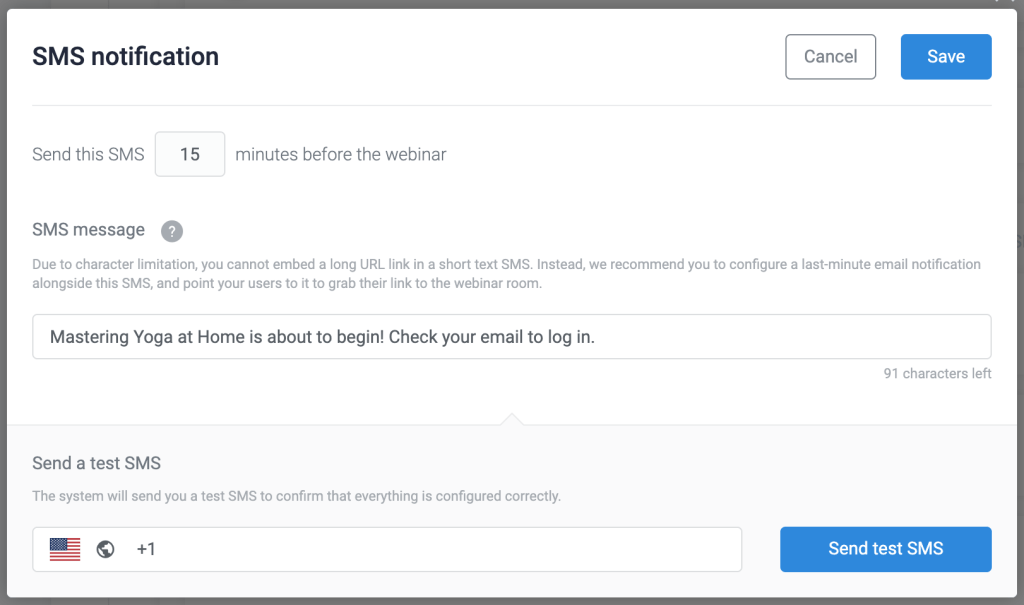
  3. Compose the text message reminder in the pop-up window and Save

Compose an SMS reminder

Pro Tips

  • Last minute notifications are sent 15 minutes before the scheduled webinar session. The timing cannot be changed.
  • Only one SMS reminder can be configured per webinar.
  • In the message, remind your attendees to check their email for a webinar link and any last-minute instructions. Adding a link to the SMS reminder is not recommended.
  • Enter your cell phone number and click Send Test SMS to ensure that your integration is working correctly.

Learn more

Twilio

This article is for WebinarJam and EverWebinar.

Integrate with Twilio to send SMS and phone call reminders for your webinars.

For example, you can send a reminder for your webinar to your participants: a “Last minute” reminder which will be sent out 15 minutes before your webinar starts.

You Will Need:

  • A Twilio account
  • The Twilio Account SID and Auth Token
  • A Twilio phone number

Set Up Twilio

  1. Go to Twilio and log in or create a new account.
    • Trial accounts allow message sending to verified numbers in specific countries only.
  2. In the account Console, click Get a phone number or go to Phone Numbers > Manage to create one.
    • Important: Verify the phone number if required. Unverified phone numbers cannot be used to send notifications.

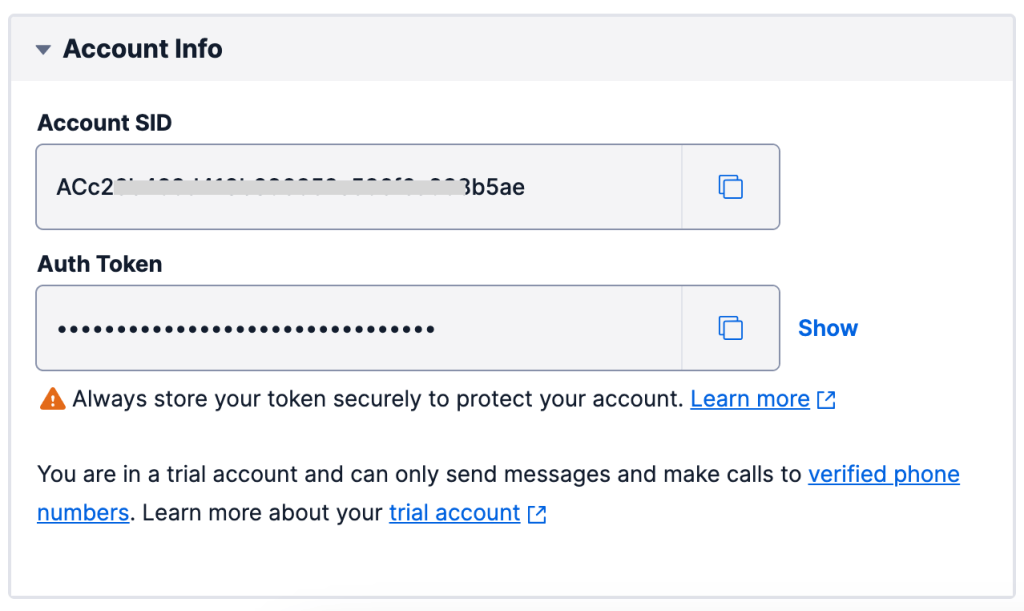
In the account Console, get the information you need to integrate with your webinars:

  • Account SID
  • Auth Token
  • Twilio phone number appears in this module when the number is created

Twilio account SID and auth token


Integrate Twilio

Connect Twilio with your account to enable SMS and voice messaging reminders for your webinars.

  1. Go to Profile > Integrations
  2. Click SMS Gateways
  3. Enter your Twilio account credentials:
    • Account SID
    • Auth Token
    • Twilio Phone Number (do not include dashes in the phone number)
  4. Click Connect to add the account

Send a test SMS to verify that the credentials are correct. Enter a valid phone number and press Send Test SMS.

To remove the integration or link to a different Twilio account, click the reset link below the Connected status indicator.

Learn how to use Twilio with WebinarJam and EverWebinar


Troubleshoot Twilio Sending

Countries outside of the United States

If you are in a country outside of the United States, you may need to enable global permissions and the country or number range to which you want to send SMS messages. Twilio has global permissions to protect your account from abuse.

  • In your Twilio account, look for SMS Geo Permissions

My registrants don’t receive messages

If the Twilio message log says your messages were sent, the delivery failure may be due to the phone provider. Providers may block certain types of messages or numbers to protect their customers from spam.

If you just created your Twilio account, you may need to confirm your account. If you need help, contact the Twilio support team.

External video hosting

This article is for WebinarJam and EverWebinar.

External video files are used by your webinar in two ways:

  • EverWebinar automated video source (Required)
  • WebinarJam live video injections (Optional)

Take Note

  • Supported video file formats are MP4 and MOV
  • Video must be hosted on a cloud-based server
  • Ideal video resolution for a webinar is 720p at 30 frames per second to balance good streaming quality and fast loading

Related resource: Optimize video for streaming


Video Hosting

Host your video on a compatible streaming service:

  • YouTube
  • Vimeo direct MP4 links (available on Pro, Business, Premium, Standard, Advanced, or Enterprise plans)
  • Amazon S3 or a similar file-hosting solution
    • Similar solutions must offer a direct MP4 playback URL for the hosted video.


YouTube

YouTube is a free video hosting option that is compatible with WebinarJam.

Important: YouTube’s legal terms and conditions do not allow the removal of the YouTube logo or video player controls. This means that it is not possible to restrict the playback controls in an EverWebinar event and videos hosted on YouTube will always show their logo in the lower right corner of the playback window.

To use a YouTube-hosted file for your webinar:

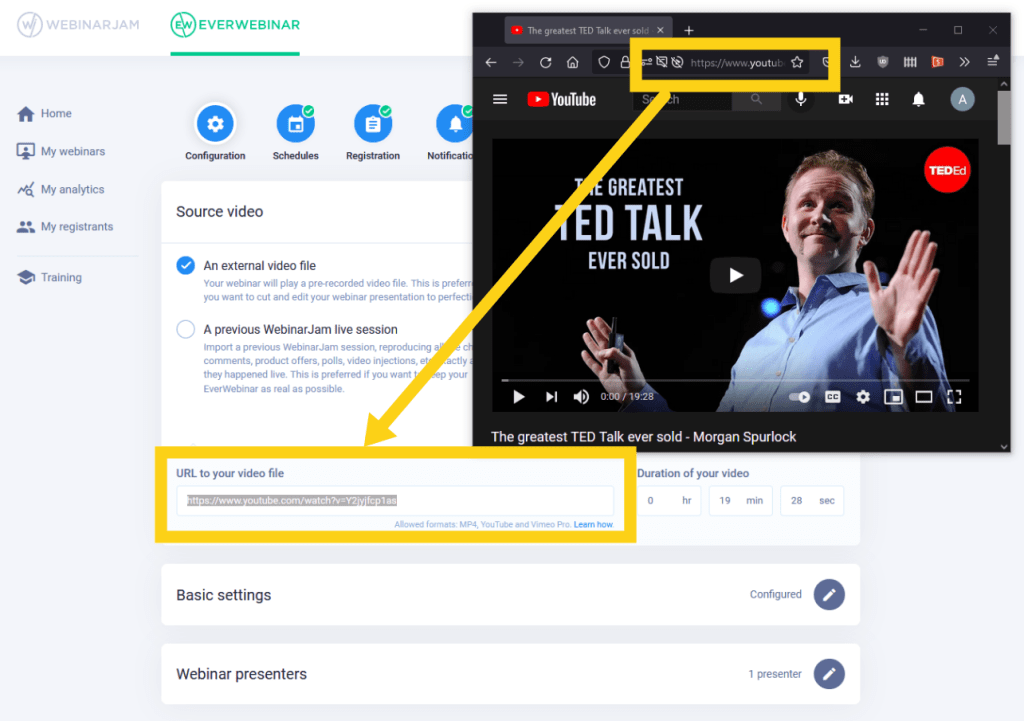
  1. Visit the dedicated page for your video on the YouTube website
  2. Copy the YouTube page URL and paste it into the WebinarJam or EverWebinar configuration
    • Note: The “share” link for the YouTube video will not work. You must use the full page URL.

YouTube-hosted EverWebinar source file


Vimeo

Vimeo direct link sharing is available on Pro, Business, Premium, Standard, Advanced, or Enterprise plans.

Direct links to a Vimeo-hosted video allow MP4 playback with logo removal and the ability for EverWebinar to override the native playback controls.

Access Vimeo links:

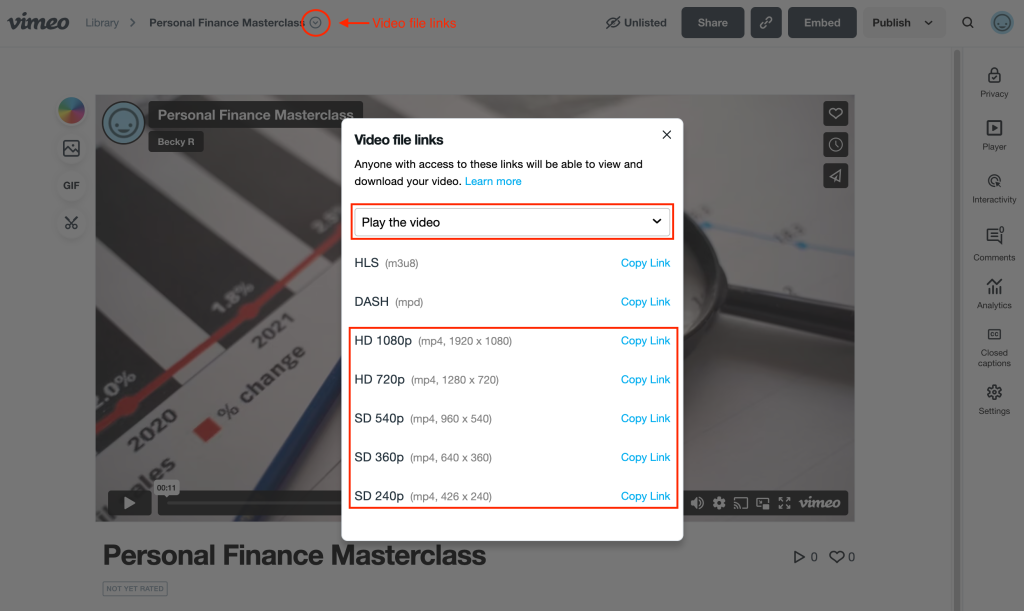
From the video links pop-up:

  1. Select “Play the video” from the dropdown menu

  2. Choose one of the MP4 options and click “Copy link” (the HLS and DASH formats are not compatible with WebinarJam)

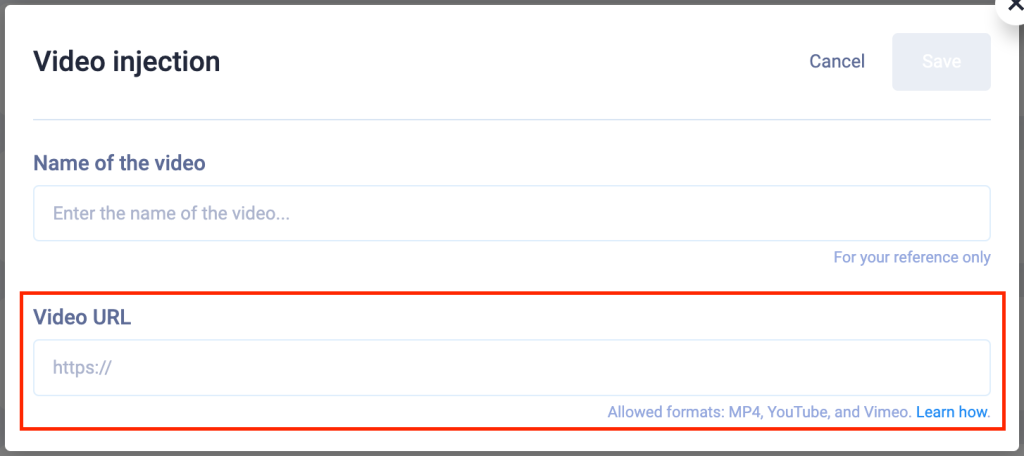
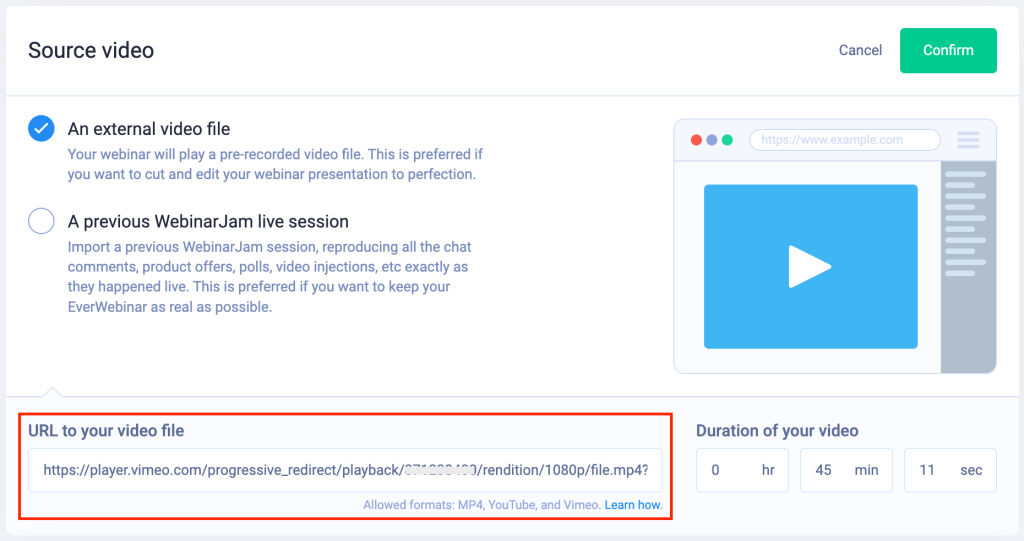
  3. Paste the link into the WebinarJam video injection field or as an EverWebinar source video and Save.

    Select the Vimeo file quality you want to use

Note: When selecting a video link from the menu shown above, choose your preferred playback quality.

Use as a WebinarJam video injection at the Live step of the webinar configuration:

WebinarJam video injection module

Use as an EverWebinar external source file:

EverWebinar external source file configuration


Amazon S3

To use a video hosted on Amazon S3 with WebinarJam or EverWebinar:

  • Set video file permissions to “public”
  • Copy the video’s MP4 file path to paste into the WebinarJam or EverWebinar configuration

Upload the video file to Amazon S3 and use Actions > Make public to change the permissions:

Get the Object URL for the MP4 file:

Amazon S3 Notes

Some visitors may experience buffering with Amazon S3 video streaming.

To improve streaming performance, host your video on Amazon S3 and stream it via Amazon’s CloudFront.

  1. Convert the S3 video file URL into a CloudFront URL to use it in your webinar configuration.
  2. Paste CloudFront URL into your WebinarJam or EverWebinar configuration to use it as a source file.

Charging for registration with PayPal

Before we begin, ensure that you have a business account with PayPal and not a personal account. This process will not work with personal PayPal accounts.

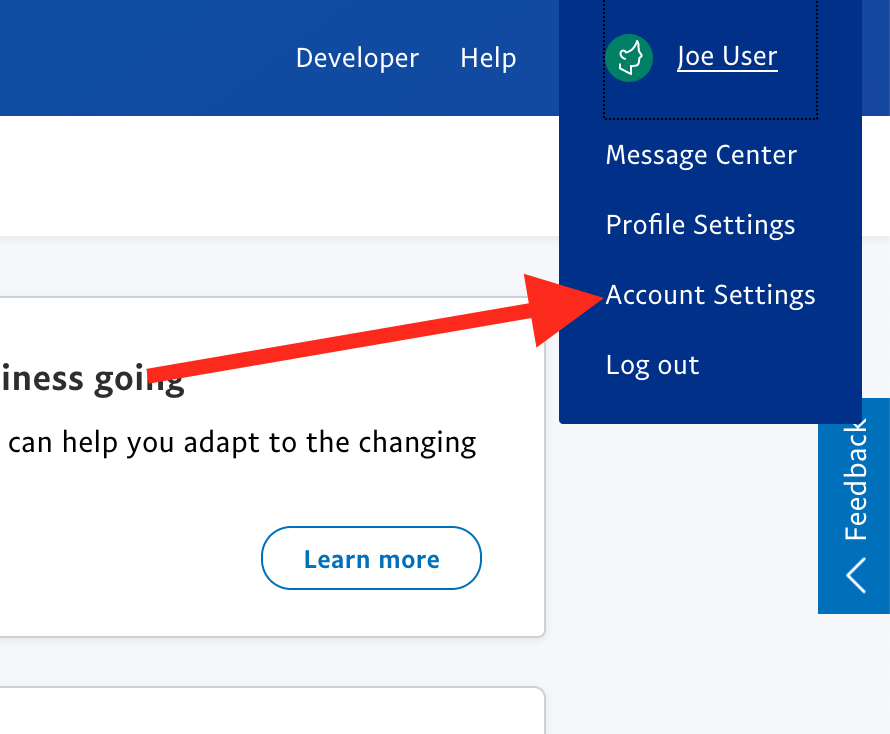
Log in to your PayPal account and click Account Settings from your profile menu.

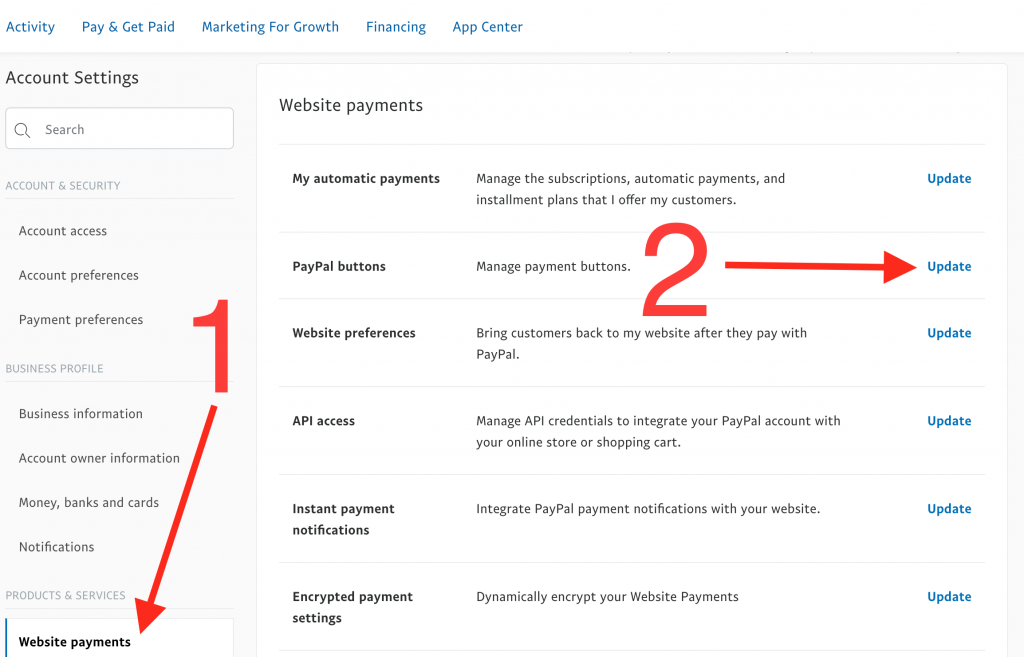
Under “Products & Services,” select Website Payments and click to Update PayPal buttons.

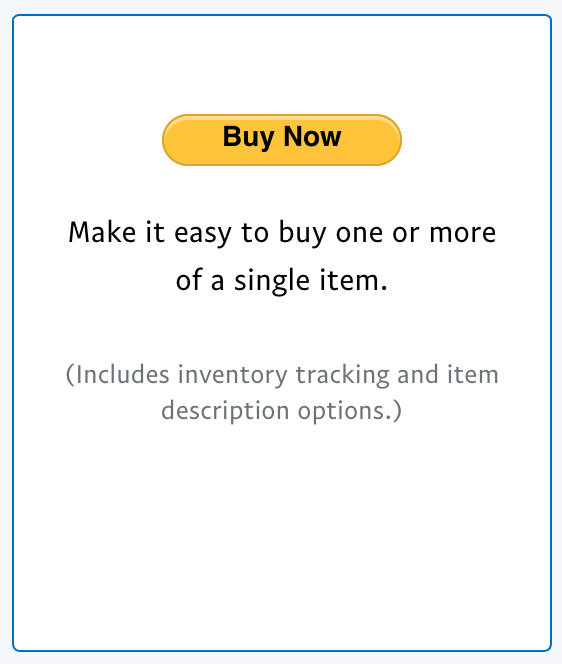
Because a webinar is a one-time sale, select the Buy Now button.

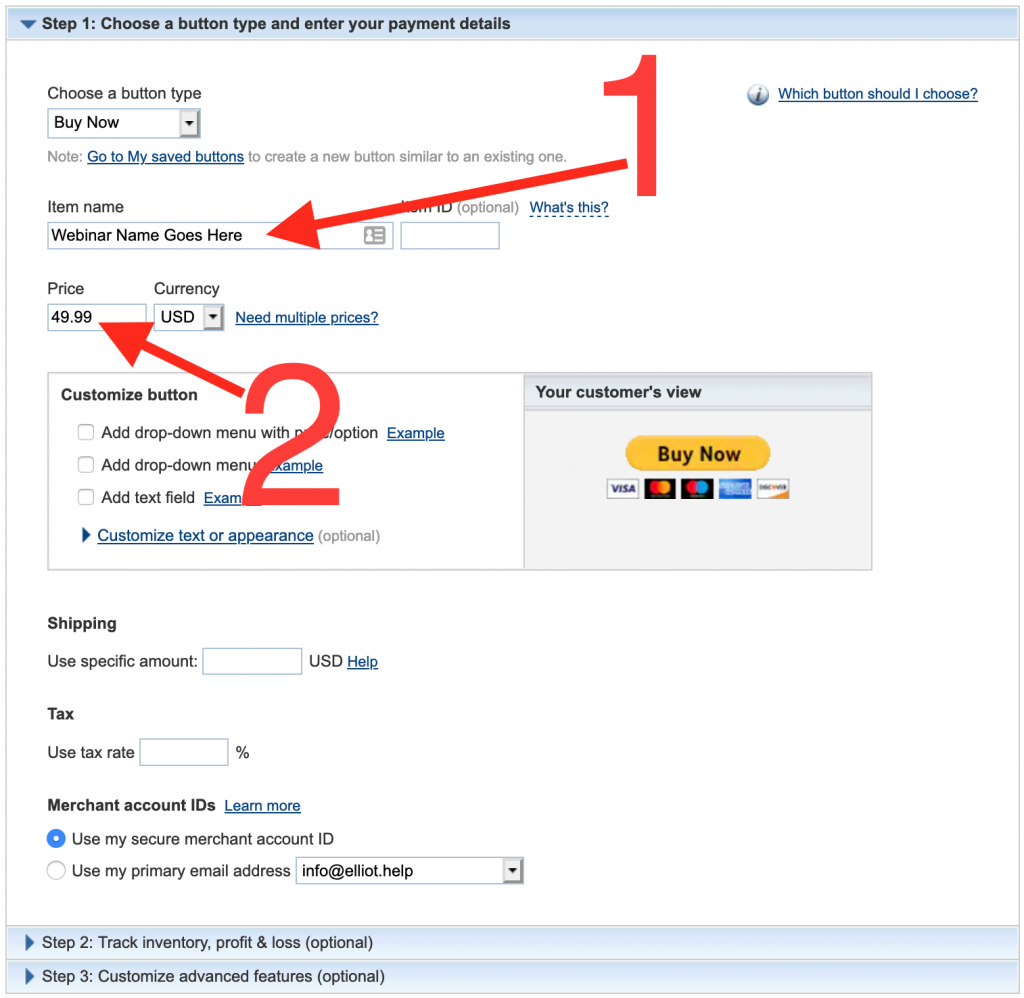
In Step 1, add the basic information for your webinar name under Item Name and registration ticket price under Price.

Leave the rest of the fields blank and go to Step 3.

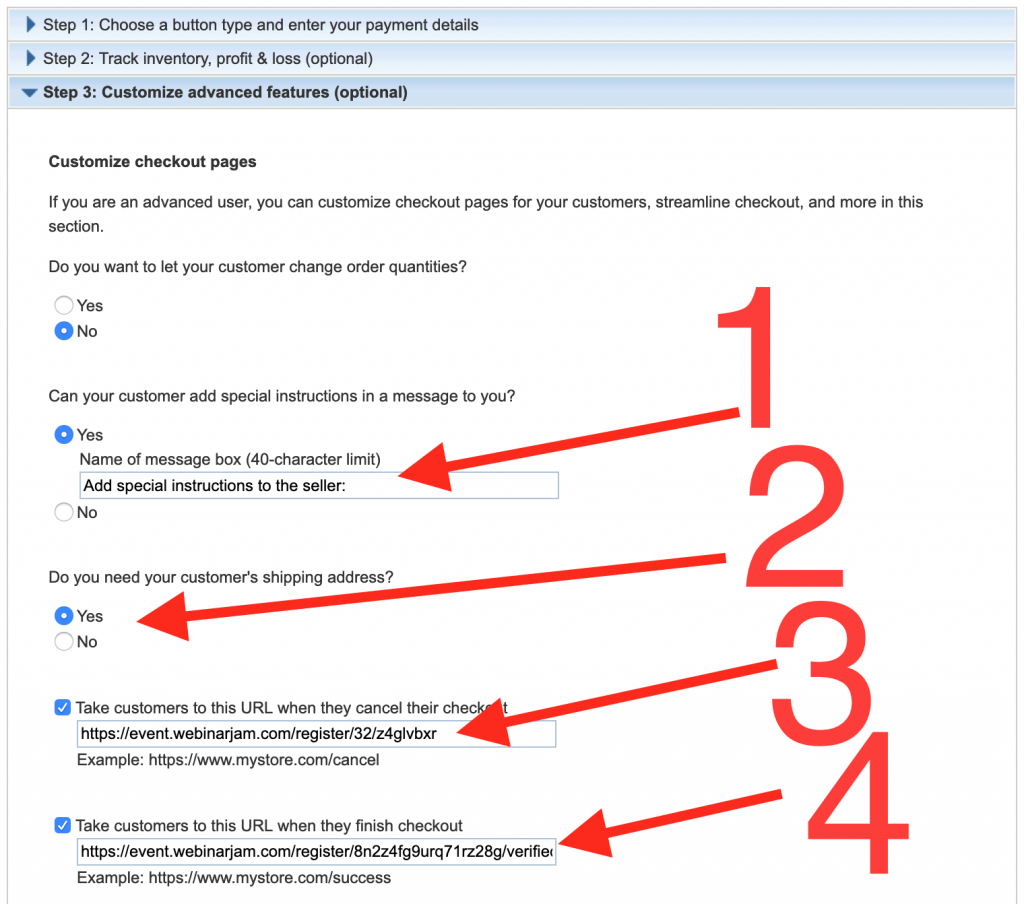
In Step 3, you will need two links from your WebinarJam or EverWebinar account:

  • Registration Page URL (marked 3 below)
  • Post-Payment URL (marked 4 below)

Add a message to the customer if desired (marked 1 above) and disable the request for a shipping address (marked 2 above) unless registration for the webinar includes a hard copy of course materials that you need to ship.

Finally, click Create Button , and you’re ready for the final step. Click the email tab (shown below) and copy the URL in the box.

In your webinar configuration, go to Registration > Free registration vs Paid registration. Paste the PayPal button URL in the settings field labeled, “Your payment checkout.”

Registration embed code

This article is for WebinarJam and EverWebinar.

Use a code snippet to embed your webinar registration form on an external web page. The embed code lets you turn any page into a custom registration page.

Embedded code requires basic HTML and CSS coding skills and access to the source code of the page where you want to put it.

Get Embed Code

In WebinarJam or EverWebinar:

  1. Look for the webinar you want to start promoting registration for
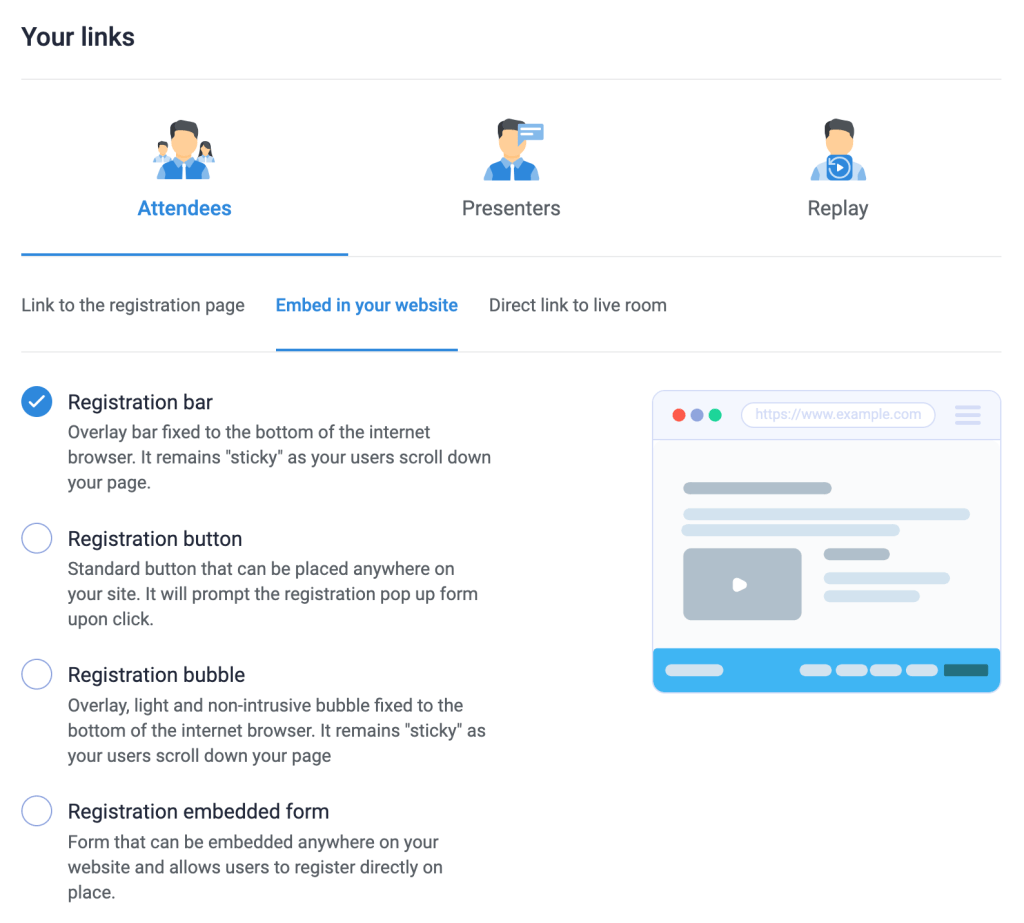
  2. Click Your links
  3. Under Attendees, click Embed in your website
  4. Choose a format for the embedded element:
    1. Floating bar with pop-up form
    2. Static button with pop-up form
    3. Floating bubble pop-over with pop-up form
    4. Static in-line form
  5. Copy the code snippet below the customization options for each element type to get the embed code

IMPORTANT: Embed only one registration code in your external page. Multiple snippets in the same page can cause a conflict in the code.

Registration embed code elements


Customize Embed Elements

Registration bar

The registration bar is a floating page footer with a countdown timer. The form to collect a registrant’s information is triggered with a button click. The bar stays sticky at the bottom of your page even as it scrolls.

  • Customize the description and button text, the bar and button color, and the style of the pop-up registration form.

Registration button

The registration button triggers a registration form pop-up on click. Insert the button code anywhere in the page content where you what to prompt a prospect to sign up.

  • Customize the button text, color, size, shape, border, and shadow. Select a style for the pop-up registration form.

Registration bubble

The registration bubble is a floating icon and pop-over window that appear in the bottom corner of the page that can be closed and reopened. The pop-over contains information about the webinar and a button to register. Clicking the button opens the registration form.

The registration bubble code contains parameters that can be used to customize the appearance of the pop-over.

Custom Style Parameters

Style parameters are separated in the embed code by an ampersand (&) character. For example:

Customize embed code parameters

Modify the code to edit each parameter according to your preferred styling.

Style Element Parameter Default Value Custom Value Guide
Button Text buttonText Register Text
Button Color buttonBgColor #29b6f6 Hex code for preferred color, URL-encoded
Button Opacity buttonBgOpacity 0.95 (95%) Decimal value between 0 and 1 to set opacity percentage
Bar Color barBgColor #ffffff Hex code for preferred color, URL-encoded
Bar Opacity barBgOpacity  1 (100%) Decimal value between 0 and 1 to set opacity percentage
Pop-up Form Style formTemplate  2 Template ID. Enter a template ID: 2, 4, 6, 8
Pop-up Form Color formColor  1 Color variation ID. Enter a variation ID: 1, 2, 3, 4, 5, 6

Registration embedded form

The registration form is a simple opt-in form that appears directly in the page without a pop-up.

Customize the style of the embedded registration form with parameters:

Style Element Parameter Default Value Custom Value Guide
Button Text formButtonText Register Text
Accent Color (Button and “Convert to another timezone” text) formAccentColor #29b6f6 Hex code for preferred color, URL-encoded
Accent Opacity(Button and “Convert to another timezone” text) formAccentOpacity 0.95 (95%) Decimal value between 0 and 1 to set opacity percentage
Background Color formBgColor #ffffff Hex code for preferred color, URL-encoded
Background Opacity formBgOpacity  1 (100%) Decimal value between 0 and 1 to set opacity percentage

Style Parameter Notes

  • All text, spaces and “#” symbols must be URL-encoded. For example, the # symbol is %23, a blank space is +, etc.

Autoresponders and CRMs

The article is for WebinarJam and EverWebinar.

Connect an Autoresponder or CRM

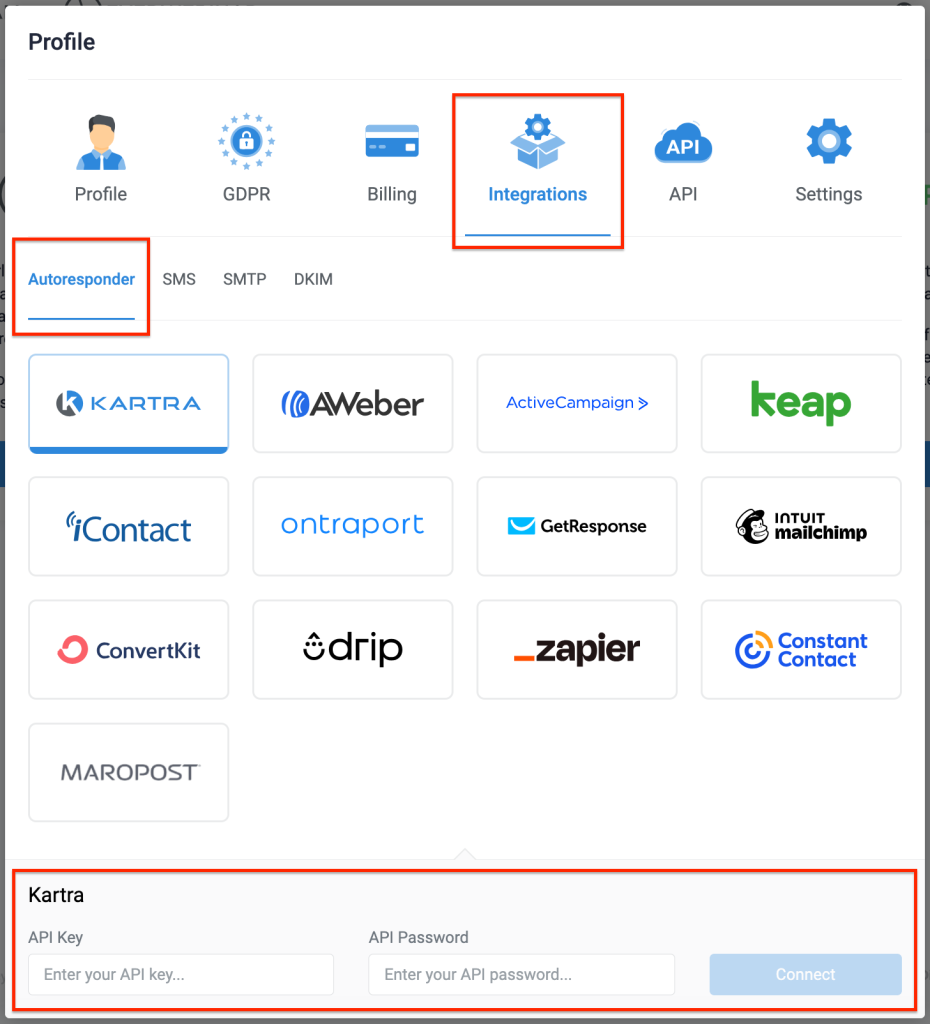
To integrate third-party autoresponder services, open your account Profile:

  1. Go to Integrations > Autoresponder Integrations
  2. Select your provider and enter the required credentials to create a connection

Integrate a third-party autoresponder or CRM

Learn more

Integration automation rules

This article is for WebinarJam and EverWebinar.

How do integration rules work?

Integration rules create automated processes that execute an action in your integrated autoresponder when a registrant interacts with your webinar.

For example:

  • Send the registrant’s contact information to your autoresponder when they sign up
  • Assign a tag to the registrant, subscribe them to a newsletter, add them to a list, etc.
  • Automate actions if a registrant leaves early or arrives late
  • Assign a tag if a registrant buys any product from the live event or replay
  • And lots more!

Add as many of these rules as you want and they will run automatically every time a triggering condition is met.

Important: Integration rules send information from WebinarJam to the integrated autoresponder, but not in reverse. Your autoresponder cannot send information to your WebinarJam account.

Create integration rules

In WebinarJam or EverWebinar:

  1. Open a webinar for editing
  2. Go to Integrations > Email autoresponder integration
  3. Click the autoresponder tile to add or edit integration rules
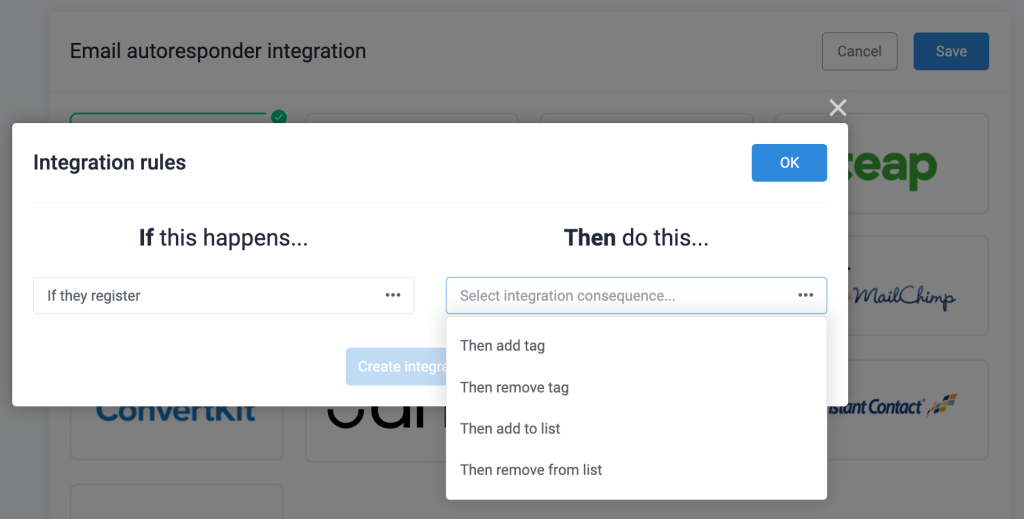
  4. Select a trigger and action for the rule
    • Example: IF they register, THEN add to list

Autoresponder integration rules

Add as many rules as needed to record the actions and engagement of your registrants.

Note: The “tag” and “list” terminology used in the integration rules configuration may not be an exact match for the name of the corresponding function in your integrated autoresponder. When in doubt, test a few rules to understand how they are interpreted by your autoresponder.

Automation Timing

Some rules are executed instantly and others are not. The difference can be thought of in terms of the positive or negative impact of the triggering action.

  • Positive rules (if they register to the webinar, if they buy your product, if they make it to the live room, etc) are triggered as soon as the positive event happens.
  • Negative rules (if they miss the webinar, if they leave early, etc) wait until the webinar session is over. After the webinar, the system analyzes attendee behavior to confirm that the negative event happened before sending the information to your autoresponder.

Mailing through your autoresponder

This article is for WebinarJam and EverWebinar.

Send webinar notifications and reminders with an integrated autoresponder platform for additional control over email branding, styling, and scheduling. This is an alternative to using the built-in WebinarJam email builder.


Create Custom Fields

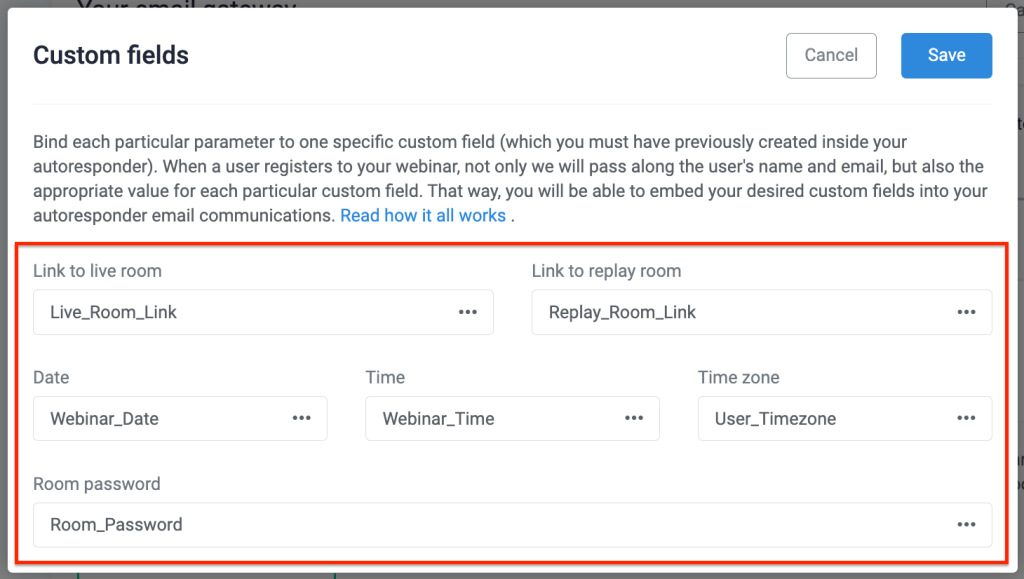
In the webinar configuration, you will need to match values from the webinar with custom fields in your autoresponder. This step is required so your autoresponder can include custom information in the emails sent for your event.
In your autoresponder, create six custom contact fields:

  • Live_Room_Link
  • Replay_Room_Link
  • Webinar_Date
  • Webinar_Time
  • User_Timezone (Required if registered time shows in User’s own time zone)
  • Room_Password (Required if the webinar room is password protected)

NOTE: Select text input as the custom field type for all values. Alternate types like drop-down, multi-select, or date-validated fields will not work.

What are custom fields?

Every autoresponder or CRM comes with standard contact data fields: first name, email address, phone number, etc.

Custom fields let you collect additional data that is specific to your market or usage. These fields are often used to personalize email marketing by injecting data into a message that is specific to an individual recipient. This is the function that your autoresponder will use to send unique details about a webinar to your registrants.

Pro tip:

If you run multiple events that are closely scheduled, consider creating unique custom fields for each event:

  • Live_Room_Link_1
  • Live_Room_Link_2
  • Replay_Room_Link_1
  • Replay_Room_Link_2

If an previous attendee registers for another webinar, the custom field values are overwritten in your autoresponder with the details from the most recent registration. If there is no overlap in the webinars’ email notification scheduling, multiple sets of custom fields are not needed.


Configure Your Webinar

To enable the integrated autoresponder or CRM:

  1. In WebinarJam
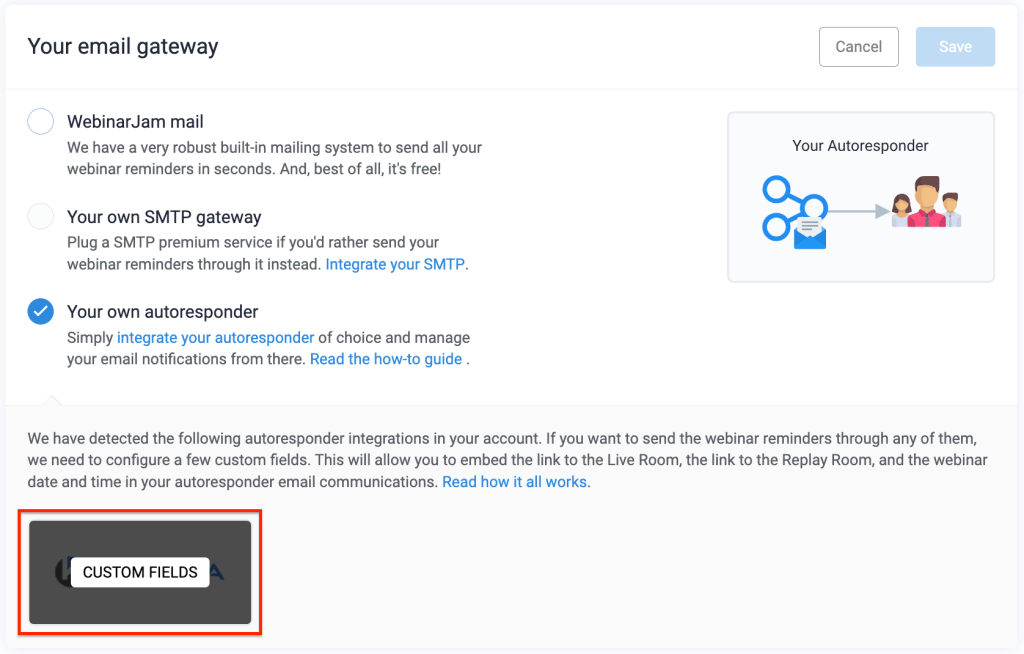
  2. Open a webinar and go to Notifications > Your Email Gateway
  3. Select Your own autoresponder
  4. All integrated autoresponders will appear below. Hover over your preferred application and click Custom Fields.

Select autoresponder in the email gateway settings

IMPORTANT: Due to limitations in their APIs, Maropost and Constant Contact are not supported for this feature.

Match Custom Fields

Match the details of your webinar to the custom fields created in your autoresponder.

Custom field matching

In the Custom fields pop-up:

  1. Click each field in the window to access a list of custom fields from your autoresponder
  2. Select the option from the drop-down that corresponds with each field value
  3. Save Custom fields and the Email Gateway module to complete the webinar setup

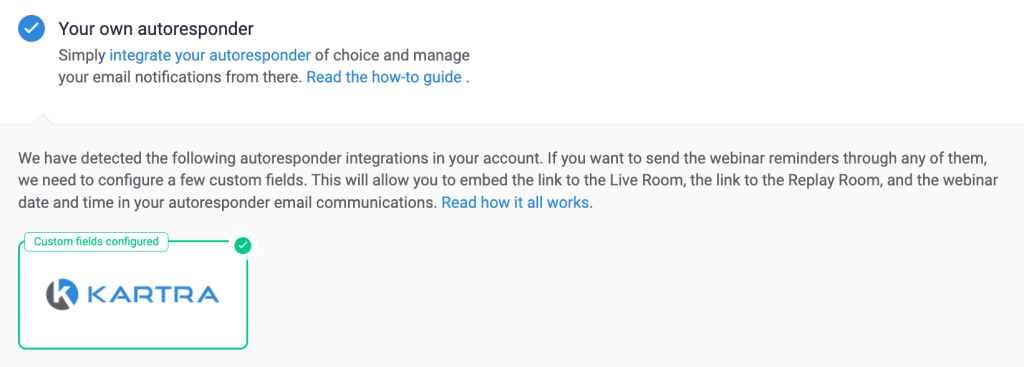
Custom field configuration successful

CRITICAL: Custom fields linked in a webinar configuration must remain active to work. If a field is deleted or changed, go back to the webinar configuration and update the custom fields portion of the integration.


Test the Integration

Test the autoresponder integration with an automation rule triggered by registration.

In the webinar configuration

  1. Go to Integrations > Email autoresponder integration
  2. Click the autoresponder tile to add or edit integration rules
  3. Select a trigger and action for the rule
    • Example: IF they register, THEN add to list

Autoresponder integration rules

In your autoresponder

  1. Create an email for webinar registrants that will send in response to the automation action configured at the previous step
    • Example: An email that sends when a contact is added to the list specified in the rule
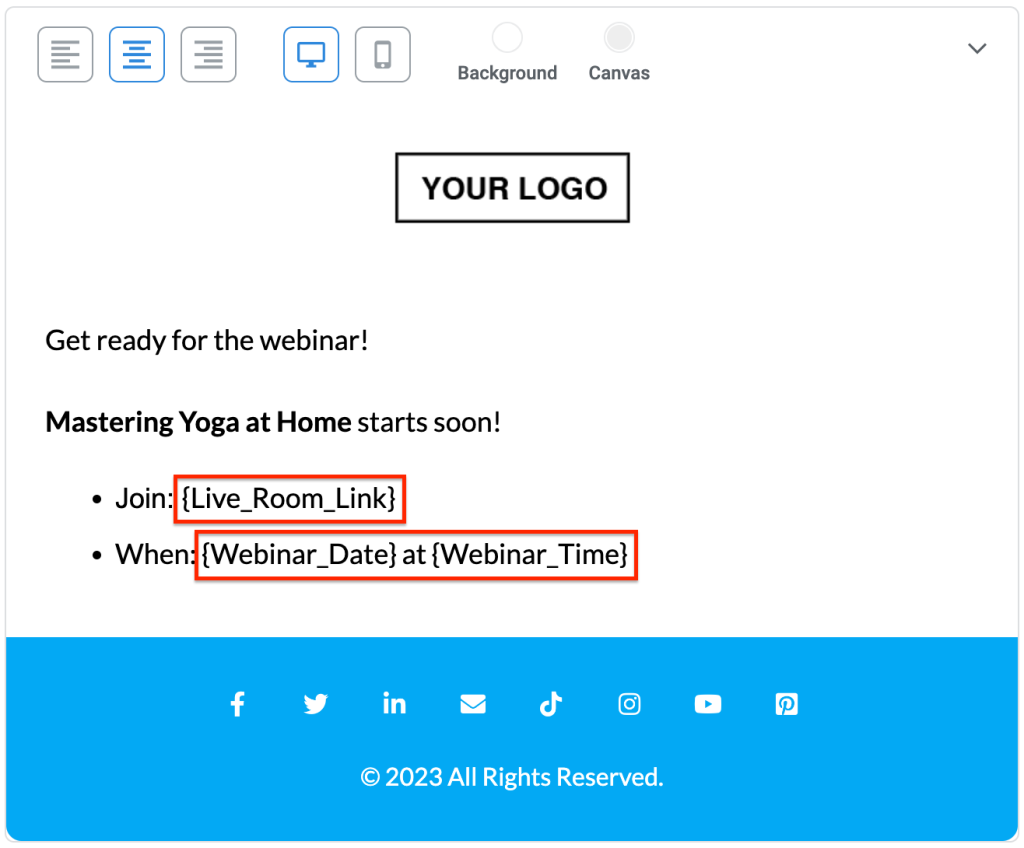
  2. In the email body, use the webinar custom fields to insert information about the event (example in the following image)Kartra email builder with custom field variables

Test the registration flow

  1. Use the registration page link for the webinar to register with a valid email address
    • If all previous steps were completed correctly, this should trigger the integration rule and send you an email with the details of the webinar.
  2. Check your autoresponder:
    • Do the custom fields appear in your test contact with webinar details in them?
    • Is the contact subscribed to the list specified in your automation rule?
  3. Check your email inbox:
    • Did you receive the webinar notification?
    • Are the correct webinar details displayed?

If the details are correct in your autoresponder and the email, the setup is complete. Use the custom field variables with the webinar information to create more notifications, a replay follow-up, and any custom funnel designs that are possible in your autoresponder.

SMTP Integrations

This article is for WebinarJam and EverWebinar.

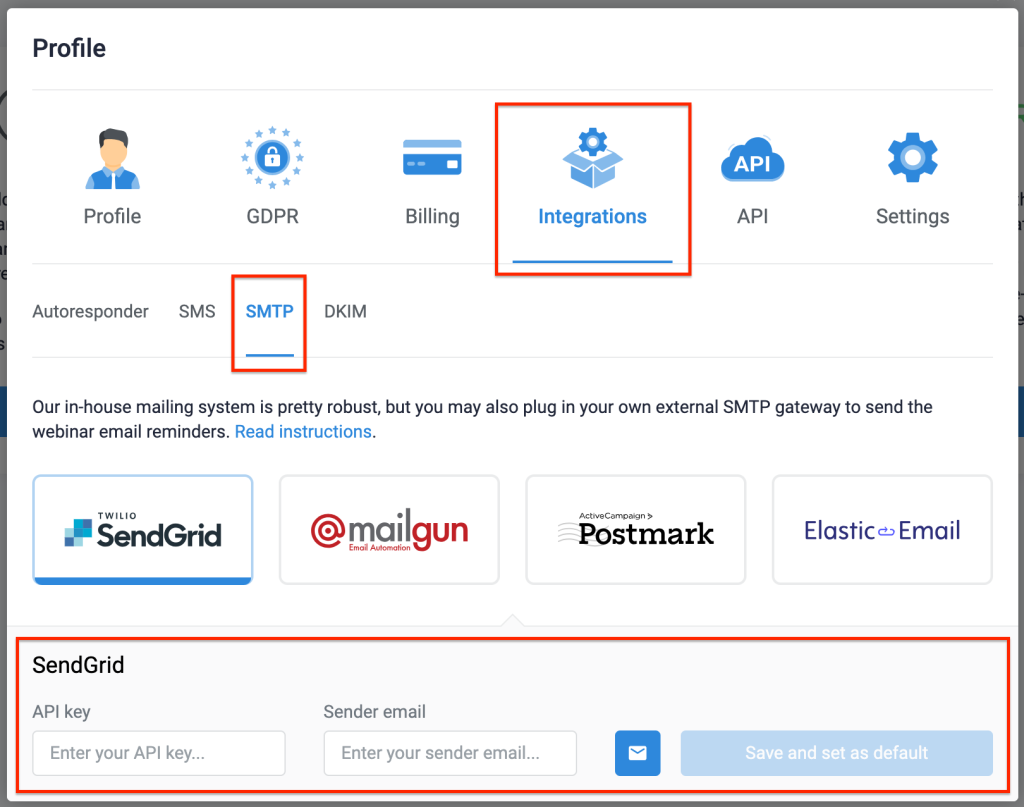
To integrate a third-party SMTP service, open your account Profile:

  1. Go to Integrations > SMTP Integrations
  2. Select your provider and enter the required credentials to create a connection

SMTP integration setup

Required credentials vary depending on the service, but most require an API key and a valid sender email address. Get the API key from your account with the SMTP service. Double-check the informationthe values must match exactly.

Learn more:

For help finding your API key, reach out to the support team that serves your SMTP. They will help you navigate your account!

Install Google Tag Manager

In Google Tag Manager

Follow the instructions from Google Support documentation to create a Tag Manager account and a container for your webinar pages.

  1. Read: Set up and install Tag Manager (Google Support)
  2. Choose the container type Web and AMP

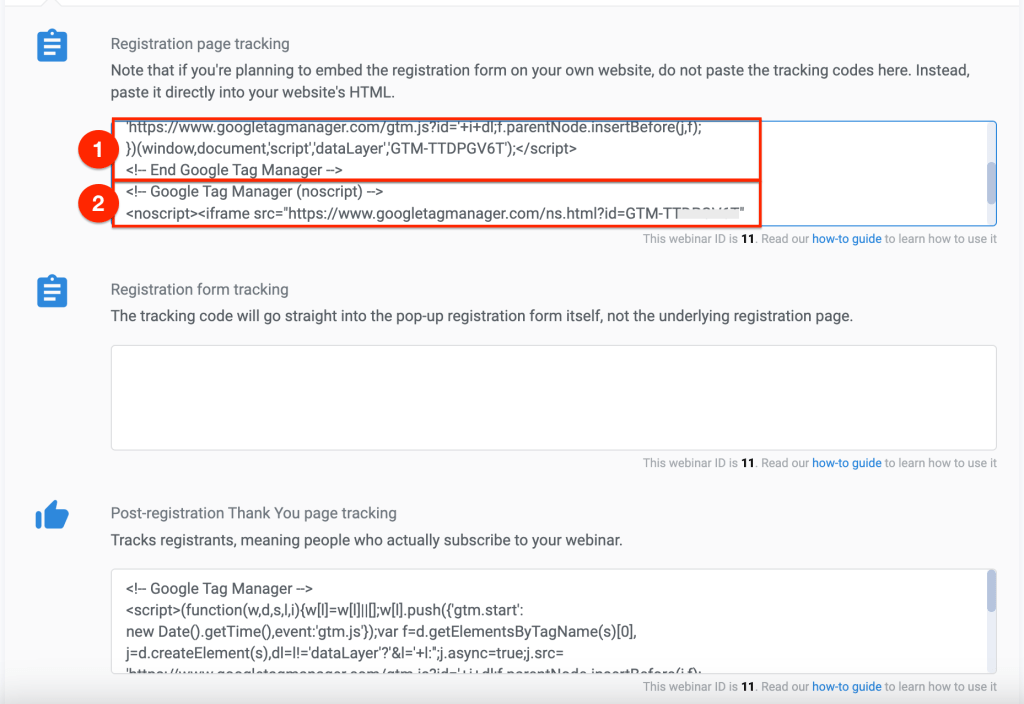
When the setup is complete, Tag Manager will provide you with two code snippets.

Google tag manager container code

Resource: Learn more about Tags, Triggers, and how to install the Meta Pixel using Google Tag Manager

In WebinarJam or EverWebinar

  1. Find the event you want to track
  2. Click Edit to access the webinar configuration
  3. Go to the Integrations step and open the 3rd party tracking systems module
  4. Add both Tag Manager codes to the registration and thank you page fields
    • Paste the code snippets one after the other in the same field. There is no accessible <head> or <body> section to place the codes in.
  5. Add the code snippets to any other fields you wish to track

Tag manager code in the WebinarJam configuration

Add Meta Pixel to Google Tag Manager


Google Tag Manager is a free service provided by Google that organizes tracking codes and other tags in a single container. This allows you to place the container code on your website once and maintain its contents from a Google dashboard.

In this article, you will learn how to create a Google Tag Manager account, add a Meta Pixel code to it, and publish the Tag container.

Create a Tag Manager Account

Follow the instructions from Google Support documentation to create a Tag Manager account and a container for your webinar pages.

  1. Read: Set up and install Tag Manager (Google Support)
  2. Choose the container type Web and AMP

When the setup is complete, Tag Manager provides you with two code snippets. (See the following example)

Google tag manager container code

Close the Install window with no further action.

Create a Trigger

Configure a trigger

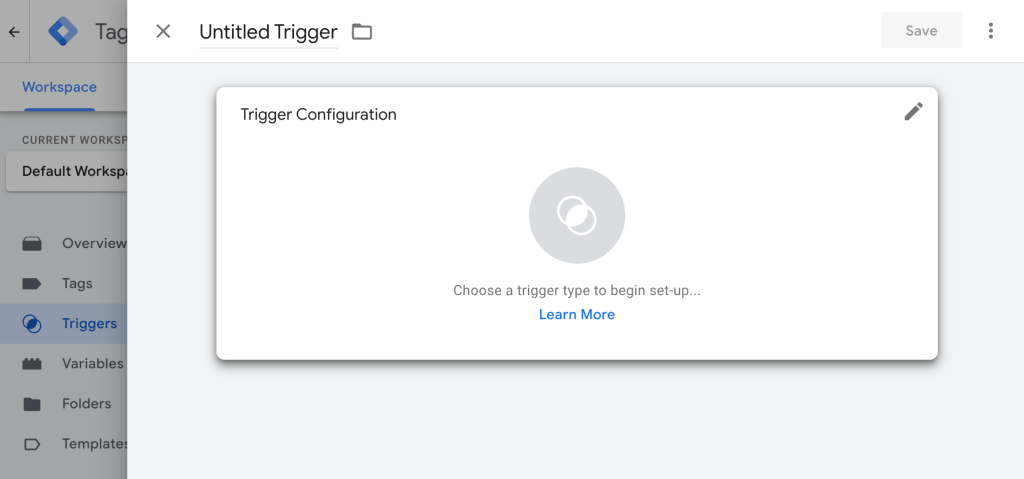
  1. In the Tag Manager workspace, go to Triggers > New
  2. Click anywhere in the configuration module to edit the trigger
  3. Choose trigger type. For this tutorial, select Page View> Page View.

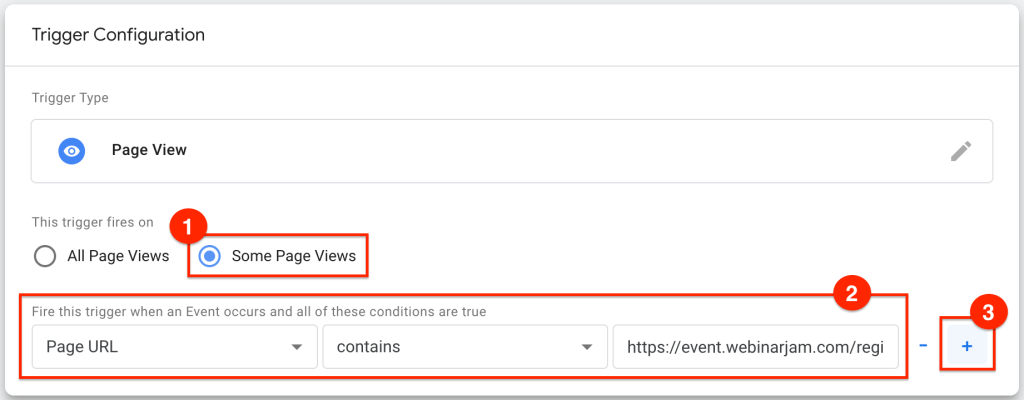
Configure Page URL Event

Tag manager page trigger configuration

  1. Select This trigger fires on Some Page Views
  2. Select Page URL > contains from the trigger conditions drop-down fields
    • Enter https://event.webinarjam.com/registration/thank-you/ in the final condition field
  3. Click the plus icon on the right to add a second rule

Important: The URL specified is correct for both WebinarJam and EverWebinar events. Both applications generate page links at event.webinarjam.com.

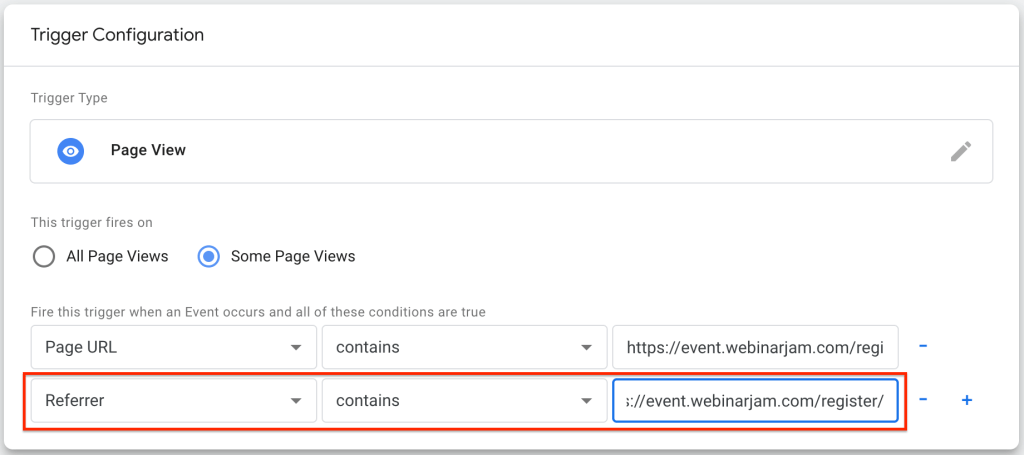
Configure Referrer Event

Tag manager referrer event

Add a second event in the same Trigger Configuration window:

  1. Select Referrer > contains from the trigger conditions drop-down fields
    1. Enter https://event.webinarjam.com/register/ in the final condition field
  2. Name and save the trigger

Important: The URL specified is correct for both WebinarJam and EverWebinar events. Both applications generate page links at event.webinarjam.com.

Add a Tag to the Container

Configure a tag

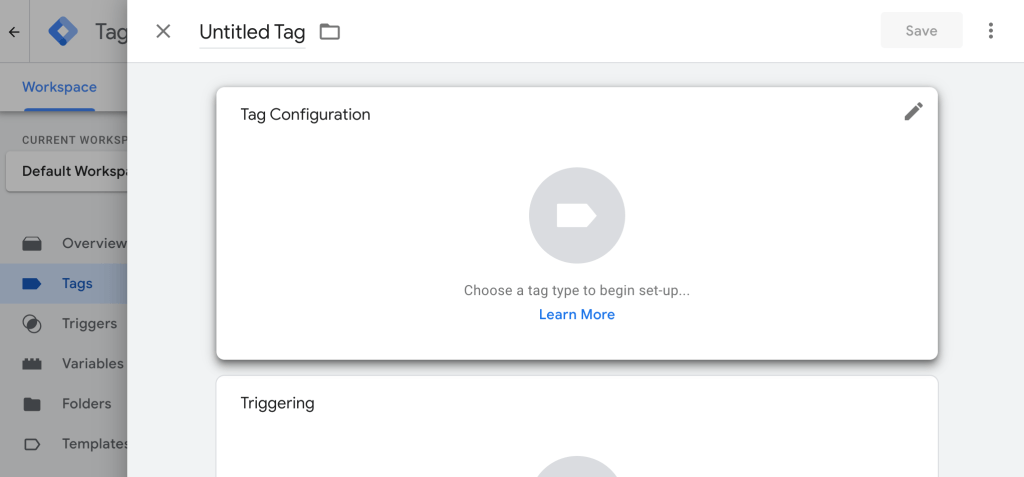
In the Tag Manager workspace, go to Tags > New

Click anywhere in the Tag Configuration box to edit the tag

Meta pixel code in the tag manager

  1. Choose Custom HTML as the tag type
  2. Paste a Meta Pixel or other tracking code into the HTML frame
    • Pro tip: Meta Pixel code is used in this example, but this process is the same to add any other tag or custom HTML you wish to manage in the Google Tag Manager.
  3. In the same Custom HTML window, click Advanced Settings
  4. From the Tag firing options drop-down, select Once per page 

Click anywhere in the Triggering box to select a trigger

Choose a trigger for the tag

  1. Choose the Page View trigger created earlier in this tutorial
  2. Name and save the trigger

Publish Container

To complete the setup and publish your changes, click Submit in the upper right corner of the Google Workspace

  1. Add a version name and description (Optional)
  2. Click Publish

Your own SMTP gateway

This article is for WebinarJam and EverWebinar.

WebinarJam Mail is included with your subscription to deliver notifications and reminders configured for your webinars. If you prefer, integrate a third-party SMTP service to manage your mail.

Note: API-based connections are required to track email analytics such as email opens, clicks, bounces, etc.

Configure Your Webinar

To enable the integrated SMTP service:

  1. Open a webinar and go to Notifications > Your Email Gateway
  2. Select Your own SMTP gateway
  3. Save the module

Repeat this process for any additional webinars you want to update. Each time you create a new webinar, select the integrated SMTP service if preferred.

Email Send-from and Reply-to

Emails sent through the integrated SMTP will be sent from the “Sender Email” address specified in the integration connection settings. The sender address will be used as the send-from and reply-to address for all notifications.

Integration sender name

The name registrants will see as the sender for notifications is the webinar host’s full name. The host is set in the webinar configuration wizard, under Configuration > Webinar presenters.

Test the Integration

Note that WebinarJam/EverWebinar cannot check the status of your SMTP account or the validity of the API credentials provided.

To ensure the deliverability of your webinar notifications, provide a valid API key and keep the integrated SMTP account active. The WebinarJam server will send an outbound API request to your integrated provider using the API credentials provided and ask them to deliver an email notification at the appropriate time.

The WebinarJam server does not receive notice of any failure to reach your SMTP service or deliver the messages. In the event of delivery failure, the emails will not be resent, and you will not be notified. Always run a few tests to ensure your configuration is correctly set up.

Facebook Live

This article is for WebinarJam only.

Important: Facebook Live has changed

As of Monday, April 22, 2024, Meta removed Facebook Group API support for all third-party services including WebinarJam. As of this date, WebinarJam events using Facebook Live as the broadcasting service will no longer stream to Facebook Groups.

Please take action immediately and update any events that are scheduled to broadcast to a Group using Facebook Live on or after April 22, 2024. You can change your streaming service to WebinarJam Live, YouTube Live, or update your Facebook Live connection to stream to a Page instead of a Group.

Configuration step of the setup wizard

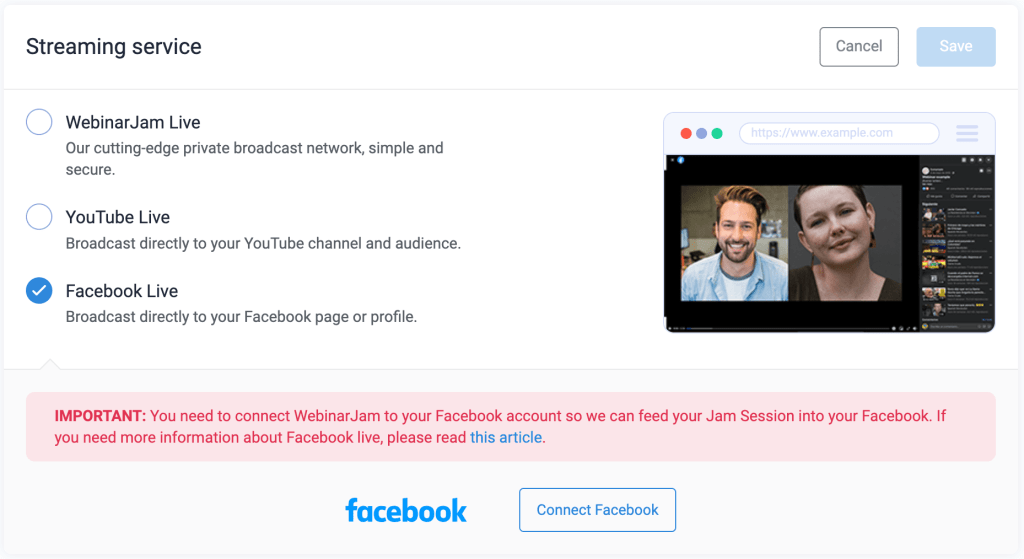
Choose Facebook Live as the streaming service for a live webinar to broadcast directly to a Facebook page or profile.

Facebook Live selection for webinar streaming

Important:

  • Webinars set to stream through Facebook Live will be automatically posted on the chosen Facebook Page. Depending on your privacy settings, this could make the event publicly accessible.
  • Elements configured at the Live step of the webinar wizard are exclusive to the WebinarJam live room. Attendees who watch the webinar from your Facebook page will not see any deployed polls, offers, etc.

Connect to Facebook

  1. In the Configuration step of a webinar setup, open the Streaming service module
  2. Choose Facebook Live and click Connect Facebook
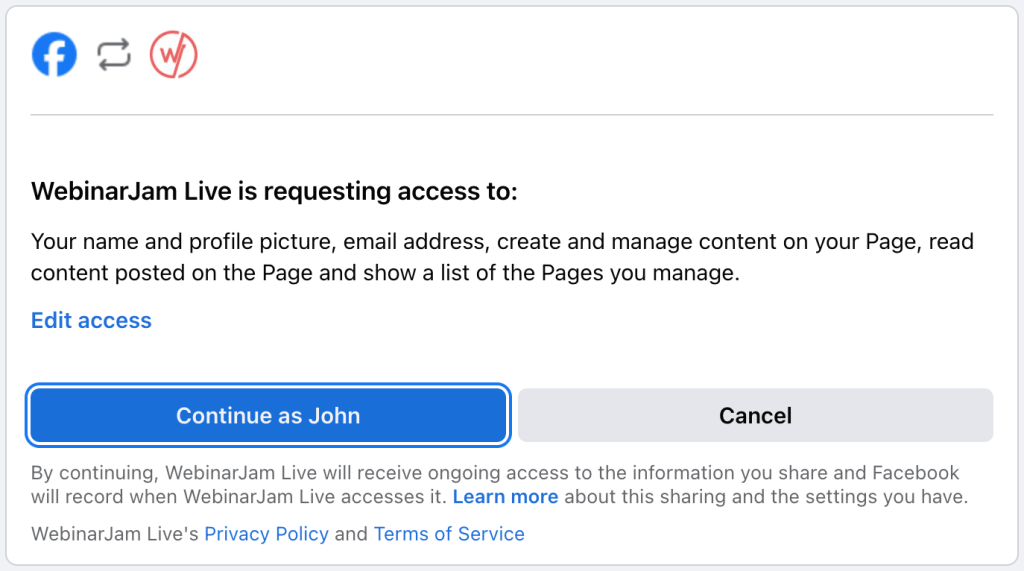
  3. Login to Facebook from the pop-up window. If your browser is already logged in to an account, you will immediately see an access authorization from WebinarJam Live

Authorize a WebinarJam Live connection with Facebook

  1. In the Facebook window, click Edit access to choose the pages where you want to broadcast webinar events
    • Important: Depending on page permissions your account may not be authorized to post videos!  If possible, check your permissions before continuing.
    • Click Continue as [Name]
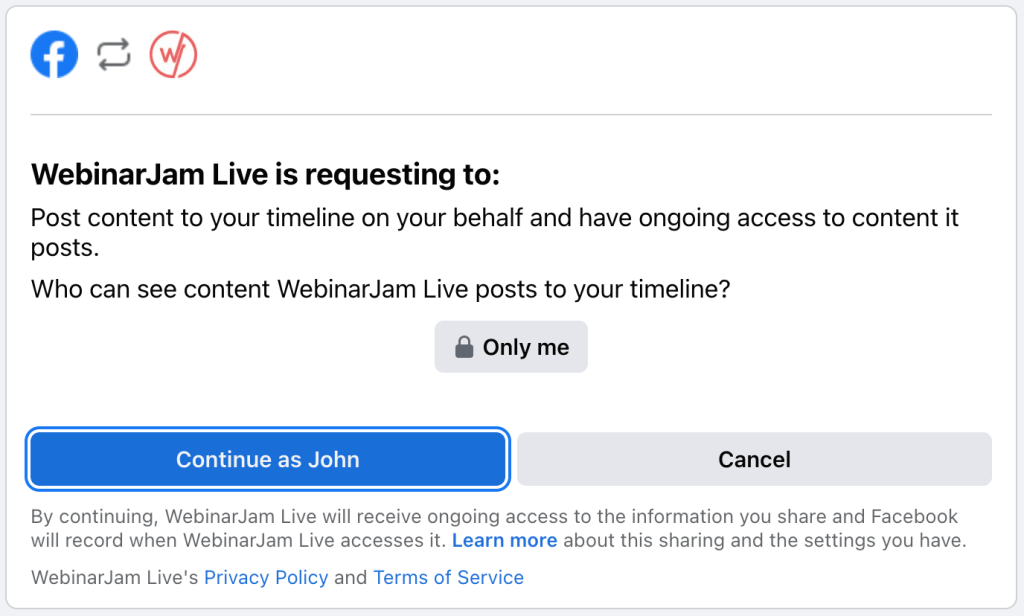
  2. On the next screen, choose who can see WebinarJam live posts in your Facebook timeline

Choose the privacy and visibility for your posts in Facebook

    • If you are testing, choose Only me to restrict post visibility so only you can see broadcasted events
    • Change this to a larger public user selection before going live with your first event
  1. Click Continue as [Name] to complete the Facebook setup
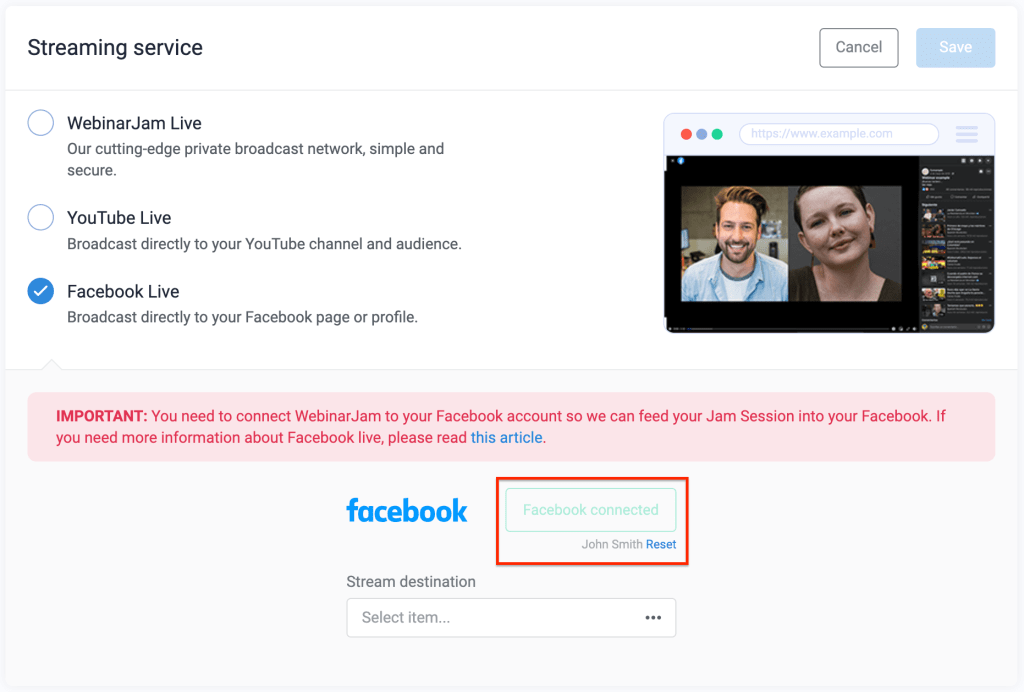
  2. When the connection is complete, a green “Facebook connected” status appears in the webinar setup

Facebook connection successful

    • Click Reset to remove the connected Facebook account from the webinar settings
  1. Select the Stream destination for your broadcast from the drop-down

Edit Facebook visibility or connection

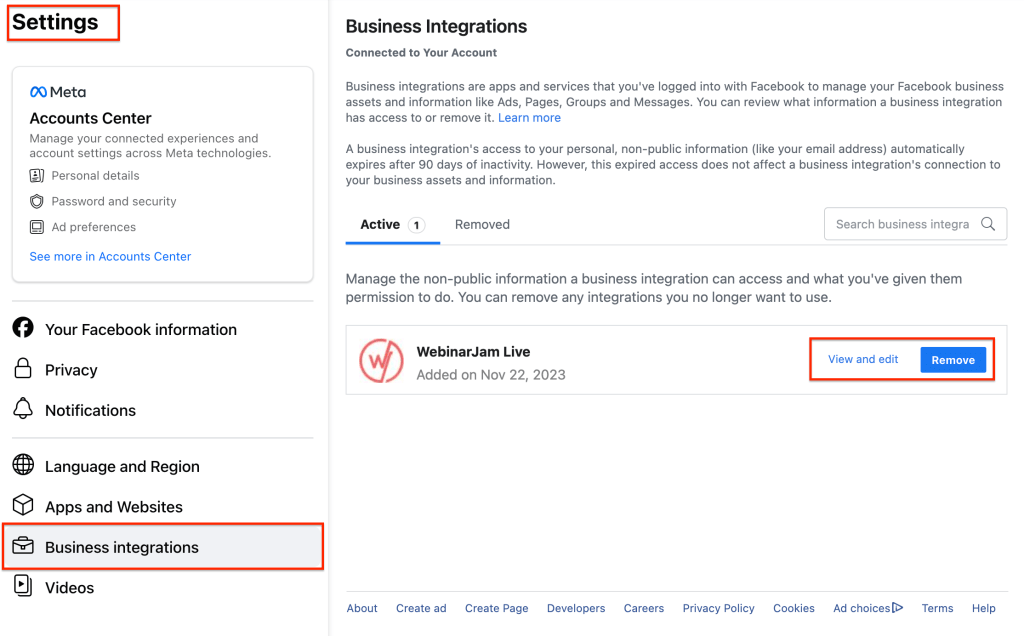
To update the WebinarJam Live connection and settings in Facebook, login to your Facebook account and go to Settings > Business Integrations.

Facebook business integrations controls

To revoke access permission between WebinarJam and Facebook, click Remove. Learn more about disconnecting a business integration from Facebook.

Important: Disconnecting the Facebook account may impact any other webinars that are configured to broadcast to the same account. Double check the configuration for all webinars configured with Facebook Live after resetting a connection to make sure there are no unintended interuptions.
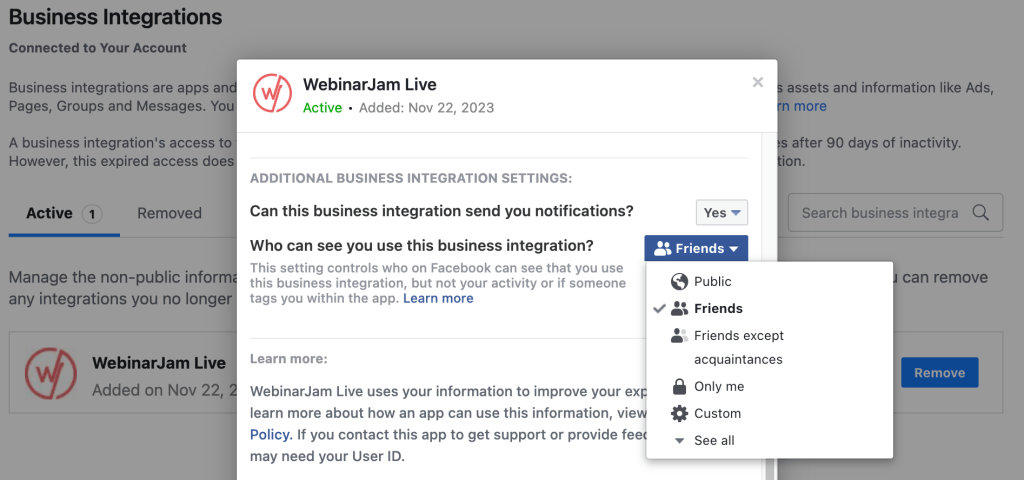
To change the visibility of WebinarJam posts, click View and edit.
Change the visibility of WebinarJam posts

Test a Facebook Live webinar

  1. Launch an event from your WebinarJam account and use the go live button in the room to start broadcasting.
    • Check your privacy! Your test will appear in the destination page according to the visibility set in Facebook.
  2. Go to the page in Facebook where the event is configured to broadcast to confirm that the stream is active.
Important: Using Run a test to test an event with Facebook Live broadcasting may be visible to visitors on your Facebook page. To run a private test in any mode, change the post visibility in Facebook to a private setting before you start the test.

Meta pixel tracking (Facebook)

Tracking codes from a 3rd-party service such as Meta or Google are added to your webinar pages in the setup wizard. You can add unique tracking codes to each page in the webinar funnel: registration page, thank you page, live room, and replay page.

To track page visits in Meta Events Manager, you will complete these steps:

  1. Create a Meta pixel
  2. Add the Meta pixel code to a WebinarJam or EverWebinar event configuration
  3. Create Meta conversion events to define the activities you want Meta to track

You will need access to your WebinarJam account and your Meta Business Events Manager account.


Step 1: Create a Meta Pixel

Log in to Meta Events Manager and connect a data source to create a tracking pixel.

Follow the instructions provided here: How to set up and install a Meta Pixel [Meta Business Help Center]

  1. Select Web as the source type
    1. Enter your website URL or select “I don’t have a website”
    2. Select “Do it yourself”
    3. Select “Meta pixel only”
    4. Select “Install code manually
  2. Copy the base code
    Copy the meta base pixel code
  3. Click through the remaining steps to complete the pixel setup. Go to the Pixel Overview without adding any events.

You will install events using code at the final step of this guide.


Step 2: Add the Meta pixel code to a webinar

Adding the pixel base code lets Meta receive information from your webinar pages. The Meta Events Manager cannot detect activity on any page without the meta base code.

Log in to WebinarJam or EverWebinar and find the webinar you want to track in the event dashboard.

  1. Edit the webinar and go to the Integrations step of the wizard
  2. Open 3rd party tracking systems for editing
  3. Paste the Meta base code in the field for each page you want to track
    Paste the meta base code into the registration page tracking

    • Important: Make a note of the webinar ID number below the tracking code field. The webinar ID will be used to set up tracking for post-registration page visits later in this guide.
  4. Save the module and complete the setup wizard


Step 3: Define Meta Conversion Events

Setting up custom conversions tells Facebook what kind of activity you want it to detect on a page with the meta base code.

The configuration for your Custom Conversion varies slightly depending on whether you want to track registration page visits or a visit to a post-registration page (such as the thank you page, live room, or replay page).

Go to the Meta Events Manager to begin.

Track Registration Page Visits

  1. Create a new Custom Conversion
  2. Add a name for the conversion (example: Registration page visit)
  3. Add a description if desired
  4. Select the data source you just created to add the pixel code to your webinar
  5. Under Rules, select URL equals
  6. In the URL keywords field, paste the full URL of your webinar registration page
    • Find this under Your Links in your WebinarJam account
  7. Click Create to save

Track Thank You, Live Room, and Replay Page Visits

  1. Create a new Custom Conversion
  2. Add a name for the conversion (example: Replay page visit)
  3. Add a description if desired
  4. Select the data source you just created to add the pixel code to your webinar
  5. Under Rules, select URL contains
  6. In the URL keywords field, paste a string containing ONLY the base URL and webinar ID for your event (see below for more information)
  7. Click Create to save

Meta conversion tracking configuration

How to find the correct value for URL keyword Rule

The URLs for the pages associated with a webinar consist of three different elements: the base URL, the Webinar ID, and an encrypted string.

The complete page URLs look something like this:

  • Thank you page: https://event.webinarjam.com/registration/thank-you/WEBINAR-ID/UNIQUE-ENCRYPTED
  • Live room: https://event.webinarjam.com/live/WEBINAR-ID/UNIQUE-ENCRYPTED
  • Replay room: https://event.webinarjam.com/replay/WEBINAR-ID/UNIQUE-ENCRYPTED

Individual elements:

  • Base URL: event.webinarjam.com/registration/thank-you/
  • Webinar ID (numeric): XXXX
  • Encrypted string: YYYYYYYYYYYY (unique for each registrant)

Because the encrypted string is unique for each registrant, it cannot be used in any general-use tracking code. If a page URL is required for your setup, use the base URL and webinar ID only.

The webinar ID in found in the webinar wizard at the Integrations > 3rd party tracking systems step under each tracking code field.

In the example above, the webinar ID is 62.

For the webinar in the example above, the URLs will be:

  • Thank you page: https://event.webinarjam.com/registration/thank-you/62/UNIQUE-ENCRYPTED
  • Live room: https://event.webinarjam.com/live/62/UNIQUE-ENCRYPTED
  • Replay room: https://event.webinarjam.com/replay/62/UNIQUE-ENCRYPTED

When your links have been defined, create Custom Conversions for the pages you want to track with the Meta Pixel.

Configure the events to track any URL that contains the fixed part of your webinar URL. For example:

  • event.webinarjam.com/registration/thank-you/5/

Do not include the HTTPS:// or the placeholder for the encrypted string (“UNIQUE-ENCRYPTED“). Instead of entering the full URL, set the event to track any URL that “contains” just the fixed aspects of the page address.

© 2024 WebinarJam All Rights Reserved