WebinarJam and EverWebinar User Documentation Webinars for everyone!

Test EverWebinar

This article is for EverWebinar.

Testing an automated EverWebinar event involves checking the registration process and all pre-configured elements to make sure everything works correctly. There is no live broadcast element in EverWebinar, so no camera, audio, or connection checks are needed.

Test Registration and Emails

Check the registration page, confirmation page, survey (if configured), and notification emails.

  1. Use the attendee registration link for your event to go to the registration page
    • Find the registration link in Your Links > Attendees
    • Review the format and messaging on the page
  2. Register for the event using a valid email address
  3. You will be automatically redirected to the confirmation page
    • Review the format and messaging on the page
    • If a survey is configured, open it and submit a test
  4. Check your email to see the pre-webinar confirmation email with your unique webinar access link

Test Webinar Room

Log in to the webinar room and test the video playback, messaging, and any configured injections.

  1. When the webinar is scheduled to begin, use the access link in the confirmation email to go to the countdown page
  2. Enter the room and click to start watching the broadcast
  3. Enter messages in the chat to test the live chat or question box (if enabled)
  4. Watch the entire webinar and check any injections that are configured to appear (polls, offers, etc.)
    • Make sure the timing is correct for all injections
    • Interact with the injections. If an offer is configured, test the complete purchase process.

Test Replay

If a replay is enabled for the webinar, test the post-webinar follow-up email and the direct access link to the replay room.

  1. Check your email for the post-webinar email containing a link to the replay (if enabled)
  2. Enter messages in the chat to test the question box (if enabled)

Testing Tips

Every function of your webinar should be tested before you launch it to your prospects. This article covers many scenarios, but it is recommended that you create your own custom testing checklist to ensure that every aspect of the setup works exactly as designed.

For example:

  • If you have Zapier automation configured for your webinar, test every trigger event for your Zaps.
  • If you are using a custom SMTP or autoresponder and automation rules, test all related scenarios to ensure your automation rules fire correctly and email notifications contain the correct information.
  • If you are using one-click registration, test the sign-up flow by registering through an email sent from your auto-responder.
  • If a product offer is configured to appear in the webinar, test the purchase flow and successful sales goal tracking
  • Check the event analytics after your test to see how your activity as an attendee was recorded

The ultimate goal of testing is to make sure that everyone engaging with your content has an excellent experience. Put on your customer glasses and take a close look at every detail!

EverWebinar broadcast source

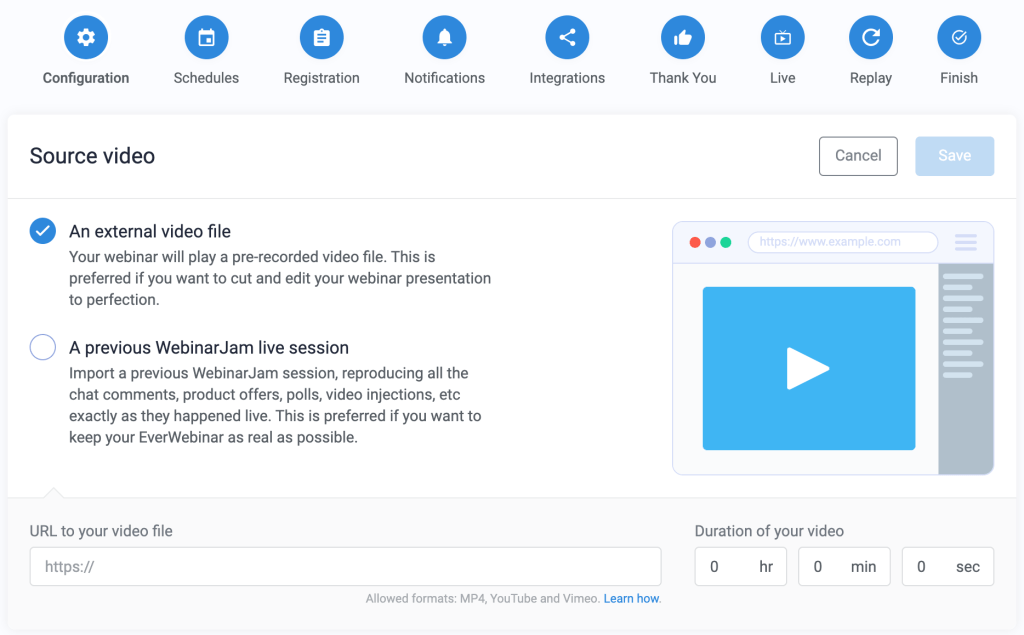
EverWebinar uses a pre-loaded source video as the primary content for a webinar broadcast. The first step of the EverWebinar configuration wizard is to select the source video.

EverWebinar source video

External Video File

Use an external video file to load a production video or a replay from another webinar platform. Supported external hosts are YouTube, Vimeo, and any cloud service that provides a direct MP4 link for playback.

Learn more:

WebinarJam Live Session

Use a previous WebinarJam live session to rebroadcast an event you hosted live in the past. Reusing a previous session from WebinarJam is an easy plug-and-play option that automatically populates many of the settings from the original WebinarJam event (including the chat!) for use in the new automated event.

Pro Tips:

  • The WebinarJam session must be hosted in the same account as the new EverWebinar event
  • To import a session, an active WebinarJam subscription is required. Your EverWebinar configuration cannot retrive a session from an inactive WebinarJam catalog.

Getting Started with EverWebinar

EverWebinar: Automated Webinars

EverWebinar automates your events, so you can serve your message to anyone, anywhere, at any time.

Use EverWebinar when: You have content you want to share or monetize without hosting a new event many times over. Automated webinars are ideal for content that has longevity and will be relevant for a wide variety of viewers for a significant amount of time.

Pro tip: Use EverWebinar automated events to reach international audiences in time zones where you would have trouble connecting live.

Take Note

You will need a prerecorded video for the main content of the webinar. This could be a replay from an earlier event or recording produced and edited in a studio. To be used as the source for an EverWebinar event, the video must be hosted on WebinarJam, YouTube, Vimeo or a cloud-based host that offers MP4 direct link access.

Content Pre-check

Prepare your content before starting the webinar setup to streamline the process! You can also add these details later.

✓ Video source for the main webinar (link to a previous WebinarJam session or direct URL to a cloud-hosted video)
✓ Names and email addresses for all presenters (Required)
✓ Headshots or other profile images for presenters (Optional)
✓ Schedule for viewing access (including any blackout dates) (Required)
✓ Details of any product offer (Optional)
✓ Elements of a poll or quiz to display (Optional)
✓ Optimized handouts to share (Optional)
✓ Timestamp for each injection in the webinar (when offers, polls, videos, etc. will display)


1. Create a Webinar

EverWebinar events use a pre-recorded source video and timed injection events to give attendees the experience of attending a live event. In the schedule configuration, allow immediate access to the automated webinar or limit registrants to pre-set days and times when the event will play.

Launch the EverWebinar app in your account:

  1. Go to Webinars and click + Add webinar
  2. Set the source video for the event and complete each step of the configuration wizard

The webinar source video is the primary broadcast content of the webinar. It is the presentation your registrants will see when they enter the webinar room. The source can be a previous WebinarJam live session or an external video file hosted on a third-party platform.

EverWebinar source video

Learn more about the EverWebinar setup


2. Test the Webinar

Run a test to ensure every element of the webinar is in place before starting to promote it.

Recommended testing

  • Test registration sign-up process
  • Test email notifications and reminders
  • Log in to the webinar room and watch to confirm that all configured live elements trigger at the correct time
  • Capture analytics, chat history, and a replay recording
  • Watch the replay and submit a question in the chat

Learn more


3. Share Registration and Access Links

EverWebinar automated events dashboard

In Webinars:

  1. Click the Your links button
  2. Click between the Attendee and Presenter tabs to find access links for the appropriate user

Attendees

  • Under Link to the registration page, copy the link to share it
    • Use the registration link for all webinar schedule types to ensure correct analytics

Presenters and moderators

  • Each presenter has a unique access link that is for their use only
  • Copy each unique access link to share them directly
    • Click the envelope icon to send the access link in an email
  • Copy and share the moderator link to give access to the Control Panel instead of the Live Room

Learn more


4. Replay and Analytics

After the event, you can retrieve several types of records and analytics.

Traffic, engagement, sales, and notification email analytics

Registrant contact details, attendance, and other data related to specific attendees

Replay link and download

  • Go to Webinars > Your links
  • Note: Just-in-Time sessions are generated on demand and do not appear in the replay download options.

Chat download, poll results, survey results, and pending questions in the replay room

Learn more

Scheduling EverWebinar

This article is for EverWebinar only.

Create the Automated Broadcast Schedule

Important: Do NOT edit a webinar schedule after attendees have already registered for the event. Editing the schedule resets the unique access link for each registrant, so the link sent in their original confirmation email will not work.

Enabling Just-in-Time or Instant Replay creates on-demand schedules for your webinar.

Disabling either option deletes the on-demand schedule and all related files and analytics. If an attendee has already viewed the webinar through an on-demand option, all records for those sessions will be lost. Instead of disabling Just-in-Time or Instant Replay for an existing webinar, create a new webinar configuration and switch registration promotions to the new event that does not have on-demand access.

Go to the Schedules step of the webinar configuration webinar.

Create one or more schedules for the webinar:

  1. Set the date and time of the broadcast. Choose:
    • On a specific date and time
    • Every day or every week at a specific time
  2. Click Add to create the series. Add additional schedules if desired.

Fixed time zone

Select a time zone and location from the drop-down field to create the schedule in a fixed time zone. If enabled, registrants can convert the schedule availability to their own time zone on the registration page.

  • Note: Multiple time zone locations may appear on the registration page when a fixed time zone is selected. This is because the schedule displays all locations that fall in the same GMT+ zone as your selection. For example, The GMT/UTC+3 hours offset is shared by countries on three continents: Europe, Africa, and Asia.

User’s own time zone

Select The user’s own time zone for the schedule to enable time zone auto-detection. In this mode, scheduling and registration information is shown in a potential registrant’s local time zone so they can easily choose the best time.

Note: The time zone selection you make for the first series in a webinar schedule locks all additional series to the same choice. In other words, if the first series is set to the user’s time zone, all additional series in the same webinar will also be displayed in the user’s time zone.

Registration Page Options

Allow time zone conversion

Visible only if a fixed time zone is selected for the webinar schedule. Enabling time zone conversion lets registrants see the time of your event in their local time zone for a more user-friendly experience.

Instant watch replay

Enable this option to display a, “Watch the replay now!” link on the registration page in addition to the other schedule options. Clicking this link takes the attendee to watch the replay immediately.

  • Important: Enable the replay session at the Replay step of the configuration wizard to enable access to a replay broadcast.

Allow late attendance

Enable this option to allow visitors to join a webinar that is already “in progress.” When attendees enter the “live” room, the webinar will auto-forward to the correct time stamp.

  • Example: The automated broadcast is configured to begin at 10 am. Allowing late attendance lets a user enter the session at 10:10 am and the broadcast will skip forward 10 minutes to simulate joining a live webinar.

Just-in-Time

Just-in-Time is on-demand scheduling that shows potential registrants a session “starting very soon,” regardless of when they visit the page. Display sessions at 15, 30, and 60-minute intervals:

  • Every :15, :30, :45 or :00 (15 minutes)
  • Every :30 or :00 (half hour)
  • Every :00 (hour)

Hide night time schedules

For Just-in-Time registration, choose Hide night time schedules to create the appearance of a regular working schedule. If someone visits your registration page at 2 am (and you have blocked schedules from 11 pm-7 am) the next available session will be the following day.

Displayed schedules

Define the schedules displayed on your registration page under Displayed Schedules. From the drop-down menu, choose how many available schedules to display to visitors at one time.

Important: If Just-in-Time / Yesterday’s Replay is selected for the displayed schedule and neither option is enabled in the webinar configuration, the webinar will not show any available registration times.

Block short-term registrations

Prevent attendees from registering last minute, up to 6 days in advance.

Block dates

Add holidays or any other days you want to exclude from the webinar broadcast schedule. Viewers will not be able to register for these dates.

EverWebinar Chat CSV formatting

This article is for EverWebinar.

Upload a CSV file to quickly add many lines of chat messages to an EverWebinar event.

In the webinar configuration wizard:

  1. Go to the Live step
  2. Open the Live chat box module and click Enable live chat
  3. Configure the chat options to create the ideal attendee experience
  4. At the bottom of the module, click Import from CSV to upload a file with multiple chat lines
    • Alternatively, enter chat lines one at a time using the fields in the setup wizard
Pro tip: Download the chat file from a WebinarJam live event and upload it. The WebinarJam CSV is correctly formatted for import into EverWebinar.

CSV Formatting

Resource: Download a CSV Chat Template

CSV file must contain only 7 columns containing chat message values. Each row in the CSV file represents a new chat message.

  • Hour: Number between 00 and 07
  • Minute: Number between 00 and 59
  • Second: Number between 00 and 59
  • Name: Name of the person
  • Role: Admin or Attendee
  • Message: The actual chat comment
  • Mode:
    • If role is Attendee: Chat, Question, or Answer
    • If role is Admin: Chat, Question, Answer, Highlighted, or Tip

Example of the correct format:

When the spreadsheet is complete, export or save it as a CSV file with UTF-8 encoding before uploading to EverWebinar.


Maximum Chat Lines

The maximum number of pre-loaded chat lines is 5,000, or 1 MB for a CSV file upload. This limit ensures a good experience for attendees by preventing high demands on the webinar room to load the chat.

In a custom chat file, do not exceed 5,000 lines or 1 MB in file size.

If WebinarJam live is used as the source file for the EverWebinar, the system will not auto-import a chat file that exceeds 5,000 lines. You will see an error message informing you that the chat was not imported.

To resolve this and get a usable chat file:

  • Go back to WebinarJam and download the chat history for the live webinar you imported.
  • Open the downloaded CSV file and manually delete chat lines until there are less than 5,000 lines. Save the file and confirm that it’s under 1 MB (delete more lines if needed).
  • Go back to EverWebinar and the Live step of the wizard. Upload the new CSV file as described in this article.
Pro tip: If you activate the “Save real comments” option, real chat lines will be added to the EverWebinar session until it reaches the limit of 5,000 lines of chat. Any additional lines will be ignored.

Register a person to a specific webinar

  • Method: register
  • Type: POST
  • Complete URL: https://api.webinarjam.com/everwebinar/register


The request must include all of the required fields, based on the table below:

Name Value
api_key* string(64)
webinar_id* {+} integer
first_name* string
last_name*** string, optional
email* string
schedule* {+} int
ip_address string, optional
phone_country_code*** string, optional, with “+”
phone*** string, optional, only numbers
timezone {-} Examples: GMT-5 or GMT+2 or GMT+4:30
date **** 2025-01-01 09:00

* Required fields
** Required if your webinar timezone is set to “Auto-detect the user’s time zone”.
*** This field might be required depending on the configured settings for each webinar
{+} The webinar_id and schedule must be obtained from a previous API call to retrieve the details of whatever specific webinar you want to register the person to. Also, please note that one particular schedule ID might refer to an entire series of webinars, and thus all individual webinar sessions within the same series will have the same schedule ID. In order to pin-point the specific individual session within a series, refer to the DATE parameter.
{-} For webinars configured to display the schedule in the attendee’s own time zone, the API will automatically convert the time zone to EST, unless you specify a particular time zone in your API call.
**** Use the DATE parameter to register a person to a specific webinar session date. Make sure it matches a valid date returned by a previous API call, or else the API will not be able to register the user to any event at all. Also, if the call was made using a custom timezone, make sure that the same timezone is passed with the request.


The response body will be a JSON object containing a user object with the following:

Name Value Description
webinar_id int Webinar ID
webinar_hash string Webinar Hash
user_id int Attendee Internal ID
first_name string Attendee Name
last_name* string Attendee Last Name
phone_country_code* string Attendee Phone Country Code
phone* string Attendee Phone Number
email string Attendee Email
password* string Attendee unique password to the room
schedule int Attendee Schedule
date string Webinar date and time
timezone string Webinar timezone
live_room_url {+} string Live Room URL
replay_room_url {+} string Replay Room URL
thank_you_url {+} string Registration Success URL

{+} live_room_url, replay_room_url and thank_you_url are unique to each attendee
* These fields will only be returned if they are enabled within the webinar’s configuration settings


Example CURL request:

curl --data "api_key=demokey&webinar_id=6&first_name=FirstName&last_name=LastName&[email protected]&phone_country_code=+1&phone=1234567890&schedule=55" https://api.webinarjam.com/everwebinar/register


Example return:

{
    "status": "success",
    "user": {
        "webinar_id": 6,
        "webinar_hash": "uvw1234",
        "user_id": 1234567,
        "first_name": "FirstName",
        "last_name": "LastName",
        "phone_country_code": "+1",
        "phone": "1234567890",
        "email": "[email protected]",
        "password": null,
        "schedule": "55",
        "date": "2024-01-05 12:00",
        "timezone": "America/Los_Angeles",
        "live_room_url": "https://event.webinarjam.com/go/live/6/ab1cd2ef3",
        "replay_room_url": "https://event.webinarjam.com/go/replay/6/ab1cd2ef3",
        "thank_you_url": "https://event.webinarjam.com/registration/thank-you/6/ab1cd2ef3gh4"
    }
}

Get details about one particular webinar from your account

  • Method: webinar
  • Type: POST
  • Complete URL: https://api.webinarjam.com/everwebinar/webinar


The request must include all of the required fields, based on the table below:

Name Value
api_key* string(64)
webinar_id* integer
timezone ** GMT-5 or GMT+2 or GMT+4:30

* Required fields
** Required if your webinar timezone is set to “Auto-detect the user’s time zone”.
** For webinars configured to automatically display the schedule in the attendee’s own time zone, the API will automatically convert the time zone to EST if the time zone is not passed to the API call.


The response body will be a JSON object containing a webinar object with the following:

Name Value Parent Description
webinar_id integer Webinar ID
name string Webinar Name (Private)
title string Webinar Title (Public)
webinar_hash **** string Webinar Hash
description string Webinar Descirption
schedules array
date string schedules Date and time of webinar
schedule int schedules Schedule ID
comment string schedules Schedule description
timezone string Webinar timezone
presenters array Presenters
name string presenters Presenter Name
email string presenters Presenter Email
picture string presenters Presenter Image URL
registration_url string Registration URL
registration_type string paid / free
registration_fee int Registration Fee
registration_currency** string Registration Currency
registration_checkout_url** string Registration Checkout URL
registration_post_payment_url** string Registration Post Payment URL
direct_live_room_url*** string Direct URL to the Live room
direct_replay_room_url*** string Direct URL to the Replay room

** This field will be returned only if they are enabled within that particular webinar configuration settings
*** These are generic links to the Live and Replay room, in case you want to send a user directly to those rooms without going through the Registration page
Note: The number of returned schedules will match “Displayed schedules” setting from the EverWebinar schedules configuration for each webinar
**** webinar_hash: this parameter is used in case you want your API to be able to generate the webinar’s one-click registration link.


Example CURL request:

curl --data "api_key=demokey&webinar_id=6" https://api.webinarjam.com/everwebinar/webinar


Example return:

{
    "status": "success",
    "webinar": {
        "webinar_id": 6,
        "webinar_hash": "uvw1234",
        "name": "Demo6",
        "title": "Demo6",
        "description": "My automated webinar",
        "schedules": [
            {
                "date": "2024-01-04 12:00",
                "schedule": 54,
                "comment": "Instant replay"
            },
            {
                "date": "2024-01-05 12:00",
                "schedule": 55,
                "comment": "Just in time"
            },
            {
                "date": "2024-01-05 13:00",
                "schedule": 56,
                "comment": "Every day, 01:00 PM"
            }
        ],
        "timezone": "America/Los_Angeles",
        "presenters": [
            {
                "name": "John Doe",
                "email": "[email protected]",
                "picture": "https://test.s3.amazonaws.com/default_user.jpg"
            }
        ],
        "registration_url": "https://event.webinarjam.com/register/6/uvw1234",
        "registration_type": "free",
        "registration_fee": 0,
        "registration_currency": "",
        "registration_checkout_url": "",
        "registration_post_payment_url": "",
        "direct_live_room_url": "https://event.webinarjam.com/go/live/6/uvw1234ab12",
        "direct_replay_room_url": "https://event.webinarjam.com/go/replay/6/uvw1234ab12"
    }
}

Retrieve a full list of all webinars published in your account

  • Method: webinars
  • Type: POST
  • Complete URL: https://api.webinarjam.com/everwebinar/webinars


The request must include all of the required fields, based on the table below:

Name Value
api_key* string(64)

* Required fields


The response body will be a JSON object containing an array of webinars. Each webinar object will contain:

Name Type Description
webinar_id integer Webinar ID
webinar_hash * string Webinar Hash
name string Webinar Name (Private)
title string Webinar Title (Public)
description string Webinar Description
schedules array Empty for right now
timezone string Webinar timezone

* webinar_hash: this parameter is used in case you want your API to be able to generate the webinar’s one-click registration link.


Example CURL request:

curl --data "api_key=demokey" https://api.webinarjam.com/everwebinar/webinars


Example return:

{
    "status": "success",
    "webinars": [
        {
            "webinar_id": 9,
            "webinar_hash": "tuvw1234",
            "name": "Demo6",
            "title": "Demo6",
            "description": "My automated webinar",
            "schedules": [
                "Instant replay",
                "Just in time",
                "Every day, 01:00 PM",
                "Every Monday, 02:00 PM",
                "Saturday, 6 Jan 2024, 03:00 PM"
            ],
            "timezone": "America/Los_Angeles"
        }
    ]
}

Connecting to EverWebinar API

Welcome to the EverWebinar API!

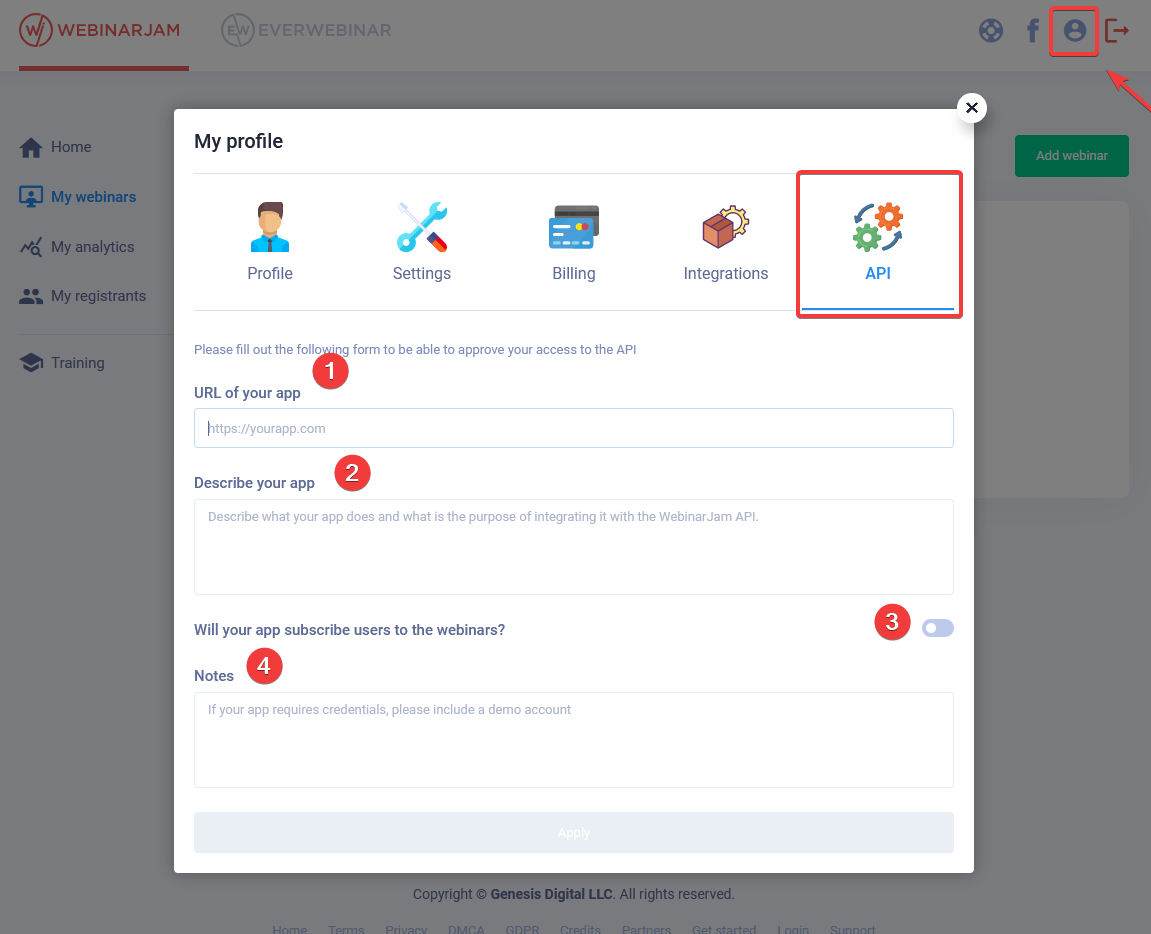
In order to integrate with our API, you will first need to apply for approval in your Profile section.  In the below screenshot please fill out the following information:

  1.  The URL of your app.  This will be either the URL of the software you’re writing to use our API, or the URL of a third-party app that uses our API, like Zapier.
  2.  A description of what your app will do with the WebinarJam API.
  3.  Whether or not your app will subscribe users to your webinars.
  4.  Any notes pertaining to your app.  This can include login credentials to a demo account or any other information that may be useful.

You should receive a response within 48 hours from submission.  After that, view the rest of this article to integrate with our API.

Please take note of the few bullet points below before digging into the actual technical articles:

  • Our API endpoint URL is https://api.webinarjam.com/everwebinar
  • You’re required to connect to our server from a SSL secure connection. Non SSL connections will be dropped.

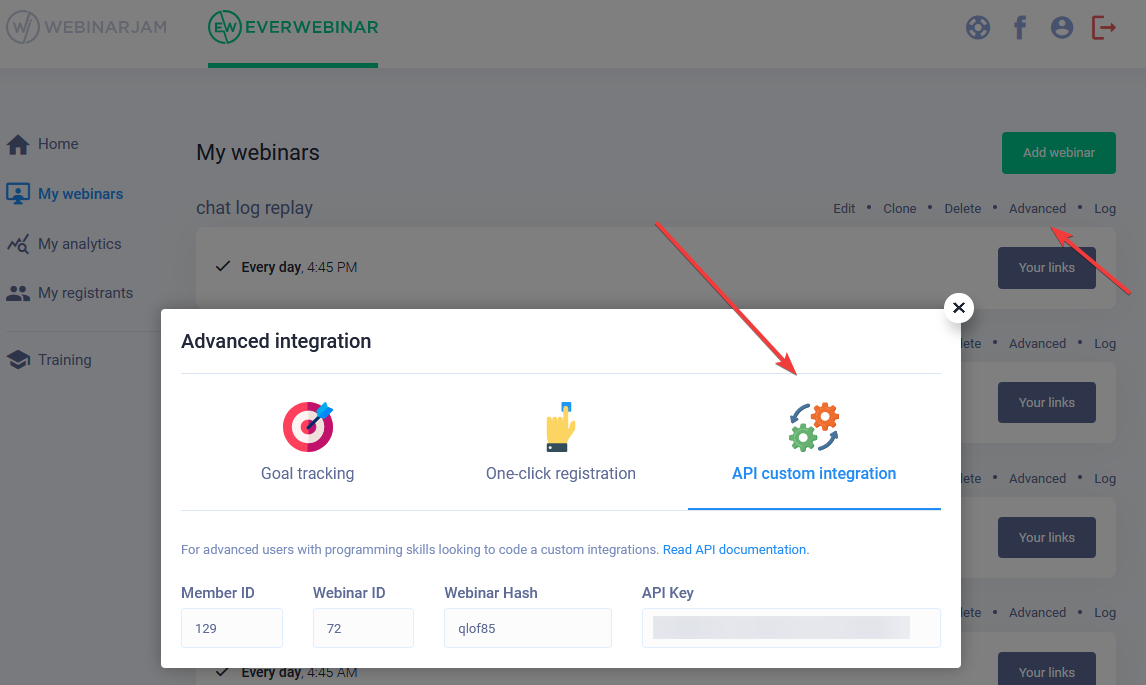
Your API Key can be found in your main webinar dashboard, by clicking on the Advanced link for any of your webinars. You don’t need a new API Key for each webinar, since the Key is global for your entire account.

For users subject to GDPR requirements (mostly European users), and since our API can potentially subscribe users to your webinars without their manual input, it’s your responsibility to make sure that…

  • They have granted you permission to handle their personal data.
  • They have agreed to be subscribed to your webinars.
  • They have granted you permission to communicate with them in the future.


Finally, it’s important to note that our API system has a hardcoded limit of 20 API calls per second per user. That means that your script should not send more than 20 API calls per second to our API endpoint. If that limit is exceeded, the system will return a “Too many requests” error message (429 error), upon which you should wait 1 second and re-try the instruction again.

We strongly recommend you to implement in your scripts a queue system that throttles your outbound API calls to a maximum rate of 20 calls per second. That way, if your script goes through a burst of activity, it will pro-actively queue up the outbound calls and process them in a first-in-first-out sequential order, so they never go beyond the limit. It’s better to hold them back for a second or two than to get them error’ed out!

© 2024 WebinarJam All Rights Reserved