WebinarJam and EverWebinar User Documentation Webinars for everyone!

Email Sender Authentication

This article is for WebinarJam and EverWebinar.

WebinarJam Mail is the sending service for both WebinarJam and EverWebinar events. Follow this series for all webinar event types.

Authenticating an email sender domain means creating and publishing three types of DNS records: DKIM, SPF, and DMARC. This article series will teach you the basics of each record type and how to implement them. All three record types must be published for each domain you use to send email messages.

Email sender authentication protocols help prove the legitimacy of your email messages and increase the odds that your message will land in a recipient’s inbox.

Adding sender authentication to WebinarJam and EverWebinar ensures that the emails containing event notifications and reminders (confirming sign-up, providing access links, and sending replays) reach your registrants. This is important for maximizing attendance rates at your events, making authentication highly recommended to ensure registrants receive these notifications.

To authenticate an email sender domain for WebinarJam Mail, follow this checklist to add your email domains to your WebinarJam account and update your Domain Name System (DNS) records.

Important: If you use an integrated CRM to send notifications and reminders for your webinars, contact the CRM service to find out how to authenticate your domains for their platform.


Sender Authentication Checklist

1. Add a custom domain email to your webinar configuration

A custom domain email address adds legitimacy to your business communications and can improve your deliverability. Contact your domain provider to create an email address and then add it to the host details for your webinar at the first configuration step.

The custom sender domains entered for the primary host presenter in WebinarJam or EverWebinar are the ones you will authenticate through the rest of this list.

2. Add the business domain to your WebinarJam / EverWebinar account to create DKIM records

Connect your email sender domain(s) to WebinarJam / EverWebinar to generate DKIM records and start the authentication process.

3. Add the auto-generated DKIM records to your business domain DNS

Copy the DKIM records generated by your WebinarJam account and add them to your custom email DNS settings to complete the authentication loop between WebinarJam and your domain.

4. Add or update an SPF record to your business domain DNS (integrated SMTP users only)

Update the SPF record for your domain to designate WebinarJam as a service authorized to send mail on your behalf.

Important: If you use the default WebinarJam Mail service, the SPF reference is automatically provided as part of the DKIM records you set up in the previous step. Skip this step unless you use an integrated SMTP to send webinar notifications.

5. Add DMARC records to your business domain DNS

Add a DMARC policy to monitor DKIM and SPF alignment of messages sent with your domain and set up reporting so you stay informed.

6. Test your updates!

Use the tools provided in each resource linked in this article to test and check each piece of the authentication puzzle. There are lots of free and paid resources available online that can help you create, check, and monitor the authentication protocols for your email domains.

Important

Email sender authentication must be performed for each domain you use to send your emails (the email address listed for each primary presenter in a webinar). If you use new email address domains for webinar hosts in the future, this checklist must be completed again to authenticate the new domain(s).

Test WebinarJam

This article is for WebinarJam.

Testing a live WebinarJam event involves checking the registration process, the live room features, and your audio and video connections.

Two types of testing are recommended: a soft test and a cloned live test.


Run A Test

The Run a test tool lets you perform a soft test of your webinar configuration to make sure the setup is complete and presenters can access and understand the broadcast room.

Run a test webinar feature

Run a test launches a low-performance test of the webinar broadcast room and features. This method is intended to help you get familiar with how to enter the room and use the controls inside. Because it is only a test environment, WebinarJam does not allocate full database resources to run it. This mode should never be used to host a live audience, as it will result in poor streaming quality for attendees and will not provide you with analytics or engagement data.
  1. In Webinars, click Run a test
  2. Use the attendee or presenter links to launch the live room
  3. Presenters will be prompted to check their audio and video settings
  4. In the live room, check all settings you intend to use:
    • Go live to start a test broadcast
    • Room settings and customization
    • Changing presenter permissions
    • Injections like polls or product offers
    • Screenshare and whiteboard

Browse the live room to see all the menu options and settings available.

Note: The test attendee and presenter links reset each time Run a test is launched. If you close the room and start a new test, distribute the new access links to any other users participating in the test. Links from a previous test will no longer function.

No data is saved from a test webinar. Complete a cloned test to test the chat history, poll results, attendee analytics, or replay playback.

If the soft test was successful and any necessary changes for the webinar configuration are complete, move on to a cloned test to check the full webinar experience.


Clone the Webinar

Cloning the webinar lets you run a live test of the exact event you intend to run for a live audience, with adjustments for the immediate access needed for your test.

  1. In Webinars, Clone your event
  2. Go to the clone and click Your Links to get presenter or attendee links for the live test

Run a clone as a live event


Test Registration and Emails

Check the registration page, confirmation page, survey (if configured), and notification emails.

  1. Use the attendee registration link for your event to go to the registration page
    • Find the registration link in Your Links > Attendees
    • Review the format and messaging on the page
  2. Register for the event using a valid email address
  3. You will be automatically redirected to the confirmation page
    • Review the format and messaging on the page
    • If a survey is configured, open it and submit a test
  4. Check your email to see the pre-webinar confirmation email with your unique webinar access link

Test as Presenter

Log in to the webinar room and test the video playback, messaging, configured injections, and any other controls.

  1. Use your unique presenter link to launch the live room and complete the audio and video check
  2. In the room, click Go Live to start the broadcast
  3. Test all settings and controls in the room (refer to the Run a test checklist for tips)
  4. Recommended: Interact with another person in the room as an attendee to test chat and Q&A interactions
    • Deploy each configured injection for attendee interaction (polls, offers, etc.)
  5. Test the panic button

If you are using the Control Panel as a moderator, use the unique moderator link to access the Control Panel during the live test.


Test as Attendee

Log in to the webinar room and test chat, broadcast playback, and injection engagement as an attendee. If you do not have another person to collaborate on the test, you can be both the presenter and attendee yourself.

Enter the room as an attendee from a completely separate browser or private window to make sure each role has a unique access session.

  1. When the webinar is scheduled to begin, use the access link in the confirmation email to go to the countdown page
  2. Enter the room and click to start watching the broadcast
  3. Enter messages in the chat to test the live chat and Q&A
  4. Interact with all injections to see them from an attendee perspective
    • If an offer is configured, test the complete purchase process.

Test Replay

If a replay is enabled for the webinar, test the post-webinar follow-up email and the direct access link to the replay room.

  1. Check your email for the post-webinar email containing a link to the replay (if enabled)
  2. Enter messages in the chat to test the question box (if enabled)

Testing Tips

Every function of your webinar should be tested before you launch it to your prospects. This article covers many scenarios, but it is recommended that you create your own custom testing checklist to ensure that every aspect of the setup works exactly as designed.

For example:

  • If you have Zapier automation configured for your webinar, test every trigger event for your Zaps.
  • If you are using a custom SMTP or autoresponder and automation rules, test all related scenarios to ensure your automation rules fire correctly and email notifications contain the correct information.
  • If you are using one-click registration, test the sign-up flow by registering through an email sent from your auto-responder.
  • If a product offer is configured to appear in the webinar, test the purchase flow and successful sales goal tracking
  • Check the event analytics after your test to see how your activity as an attendee was recorded

The ultimate goal of testing is to make sure that everyone engaging with your content has an excellent experience. Put on your customer glasses and take a close look at every detail!

Test EverWebinar

This article is for EverWebinar.

Testing an automated EverWebinar event involves checking the registration process and all pre-configured elements to make sure everything works correctly. There is no live broadcast element in EverWebinar, so no camera, audio, or connection checks are needed.

Test Registration and Emails

Check the registration page, confirmation page, survey (if configured), and notification emails.

  1. Use the attendee registration link for your event to go to the registration page
    • Find the registration link in Your Links > Attendees
    • Review the format and messaging on the page
  2. Register for the event using a valid email address
  3. You will be automatically redirected to the confirmation page
    • Review the format and messaging on the page
    • If a survey is configured, open it and submit a test
  4. Check your email to see the pre-webinar confirmation email with your unique webinar access link

Test Webinar Room

Log in to the webinar room and test the video playback, messaging, and any configured injections.

  1. When the webinar is scheduled to begin, use the access link in the confirmation email to go to the countdown page
  2. Enter the room and click to start watching the broadcast
  3. Enter messages in the chat to test the live chat or question box (if enabled)
  4. Watch the entire webinar and check any injections that are configured to appear (polls, offers, etc.)
    • Make sure the timing is correct for all injections
    • Interact with the injections. If an offer is configured, test the complete purchase process.

Test Replay

If a replay is enabled for the webinar, test the post-webinar follow-up email and the direct access link to the replay room.

  1. Check your email for the post-webinar email containing a link to the replay (if enabled)
  2. Enter messages in the chat to test the question box (if enabled)

Testing Tips

Every function of your webinar should be tested before you launch it to your prospects. This article covers many scenarios, but it is recommended that you create your own custom testing checklist to ensure that every aspect of the setup works exactly as designed.

For example:

  • If you have Zapier automation configured for your webinar, test every trigger event for your Zaps.
  • If you are using a custom SMTP or autoresponder and automation rules, test all related scenarios to ensure your automation rules fire correctly and email notifications contain the correct information.
  • If you are using one-click registration, test the sign-up flow by registering through an email sent from your auto-responder.
  • If a product offer is configured to appear in the webinar, test the purchase flow and successful sales goal tracking
  • Check the event analytics after your test to see how your activity as an attendee was recorded

The ultimate goal of testing is to make sure that everyone engaging with your content has an excellent experience. Put on your customer glasses and take a close look at every detail!

Using screenshare

This article is for WebinarJam.

Presenters in the WebinarJam live room can appear on camera, use a virtual whiteboard, and share their local computer screen with the room.

Screenshare Best Practices

Before running a live webinar, test the screen share tool to make sure you are familiar with the settings and your device has the necessary permissions enabled.

Grant device or browser permissions to allow screen share. The exact steps will vary depending on your device and operating system.

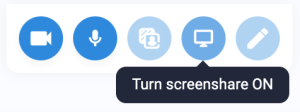
Click the screenshare icon at the top of your presenter video feed in the live room to start sharing.

Turn screenshare on

  1. Select a single window for sharing. Do not share the entire screen.
  2. Keep the shared window maximized. Minimizing the window will hide the content from the room.

If your browser or operating system has been updated since your last webinar, check permissions again before running a new live webinar.

As a matter of best practice, always include a screenshare test when testing a new webinar.

Broadcasting from a mobile device

The screenshare and whiteboard tools are not available in the live room for presenters logged in on a mobile device. For the best experience using WebinarJam, a desktop or laptop computer is recommended for all presenters.

Enable presenter third-party cookies

This article is for WebinarJam.

Important: Cookie tracking is part of your browser’s privacy settings because cookies are used to store information about your browser sessions and activity and can impact how data about you and your behavior are shared online. Enabling third-party cookies will allow WebinarJam to gather analytics about activity in your event, so it is helpful to turn them on for the duration of the webinar. Revert your cookie settings to the browser default after the event to restore the security settings for your normal browsing activity.

It is recommended that webinar presenters and moderators enable cookies and third-party cookies in the browser used to broadcast a WebinarJam event to ensure that all functions of the webinar operate correctly.

Webinar attendees are not subject to any cookie requirements and can view an event regardless of their cookie preferences.

Learn how to find your cookie settings in:

  • Google Chrome
  • Firefox
  • Apple Safari
  • Microsoft Edge

Note: Internet Explorer is no longer supported by Microsoft. Please update to Microsoft Edge instead of using an old version of Internet Explorer in order to ensure support for your webinar.


Google Chrome (Windows and MacOS)

In Google Chrome:

  1. Go to Settings > Privacy and security
  2. Click Cookies and other site data in the privacy menu

Safari (MacOS only)

In Safari:

  1. Go to Preferences > Privacy

Note: Apple no longer updates or supports their Safari browser for non-macOS platforms. Use of the Safari browser on a Windows-based PC is not recommended for WebinarJam events.


Firefox (Windows and MacOS)

In Firefox:

  1. Click Settings in the main menu
  2. Go to Privacy & Security and adjust your privacy settings to enable third-party cookies

Microsoft Edge (Windows and MacOS)

In Edge:

  1. Go to Settings > Cookies and site permissions
  2. Under Cookies and data stored, click Manage and delete cookies and site data

Optimize video for streaming

This article is for WebinarJam and EverWebinar.

Related resourceExternal video hosting

While your video recording camera or phone may record at full HD resolution (even 4K!) and 60 frames per second, streaming a video in high definition can have a negative impact on your event. Attendees watching your webinar are reliant on the streaming quality of their own internet connection, which can be anything from high-speed access to limited hotel internet, mobile cell service, etc.

Because it’s impossible to predict  the connection speed of every attendee, it is best practice to optimize any external video that will be streamed during the video to minimize buffering for your viewers.

Optimize with HandBrake

Use a tool like HandBrake to re-encode and optimize your videos. This reduces the total file size of the video without significant (or any) quality loss.

Recommended optimization settings:

  • MP4 format
  • 720p resolution at 30 frames per second
  • Web optimized option ticked ON
  • Audio bitrate set at 128

The following video demonstrates the Handbrake process:

Important: Optimizing a video to reduce its size can affect its quality, resolution, and compatibility with some devices.

Always test the optimized video before the webinar with multiple playback devices to ensure that it works as intended. Recommended devices for testing include: desktop/laptop computer, mobile device, tablet.

If the playback of the optimized video is not acceptable, the best option may be to use the original video instead.

Equipment and Connectivity

This article is for WebinarJam.

For the best webinar experience, optimized hardware and internet connections are recommended for the webinar host and all presenters.

Equipment

  • Use a computer with a modern quad-core processor with 8Gb RAM (minimum) to broadcast a webinar as the host.
  • Use internal camera and microphone devices or connect external hardware with a USB connection.
  • Set camera resolution to a minimum of 720p (high-definition display, 1280×720 pixels).
    • WebinarJam supports up to 1080p (full HD display, 1920×1080 pixels).
  • Headphones are recommended to reduce audio feedback and keep sound input and output separate

Internet Connection

  • Run your webinars from a hardwired internet connection instead of WiFi, if possible.
  • Check the connection quality for the host and co-presenters with a speedtest: https://www.waveform.com/tools/bufferbloat
    • Upload and download speeds should be at least 5mbps, but higher is better.
    • Bufferbloat (latency) should be at least “B” or higher (less than 100 milliseconds).
  • Keep your internet connection clear of any other activity during the live broadcast.
    • Example: Family members watching streaming media or playing video games on the same connection may negatively impact your broadcast quality.
  • Close all applications, windows, tabs, music, and anything not necessary for the webinar to improve resource allocation for the broadcast.
  • Avoid hosting a webinar (uploading the stream) and watching as an attendee (downloading the stream) on the same internet connection. WebinarJam will prioritize the upload stream, which may negatively impact the quality of the attendee stream.

Browser Best Practices

  • Google Chrome is the recommended browser to run and attend a live WebinarJam event.
    • Firefox is a good secondary option. For iOS devices use Safari.
  • Before every event:
    • Update your browser to the latest version
    • Clear your cache and cookies for “all time”
    • Restart your computer

© 2024 WebinarJam All Rights Reserved