
Create SPF record (integrated SMTP)
This article is for WebinarJam and EverWebinar.
Integrated SMTP Users Only
STOP: If you configured DKIM in your WebinarJam account in the previous step in this guide, SPF has already been provided for you. Skip this guide completely and do not add an additional SPF record.
If you are using an integrated SMTP service like MailGun or Postmark, however, you may need to add a separate SPF record. If that is the case, proceed with this guide.
Before diving into the technicalities, let’s understand the basics. An SPF record is like a safelist for your emails, telling receiving mail servers that a particular server is allowed to send emails on behalf of your domain. This helps prevent cybercriminals from forging your email address and sending malicious emails.
Using this guide, add or update an SPF record for your domain to designate your integrated SMTP as a service authorized to send mail on your behalf.
Step 1: Identify Your Sender Domain(s)
Start by identifying the domain(s) you want to protect. Your domain is the part of your email address that comes after the ‘@’ symbol, such as yourcompany.com.
The person identified as the Webinar Host & Presenter is used as the sender for all notification emails for a particular event (the host is shown in the following image as “John Smith”).
To protect all the email domains you use for your webinars, look at the primary host information each time you create a new event. The email addresses associated with each host are the ones you must authenticate.
It is not necessary to authenticate the email domains for secondary presenters (ie, “Jane Doe” in the following image is a secondary presenter).
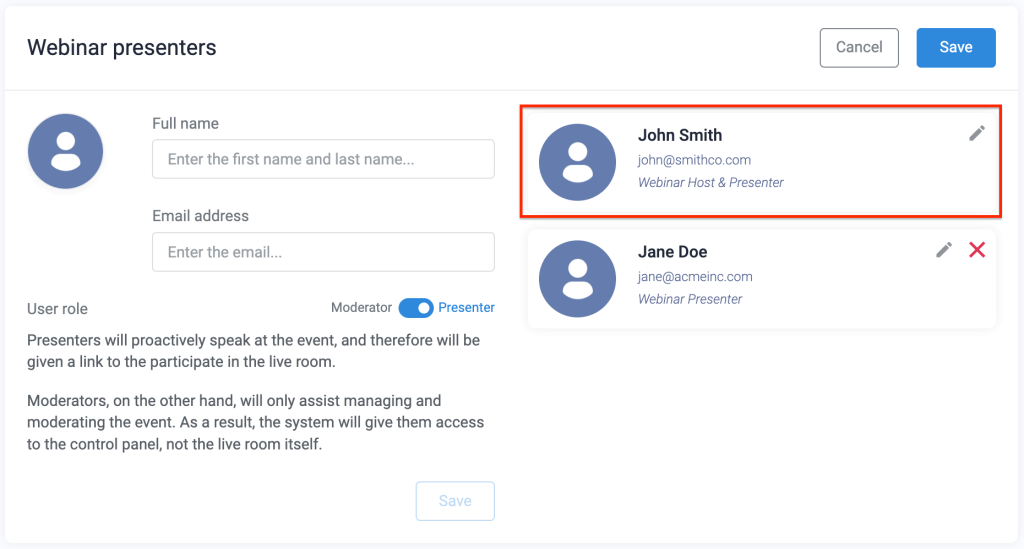
Example of the email sender settings in a webinar configuration
Remember: If you add different hosts with different email address domains to your webinars, SPF records must be added to the DNS settings for each one.
Step 2: Check for Existing SPF Records
In some cases, your domain may already have an SPF record in place. To check, you can use an online SPF record-checking tool or log in to your domain registrar account to review the DNS records that already exist. If you’re not sure how to understand the existing records, your domain provider’s support can help.
If there is no SPF record for your domain, you will need to create one. If there is already a record, you must edit the existing record instead. You can only have one SPF record per domain.
Step 3: Create Your SPF Record
If you don’t have an SPF record, it’s time to create one. The finished record will be added to your domain’s DNS (Domain Name System) settings. Contact your SMTP service to find out how to add their information to your SPF record. They may provide an IP address or a domain for you to include.
A basic SPF record looks like this:
v=spf1 include:samplesmtp.net ~all
Note: The domain “samplesmtp.net” is provided for demonstration only. Do not copy and paste that value into your own record.
Understanding the SPF Record
The syntax for an SPF record is made up of three parts:
- A version reference.
- A list of IP addresses and/or third-party includes authorized to deliver mail for the domain.
- A final mechanism to define the strictness of the authentication match.
Example of an SPF record value with multiple authorized senders. The parts are shown here in different colors to show their different functions:
v=spf1 ip4:1.2.3.4 include:samplesmtp.net ~all
This record has a version value of “spf1,” and specifies two approved senders for the domain: one by IP address and one by server domain. It ends with a soft fail final mechanism, meaning that any email message where the delivery server does not match the authorized values will be marked as spam.
Step 4: Publish Your SPF Record
Once you’ve created your SPF record, you need to publish it by updating your DNS settings. To do this, log in to the account where you manage your domain and locate your DNS management panel.
- Log into your DNS management console
- Locate the domain you use to send email
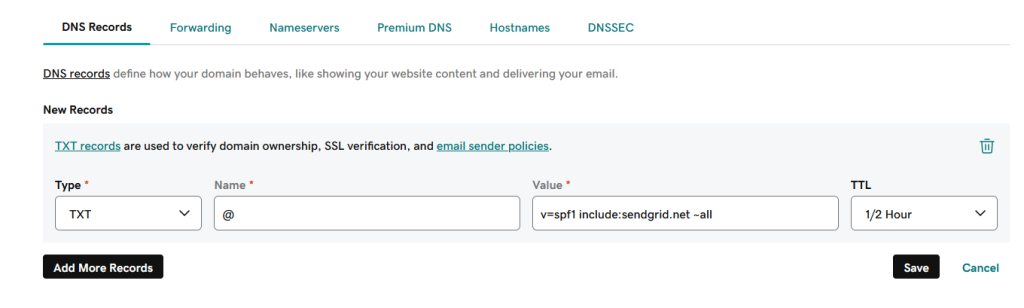
- Add a new TXT record to the domain and enter the SPF details:
- Host: @
- Value: Paste or type your SPF record in the Value or Content field. Get these details from your SMTP provider.
- TTL: Default/Automatic
- Save the record to publish it
Update an existing SPF Record
If you already have an SPF record for your sender domain, update the existing record instead of creating a new one. Having more than one SPF record will invalidate them all.
To add your SMTP service as an authorized sender to an existing record, simply add an include or IP address entry to the existing record. Contact your SMTP service to find out exactly what you need to add.
For example, if your current SPF record looks like this:
v=spf1 include:_spf.google.com ~all
This example allows mail sent via Google Workspace for your domain.
Add your provider as an additional reference::
v=spf1 include:_spf.google.com include:samplesmtp.net ~all
This example allows mail sent via both Google Workspace and a secondary provider (samplesmtp.net is an example only) for your domain.
Step 5: Test Your SPF Record
After publishing your SPF record, it’s a good idea to test it to ensure everything is working correctly. Online SPF record testing tools like Free SPF Record Checker can help you verify if your SPF record is correctly set up. (There are lots of options available! Find one or more than you like and test your record.)
Note that you might need to wait a little while before you can fully confirm that the record is set up correctly. The newly published SPF record may take up to 1 hour to propagate before appearing in the results of your checker tool.