WebinarJam and EverWebinar User Documentation Webinars for everyone!

Customize pages

This article is for WebinarJam and EverWebinar.

Each new webinar configuration includes three pages that can be customized: Registration, sign-up confirmation, and an event countdown page.

Prospects go to the registration page to sign up for the webinar and are redirected to the confirmation page after submitting their information. The countdown page is the temporary destination of the live event link, which attendees will see if they visit the link before the event begins.

Templates for each page type and a basic page editor are provided inside the webinar configuration wizard.


Page Templates

Registration

  • Go to the Registration step of the webinar wizard and open Registration page design

Confirmation

  • Go to the Thank You step of the webinar wizard and open Thank you page design
  • Default confirmation page must be selected under Default vs Custom confirmation page

Countdown

  • Go to the Live step of the webinar wizard and open Countdown page design

Thank you page templates

Hover over a template tile:

  • Click Preview to view a simple preview of the template design
  • Click Customize to select a template and launch the page editor

Using the Page Editor

Use the page editor to customize some text, backgrounds, and colors on the page.

Hover over sections of the page to see action buttons:

  • Click the pencil icon to edit a component
  • Click the X icon to delete a component
CAUTION: Deleting a component cannot be undone. To undo changes to the structure of the page, the template must be reset.

Edit page components

When you are finished customizing a page in the editor, click the Actions menu in the top right to Save and exit the builder.

  • Click Reset to discard all changes and restore the original template design.

Page editor actions menu

Pro Tips:

  • A survey bar is available to edit on a Thank You page if Survey your registrants is Enabled on the default confirmation page.
  • Choose your preferred format for the sign-up form when launching the Registration page. Customize multiple or all formats if you intend to share more than one with your prospects. Learn more about embedding registration forms.
  • Enable split testing for the registration page to select and customize two designs for conversion testing.

Survey your registrants

This article is for WebinarJam and EverWebinar.

Configure a survey for your webinar’s registration thank you page to get information and feedback from your audience before the event. For example, you can use the survey to ask your registrants about the topics they’re most interested in and script your webinar content around those topics.

Important: Surveys are available with the Default confirmation page configured at the Thank You step of the webinar wizard. If you are using a custom confirmation page, post-registration surveys are not available.
  1. Go to the Thank You step in the webinar configuration wizard.
  2. Open the Default vs Custom confirmation page module, select Default confirmation page, and Save.
  3. Open the Survey your registrants module that appears.
  4. Choose Yes, survey my registrants and configure the survey. Choose a mix of four question types:
    • Poll allowing only one answer​​​​​​​: Requires a single response
    • Poll allowing multiple answers: Allows multiple response selections
    • Question for a short answer: Single-line text response
    • Question for a long answer: Multi-line text response
  5. Save the survey module and continue.

Registrants will see a floating survey bar on the default confirmation page after registering. A button opens the survey in a pop-up window.

Survey bar on the post-registration thank you page

Add a custom message and styling to the survey bar by customizing the Thank you page design.

The following image shows an example of each survey question type.

Registration survey example

Send a voice call reminder

This article is for WebinarJam and EverWebinar.

Send webinar reminders by text message or voice call with a Twilio SMS integration.

Important: Record an audio message with your reminder and upload it to the internet. To add the recording to your webinar reminders, you must be able to get a direct MP3 URL for the uploaded file.

Add a Voice Call Reminder

Open a WebinarJam or EverWebinar event for editing:

  1. Go to Notifications > Reminder notificationsAdd a voice call reminder
  2. Under Last minute notification, click Add call
    • Voice calls are not available for any other reminder or notification type
    • A reminder email is configured by default. To send only a voice call reminder, delete the email.
  3. Enter a direct URL to a hosted MP3 file with your voice reminder and Save

Add a voice recording URL

Pro Tips

  • Last minute notifications are sent 15 minutes before the scheduled webinar session. The timing cannot be changed.
  • Only one voice call reminder can be configured per webinar.
  • The audio file must be hosted on the internet and accessible via a direct MP3 URL.
  • Enter a phone number and click Test call to ensure that your integration is working correctly.

Learn more

Send an SMS reminder

This article is for WebinarJam and EverWebinar.

Send webinar reminders by text message or voice call with a Twilio SMS integration.


Add an SMS Reminder

Open a WebinarJam or EverWebinar event for editing:

  1. Go to Notifications > Reminder notificationsAdd SMS last minute reminder
  2. Under Last minute notification, click Add SMS
    • SMS is not available for any other reminder or notification type
    • A reminder email is configured by default. To send only an SMS reminder, delete the email.
  3. Compose the text message reminder in the pop-up window and Save

Compose an SMS reminder

Pro Tips

  • Last minute notifications are sent 15 minutes before the scheduled webinar session. The timing cannot be changed.
  • Only one SMS reminder can be configured per webinar.
  • In the message, remind your attendees to check their email for a webinar link and any last-minute instructions. Adding a link to the SMS reminder is not recommended.
  • Enter your cell phone number and click Send Test SMS to ensure that your integration is working correctly.

Learn more

EverWebinar broadcast source

EverWebinar uses a pre-loaded source video as the primary content for a webinar broadcast. The first step of the EverWebinar configuration wizard is to select the source video.

EverWebinar source video

External Video File

Use an external video file to load a production video or a replay from another webinar platform. Supported external hosts are YouTube, Vimeo, and any cloud service that provides a direct MP4 link for playback.

Learn more:

WebinarJam Live Session

Use a previous WebinarJam live session to rebroadcast an event you hosted live in the past. Reusing a previous session from WebinarJam is an easy plug-and-play option that automatically populates many of the settings from the original WebinarJam event (including the chat!) for use in the new automated event.

Pro Tips:

  • The WebinarJam session must be hosted in the same account as the new EverWebinar event
  • To import a session, an active WebinarJam subscription is required. Your EverWebinar configuration cannot retrive a session from an inactive WebinarJam catalog.

WebinarJam configurations and event types

This article is for WebinarJam.

In your Webinars dashboard, click + Add webinar to create a new configuration. Choose a configuration and event type to launch the setup wizard.

Express or Full Configuration

Choose express or full configuration

Express configuration

Smart defaults preconfigure many details of your webinar for you. Complete basic information and selections for the event:

  • Webinar name (private name)
  • Webinar title (public name)
  • Webinar description
  • Webinar language
  • Add or edit host and presenters
  • Webinar schedule
  • Select and customize registration page
  • Customize email notifications and reminders

Important: Access all settings after the express configuration by editing the finished webinar and selecting “full configuration.” Webinar replay is disabled by default in an express configuration.

Full configuration

Fine-tune every setting in your webinar with a multi-step configuration wizard.

  • Basic configuration, presenters, and streaming service
  • Schedules and recurring event series
  • Registration, auto-subscription, pay to register, and password protection
  • Notifications and your email gateway
  • Integrations and third-party tracking
  • Thank You page customization or custom confirmation page
  • Live broadcast room features, polls, product offers, slides, and more.
  • Replay enable/disable, controls, expiration, etc.

See related user documentation for more information about individual features and controls.


Event Type

Select the webinar run type

Right Now

Use Right Now to configure and launch a one-time webinar quickly. There are no notifcations or schedule, and you will send attendees the link to access the room.

  • Right Now webinars are meant to be used one time for unexpected calls.
  • Right Now webinars are accessible 24/7 eliminating the need to set up a schedule.
  • Right Now webinars allow only free registration with an opt-in form.
  • There are no automatic notifications in Right Now webinars. You will need to send your attendees the registration page link displayed in the final step of webinar setup.

Schedule for Later

Use Schedule for Later to plan events and series of events for a later date.

  • The Scheduled webinar will take place sometime in the future. You can choose to set up your webinar in three ways:
    • Single session – Customer chooses one date/time,
    • Multiple sessions – Customer registers for all webinars
    • Recurring series of sessions – Customer registers to a series of daily or weekly sessions. These can be a predetermined number of sessions or recurring until they cancel the webinar subscription.
  • Scheduled webinars allow both free and paid registration with an opt-in form.
  • Your customers will fill out a registration form and receive a webinar link via email.

Always On

Use Always On to create a webinar room that can be used repeatedly, such as for meeting rooms or on-the-spot training. Like Right Now, this has no notification emails or schedule.

  • Always On webinars are meant to be reused.
    • Download the replay and the chat log after each event if you want to save them. Every new event hosted in the live room generates a new replay recording and a new chat log overwriting the old records.
  • Always On webinars are accessible 24/7 eliminating the need to set up a schedule.
  • Always On webinars allow only free registration with an opt-in form.
  • There are no automatic notifications in Always On webinars. You will need to send your attendees the registration page link displayed in the final step of webinar setup.

Custom confirmation page

This article is for WebinarJam and EverWebinar.

Enable Custom Confirmation Page

When a person registers for your webinar, choose to direct them to a default confirmation page or a custom page.

To use a custom confirmation page:

  1. Go to the Thank You step in the webinar configuration wizard
  2. Open the Default vs Custom confirmation page module and select Your own custom page
  3. Enter the link to your custom page in the Post-regisration confirmation page field
    • Turn Send register information and webinar information on or off. This option is ON by default.

Thank you page - Custom page URL


Send Registration and Webinar Information

If the registration confirmation page is hosted outside the WebinarJam/EverWebinar system, some registration information can be passed as parameters in the URL if you want to display them on the external page. This is optional.

To enable this, make sure Send register information and webinar information is turned ON at the Thank You page step of the webinar configuration.

Important: Using the registration data sent in the URL string requires Javascript coding knowledge. URL parameters allow advanced users with programming skills to customize a confirmation page. Learn more from this SitePoint article.

Registration URL Parameters

Parameters Example (Decoded) Description
wj_lead_first_name John Data entered in the First name registration form field.
wj_lead_last_name Smith Data entered in the Last name registration form field (if collected).
wj_lead_email [email protected] Data entered in the Email address registration form field.
wj_lead_phone_country_code +1 Country code selected in the registration form (if collected).
wj_lead_phone_number 1234567890 Data entered in the Phone number registration form field (if collected).
wj_lead_unique_link_live_room UNIQUE Returns a unique system-generated access link for the registrant.
wj_room_password UNIQUE An alphanumeric password for the webinar room (if enabled in the webinar configuration). IMPORTANT: The password is passed in plain text.
wj_next_event_date Monday, 31 August 2020 Event date displayed as Day, DD MMMM YYYY.
wj_next_event_time 1:45 AM Event time displayed as HH:MM AM/PM. The time displayed will match the standard format used in the country represented by the flag in the webinar’s language selection.
wj_next_event_timezone Pacific Time (US and Canada) GMT-7 Time zone displayed as location and GMT.
wj_event_ts 1598863500 Event Unix timestamp.
wj_event_tz America/Los_Angeles Time zone displayed as TZ identifier.

Take Note

  • Parameters containing personal data (ie, wj_lead_first_name, wj_lead_last_name, wj_lead_email, wj_lead_phone_country_code, and wj_lead_phone_number) are sent only if Send register information and webinar information is turned on in the webinar configuration.
  • Parameters are passed to the custom confirmation page automatically. No additional configuration is required.
  • Parameters are passed every time, even if they are empty.
    • Exception: The password parameter is generated only if password protection is enabled in the webinar configuration.
  • Parameters are UTF-8 encoded and must be decoded for display on a page. Example: email@domain.com will be passed as email%40domain.com.

URL Example

The URL is made up of two parts:

  • Base URL: https://www.domain.com/YOUR-PAGE
  • Parameters: ?wj_lead_first_name=John&wj_lead_last_name=&wj_lead_email=johnsmith%40domain.com […]

The parameters portion of the URL begins with ? and individual parameters are separated by &.

  • Parameters in the following example are shown in blue, with their values in red
  • Example shows data sent by a registration form that only asked for first name and email address. Note how some parameters carry no value because the fields were not requested in the registration form.
https://www.domain.com/YOUR-PAGE?wj_lead_email=johnsmith%40domain.com&wj_lead_first_name=John&wj_lead_last_name=&wj_lead_phone_country_code=&wj_lead_phone_number=&wj_room_password=&wj_lead_unique_link_live_room=https%3A%2F%2Fevent.webinarjam.com%2Fgo%2Flive%2F12%2F0g02hkd4m8vy&wj_event_ts=1598863500&wj_event_tz=America%2FLos_Angeles&wj_next_event_date=Monday%2C+31+August+2020&wj_next_event_time=1%3A45+AM&wj_next_event_timezone=Pacific+Time+%28US+and+Canada%29+GMT+-7
Important: This code is provided as an example only. Always build a new URL with the parameters needed for your own use.

Activate Confirmation Email Message

If you turn off Send register information and webinar information or choose NOT to include custom parameters in the confirmation page, make sure the confirmation email at the Notifications step is active.

The confirmation email sends registrants a unique link to the webinar room and a reminder of the event’s date and time.

Auto-subscription to future webinars

This article is for WebinarJam only.

Enable Auto-subscription

Auto-subscription to future webinars lets attendees register once to automatically be subscribed to all future WebinarJam events configured in your account.

Important: Subscription to new webinars requires manual action from a webinar manager when each new event is configured. While subscription will be “automatic” for the user, you control whether to complete the action in each new webinar.

To enable auto-subscription:

  • Go to the Registration step of the webinar configuration wizard
  • Open the Auto-subscription to future webinars module
  • Click Enable auto-subscription and Save the module

If enabled, the webinar registration form will display an extra check box labeled Auto-subscribe to future webinars from this host. The registrant must check the box to accept auto-subscription. This option cannot be turned on by default.

Auto-subscription option in the registration form


Register Auto-subscribed Users

Each time you create a new webinar, manually add auto-subscribed registrants from previous webinars to the new session.

Auto-subscribed registrants

  1. In Webinars, find the new event
  2. Click Your Links > Attendees
  3. Select a session from the drop-down under Auto-subscribe registrants from previous webinars
    • A bubble appears with the total number of auto-subscribed users registered in your account
  4. Click Subscribe to register all saved users for the selected session
    • The auto-subscription down-down and button disappear when the action is complete

Auto-subscribed registrants will receive the confirmation email with the details for your upcoming webinar: the webinar topic, scheduled date and time, their unique link to the live session, etc.

Customize the confirmation email at the Notifications step of your new webinar configuration.

Important: Auto-subscription must be enabled at the Registration step of the new webinar’s configuration or the auto-subscription option will not appear in Your Links.

Opt Out of Auto-subscription

A mandatory unsubscribe link appears in the footer of every email notification sent by your account. Registrants can click the link to opt out of future notifications for each webinar they are subscribed to.

Scheduling WebinarJam

This article is for WebinarJam only.

Create the Session Schedule

Caution: Do NOT edit a webinar schedule after attendees have already registered for the event. Editing the schedule resets the unique access link for each registrant, so the link sent in their original confirmation email will not work.

Changing the session type (from single to multiple, etc.) deletes the original session in the database. Files and analytics associated with the original session will also be deleted. Instead of changing the session type for an existing webinar, create a new webinar configuration for the new schedule structure.

Go to the Schedules step of the webinar configuration wizard and open Webinar schedule.

Choose a schedule type for the webinar:

  • One single session
  • Multiple sessions
  • A recurring series of presentations

Single Session

Use the single session option when you have one presentation that you want to broadcast once or repeat at different times. With this schedule, attendees will choose the date and time they want from the schedule you create.

  • Example: An free introductory class designed to be seen once.

Multiple Sessions

Use multiple sessions when you are offering a series of presentations that are all different but related to each other. Attendees register once to attend multiple sessions at the dates and times you create.

  • Example: A paid workshop consisting of five lessons on a specific topic.

Recurring Series of Sessions

Attendees who register for a recurring series sign up for a daily or weekly series, for as long as it lasts.

To create a recurring series:

  1. Select Daily or a day of the week as the type of recurrance
  2. Select Unlimited or Limited to define the duration of the series
    • If limited, enter the number of sessions
  3. Add additional series to the same webinar configuration if desired
    • Example: One series runs every Monday, and a second series runs every Wednesday.
  4. Click Add to create each series

Configure recurring series schedules


Allow Time Zone Conversion

Toggle time zone conversion on or off to show your webinar session times in a viewer’s local time-zone on the registration page and in email notifications. Time zone conversion is ON by default. Switch it off if you prefer to display a specific time-zone for the webinar.

Toggle timezone conversion on or off

Scheduling EverWebinar

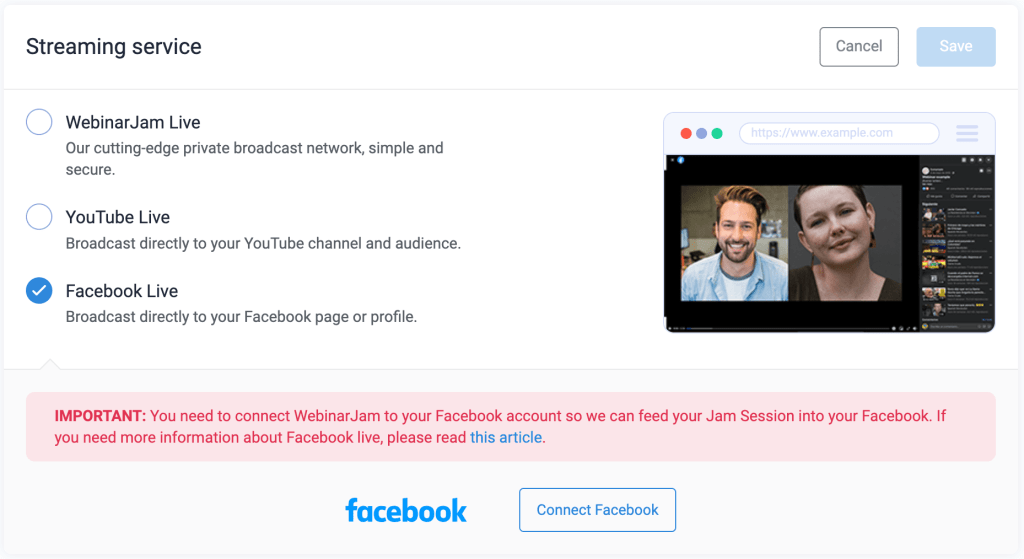
This article is for EverWebinar only.

Create the Automated Broadcast Schedule

Important: Do NOT edit a webinar schedule after attendees have already registered for the event. Editing the schedule resets the unique access link for each registrant, so the link sent in their original confirmation email will not work.

Enabling Just-in-Time or Instant Replay creates on-demand schedules for your webinar.

Disabling either option deletes the on-demand schedule and all related files and analytics. If an attendee has already viewed the webinar through an on-demand option, all records for those sessions will be lost. Instead of disabling Just-in-Time or Instant Replay for an existing webinar, create a new webinar configuration and switch registration promotions to the new event that does not have on-demand access.

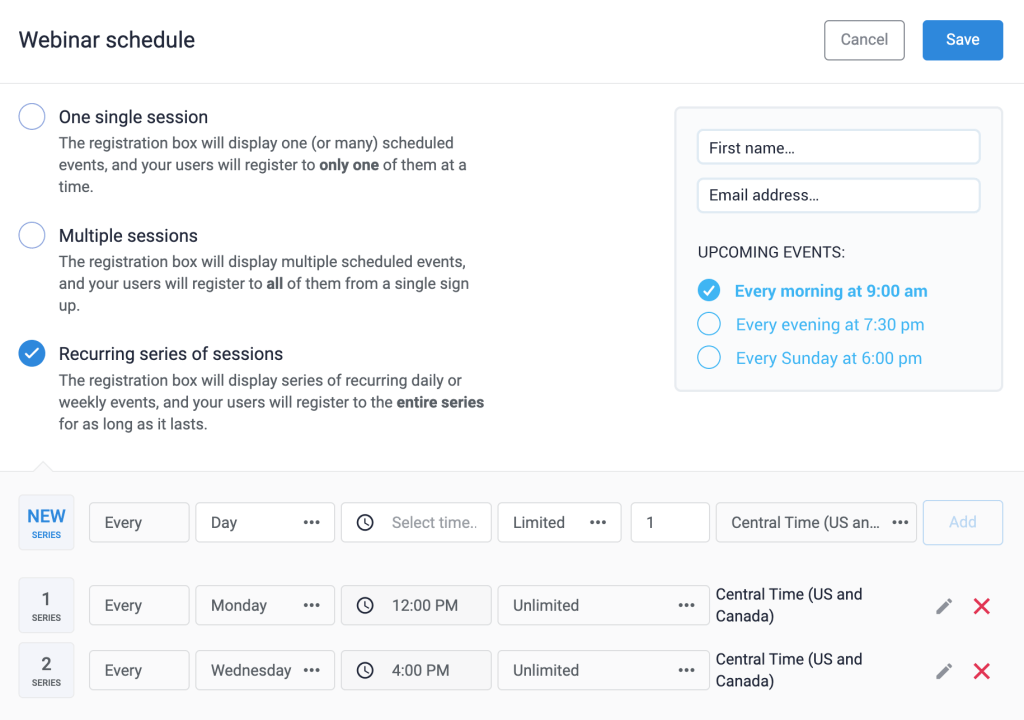
Go to the Schedules step of the webinar configuration webinar.

Create one or more schedules for the webinar:

  1. Set the date and time of the broadcast. Choose:
    • On a specific date and time
    • Every day or every week at a specific time
  2. Click Add to create the series. Add additional schedules if desired.

Fixed time zone

Select a time zone and location from the drop-down field to create the schedule in a fixed time zone. If enabled, registrants can convert the schedule availability to their own time zone on the registration page.

  • Note: Multiple time zone locations may appear on the registration page when a fixed time zone is selected. This is because the schedule displays all locations that fall in the same GMT+ zone as your selection. For example, The GMT/UTC+3 hours offset is shared by countries on three continents: Europe, Africa, and Asia.

User’s own time zone

Select The user’s own time zone for the schedule to enable time zone auto-detection. In this mode, scheduling and registration information is shown in a potential registrant’s local time zone so they can easily choose the best time.

Note: The time zone selection you make for the first series in a webinar schedule locks all additional series to the same choice. In other words, if the first series is set to the user’s time zone, all additional series in the same webinar will also be displayed in the user’s time zone.

Registration Page Options

Allow time zone conversion

Visible only if a fixed time zone is selected for the webinar schedule. Enabling time zone conversion lets registrants see the time of your event in their local time zone for a more user-friendly experience.

Instant watch replay

Enable this option to display a, “Watch the replay now!” link on the registration page in addition to the other schedule options. Clicking this link takes the attendee to watch the replay immediately.

  • Important: Enable the replay session at the Replay step of the configuration wizard to enable access to a replay broadcast.

Allow late attendance

Enable this option to allow visitors to join a webinar that is already “in progress.” When attendees enter the “live” room, the webinar will auto-forward to the correct time stamp.

  • Example: The automated broadcast is configured to begin at 10 am. Allowing late attendance lets a user enter the session at 10:10 am and the broadcast will skip forward 10 minutes to simulate joining a live webinar.

Just-in-Time

Just-in-Time is on-demand scheduling that shows potential registrants a session “starting very soon,” regardless of when they visit the page. Display sessions at 15, 30, and 60-minute intervals:

  • Every :15, :30, :45 or :00 (15 minutes)
  • Every :30 or :00 (half hour)
  • Every :00 (hour)

Hide night time schedules

For Just-in-Time registration, choose Hide night time schedules to create the appearance of a regular working schedule. If someone visits your registration page at 2 am (and you have blocked schedules from 11 pm-7 am) the next available session will be the following day.

Displayed schedules

Define the schedules displayed on your registration page under Displayed Schedules. From the drop-down menu, choose how many available schedules to display to visitors at one time.

Important: If Just-in-Time / Yesterday’s Replay is selected for the displayed schedule and neither option is enabled in the webinar configuration, the webinar will not show any available registration times.

Block short-term registrations

Prevent attendees from registering last minute, up to 6 days in advance.

Block dates

Add holidays or any other days you want to exclude from the webinar broadcast schedule. Viewers will not be able to register for these dates.

Charge a fee for registration

This article is for WebinarJam and EverWebinar.
Important: A third-party payment checkout is needed to collect payments from registrants. The paid registration function of your webinar configuration redirects registrants to the third-party checkout to complete their payment. WebinarJam and EverWebinar do not process payments.

Enable Paid Registration

In your webinar configuration, go to the Registration step:

  1. Open the Free registration vs Paid registration module
  2. Click Charge a registration fee

Configure a paid registration funnel

  1. Enter the amount of the fee (for analytics tracking) and the URL of a third-party checkout page where the customer can complete a payment.
  2. Copy the Post-Payment Redirect URL and set it as the payment success or “thank you” page in your third-party checkout configuration. With the post-payment URL in place, your third-party payment processor will redirect customers to the post-payment registration page to complete their registration for the webinar.
    • A “register” button appears on the post-payment registration page. The registrant must click the button and submit the registration form that pops up to complete their sign-up.

Troubleshooting and Tips

Incomplete Registration

If you receive payment for a webinar but no new registrant, the customer did not complete their registration. To resolve this, copy and send the Post-Payment Redirect URL to the customer. This will take them straight to the registration page without having to complete the checkout again.

Skip the Registration Payment

To allow free registration to one specific user, copy and share the Post-Payment Redirect URL with the user. Anyone with this URL will go straight to the registration page without completing a payment, so share it carefully.

Charging with PayPal

Charging for registration with PayPal

Before we begin, ensure that you have a business account with PayPal and not a personal account. This process will not work with personal PayPal accounts.

Log in to your PayPal account and click Account Settings from your profile menu.

Under “Products & Services,” select Website Payments and click to Update PayPal buttons.

Because a webinar is a one-time sale, select the Buy Now button.

In Step 1, add the basic information for your webinar name under Item Name and registration ticket price under Price.

Leave the rest of the fields blank and go to Step 3.

In Step 3, you will need two links from your WebinarJam or EverWebinar account:

  • Registration Page URL (marked 3 below)
  • Post-Payment URL (marked 4 below)

Add a message to the customer if desired (marked 1 above) and disable the request for a shipping address (marked 2 above) unless registration for the webinar includes a hard copy of course materials that you need to ship.

Finally, click Create Button , and you’re ready for the final step. Click the email tab (shown below) and copy the URL in the box.

In your webinar configuration, go to Registration > Free registration vs Paid registration. Paste the PayPal button URL in the settings field labeled, “Your payment checkout.”

Introduction to live injections

This article is for WebinarJam and EverWebinar.

Live injections let you pre-load content for a webinar that can be quickly launched and managed during the live broadcast.

The live options are different depending on whether your configuration is for WebinarJam (true live) or an automated EverWebinar (simulated live).

In both webinar models, live injections are found at the Live step of the webinar configuration.

Webinar wizard steps


WebinarJam injections

Live injections for WebinarJam are launched manually by presenters inside the Live Room. Learn more about the live room interface.

Agenda: Add a prewritten or AI-assisted outline for the webinar

Polls and quizzes: Encourage engagement and feedback from the webinar audience

Product offers: Promote products and services inside the live room

Video injections: Plug and play video segments to enhance the presentation

File handouts: Share downloadable handouts and other files with attendees

Slide presentations: Preload a slide deck to share from the WebinarJam server instead of your local bandwidth


EverWebinar injections

Live injections for EverWebinar are scheduled in the webinar setup to automatically launch at a specific time during the event. At the Live step of the configuration wizard, open the Live content module to add scheduled injections.

Scheduled injections are configured to appear and disappear at specific times during the event.

Schedule live content in EverWebinar
Example of the scheduling options for an EverWebinar live injection

Poll: Create and schedule a poll to appear.

File sharing: Upload files and schedule them to be shared in the webinar room.

Announcements: Schedule chat announcements.

Sticky message: Schedule sticky chat messages.

Product offer: Schedule product offers to appear.

Live sale announcement: Schedule announcements that tell the room a sale was made (to simulate live purchase engagement).

Redirect: Send all attendees from the webinar room to a specified URL.

Live chat: Add or upload chat messages with timestamps to simulate live chat activity for attendees.

Display number of attendees: Display the actual or a simulated attendee count for the live room where viewers can see it.


Learn more about the Live Room

Live: Slide Presentations

This article is for WebinarJam only.

Add a slide presentation to your webinar during the configuration process. During the live broadcast, the presentation is available in the live room menu to broadcast to your attendees with the click of a button.


Upload a slide presentation

Upload a slide presentation

Upload a presentation from your local computer:

  1. In the webinar setup, go to Live > Slide presentations
  2. Click Add new presentation
  3. Enter a display name for the file
  4. Click Upload the file to locate and add the presentation file
    • Accepted file formats: Microsoft PowerPoint (PPT, PPTX), Apple KeyNote (KEY), and PDF.

Important: Google Slide links or other cloud-based presentations cannot be added.

Uploading and encoding for your presentation can take up to 5 minutes to complete.


Benefits of uploading a presentation

You can use the screen share function to present the slides from your local the computer. However, uploading the presentation to the WebinarJam cloud server is recommended for two reasons:

  • Pre-loaded presentations are delivered by the WebinarJam servers instead of your local internet service. As a result, the image quality on pre-loaded slides is generally better, resulting in a smoother experience for your attendees.
  • Presentations uploaded to the live room can be shown using custom animations and transitions.

Optimize presentation files

Smaller files load faster and more reliably for attendees so everyone can see your content smoothly, regardless of their internet connection speed.

The maximum file size for an uploaded presentation is 80MB. If your file is over 80MB, the resolution of the images inside the slides may be too high, or there may be media injections (such as video) that should be removed.

Optimization and troubleshooting tips:

  • Always save images and slides at a maximum resolution of 720p to optimize them for live-streaming
  • Split the presentation in two if it’s too large to upload
  • If you have trouble uploading a PowerPoint or Keynote file:
    • Look for video or audio media in the presentation that can be removed
    • Export the presentation to a PDF with each slide on a separate page. Optimize the PDF to create a smaller file.

Learn more about using slide presentations in the Live Room

Live: Video Injections

This article is for WebinarJam.

Add video injections into a webinar to cut seamlessly from the presenters speaking to pre-recorded video playback. This is useful for inserting short video clips or to create a “hybrid” webinar experience.

Hybrid webinars combine a pre-recorded presentation with a live segment such as a custom introduction or a Q&A session at the end.

Go to the Live step of the webinar configuration:

  1. Open Video injections and click Add new video
  2. Add a name for your reference (you will see this in the live room)
  3. Add the video source URL
  4. Save the video injection window and click Confirm to continue the webinar setup

Saved video injections are available to deploy inside the live webinar room.

Note: Compatible video sources are hosted MP4 files, YouTube, or Vimeo. Hosts like Wistia or Dropbox that do not provide an MP4 file link will not work for this function.

Learn more

Live: Product Offers

This article is for WebinarJam and EverWebinar.

Inject product offers into your webinars and convert attendees to customers. To configure the offer, go to the Live step of the webinar configuration.


WebinarJam > Live

  1. Open Product offers and click Add new offer
  2. Add the details of your offer. The right-side panel shows a preview.

    Configure the product offer

  3. Toggle ON any advanced options you wish to use:
    • Broadcast sales in real time
    • Apply scarcity in your offer
    • Apply urgency in your offer

Advanced Options

Encourage attendees to purchase during the webinar by limiting inventory or sharing sales activity with the webinar room.

  • Broadcast sales in real-time displays, “Name has just purchased,” each time a sale is completed.
  • Apply scarcity displays the number of available units in the offer panel.
    • Scarcity is updated automatically during a single webinar session if sales goal tracking is configured.
    • In the live room panel, presenters can click to reduce the inventory number manually as sales are made.
  • Apply urgency displays a countdown timer.
    • The timer begins when the offer is first displayed and expires according to your configuration.

EverWebinar > Live

Configure live content for EverWebinar

  1. Open Live content and click Add event > Product offer
  2. Add the details of your offer. The right-side panel shows a preview.
  3. Add a Start and End time for the automatic offer
  4. Toggle Apply urgency ON to display a countdown timer

Live: Polls and Quizzes

This article is for WebinarJam and EverWebinar.

Add polls or quizzes to a webinar to survey your attendees and prompt engagement with your presentation. To configure a poll, go to the Live step of the webinar configuration.

WebinarJam > Live

  1. Open Polls and quizzes and click Add new poll
  2. Add the poll question
  3. Add answer options
    • Click Add another option at the bottom of the window to add more than two possible answers.
  4. Save the poll or quiz window and click Confirm to continue the webinar setup

Polls are deployed and new polls are added inside the live webinar room.


EverWebinar > Live

Important: Polls in EverWebinar are interactive for attendees to simulate the experience of a live event, but the results are fully preconfigured. No additional poll statistics are generated from attendee interaction in an EverWebinar event.

Configure live content for EverWebinar

  1. Open Live content and click Add event > Poll
  2. Click to toggle Make the results public at the end of the poll (Optional)
    • If ON, add simulated poll results by entering a percentage after each answer choice. Attendees will see the preconfigured results after submitting an answer during the webinar.
  3. Add the question and answer options
    • Click Add Another Option to add additional answer choices.
  4. Add a Start and End time for the automatic poll
  5. Save the poll event and the Live content module to continue the webinar setup

Live: Agenda

This article is for WebinarJam only.

Keep your presentation organized and delivered on time with an agenda. Add a pre-written outline to the agenda module or use the AI Agenda Planner to generated one with AI. The agenda is visible to view and edit during the live event.

In the webinar configuration wizard, go to Live > Agenda

Webinar agenda module

To create an AI-generated agenda:

  1. Click AI Agenda Planner to launch the AI creation tool
    • Add details about your webinar to the planner, defining the duration, topic, audience, and goal. Be specific! The AI uses the content in these fields as prompts to create your agenda, so add as much detail as you can.

      Agenda Planner window

  2. Click Generate agenda
    • Wait for the AI to process your agenda and then it’s ready to review and edit! You will receive an outline broken down into sections that include an introduction, main points, a Q&A, and a conclusion, each with a suggested duration to fill the total time of your event.

      AI Agenda Planner results window

  3. Click Replace full agenda to save the content and close the AI Agenda Planner
    • Note: This will overwrite any content already saved in the Agenda module of the setup wizard
    • To start over with new prompts, click generate a new agenda in the tooltip instead
  4. Save the Agenda module and complete the webinar setup wizard

Pro Tips

  • AI Agenda Planner will generate an agenda in the language selected under Configuration > Basic settings in the setup wizard.
  • Check the time estimates in the agenda and adjust them as needed to make sure they match the amount of time you want to spend on each section and overall.
  • Your agenda will appear in the Live Room and in the Control Panel of your webinar and is visible to all presenters and moderators.
  • Add notes or edit the agenda during the event to adjust your plan.
  • If you don’t want to use the AI Agenda Planner, you can manually add an agenda or outline instead. Copy and paste the contents of your agenda into the text field in the Agenda module and save to add it to your webinar resources.

AI Best Practices

To get the best results out of any AI tool, keep a few things in mind:

  • Be specific about the topic you want the AI to address. This keeps the topic focused and helps prevent vague results. Instead of a generic prompt like, “Talk about personal coaching,” be specific. For example, “Explain three ways that personal coaching benefits small business owners” or “Provide tips for optimizing paid ad campaigns.”
  • Avoid entering private or personal details into an AI tool that you wouldn’t post publicly online. All AI engines “learn” from the queries they receive, which means that your entries may be stored by the tool.
  • AI content can be wrong. Always review and fact-check the content generated by an AI tool, especially when the facts are critical to your presentation or field of knowledge.


Webinar notifications

This article is for WebinarJam and EverWebinar.

Webinar notification emails are sent automatically to the people who register for your events. Add up to 10 notifications before and 10 notifications after the webinar.

Send a confirmation message immediately after registration

Pre-webinar notifications:

  • Signup Confirmation Message: Sent when a person registers. ON by default.
  • Pre-webinar reminders: Sent before the webinar (configure timing in the settings).
  • Last-minute reminder: Sent 15 minutes before the webinar. ON by default.

Post-webinar notifications:

  • Post-webinar follow-ups: Turn on to automatically send a replay to all registrants after the event. Configure recipient conditions and timing in the settings.

Add or Edit Notifications

  1. Open a webinar and go to Notifications > Reminder notifications
  2. To edit an existing email: Click the pencil icon on any email module to edit it
    • Click the envelope icon to send yourself a test copy of the email
    • Click the X to delete the email (Warning: This cannot be reversed)
  3. To add a new email: Click Add email to add a pre-webinar reminder or post-webinar follow-up email
    • Use the post-reminder follow-up to automatically send registrants a replay of the webinar
  4. Customize the email in the pop-up editor window
  5. Save the email editor and complete the Notification step of the wizard

Customize Notifications

  • Pre-webinar notifications are sent to ALL registrants.
  • Post-webinar notifications can be segmented to send to all or some registrants based on behavior conditions.

Shortcodes

Add unique information about your webinar to the email using shortcodes. These dynamic content codes are contained in {curly_brackets}.

Notification email editor

Shortcodes are automatically replaced with the code’s corresponding value when the email is sent. For example, {first_name} might become John in the recipient’s inbox.

Notification shortcodes:

  • {TITLE} – Title of your webinar
  • {DESCRIPTION} – Description of your webinar
  • {PRESENTER} – List of the host and presenters for the webinar
  • {FIRST_NAME} – Email recipient’s first name
  • {LAST_NAME} – Email recipient’s last name
  • {ATTENDEE_EMAIL} – Email recipient’s email address
  • {DATE} – Date of the upcoming webinar
  • {TIME} – Broadcast time of the upcoming session
  • {LIVE_LINK} – Unique live room URL for the registrant to attend the webinar
  • {PASSWORD} – Password to enter the room (if password protection is enabled in the webinar settings)

Important: Shortcodes are a type of web code. They must be used exactly as provided in the interface, or the system cannot read them and display the correct information.

Adding a Link

To create a link with the {LIVE_LINK} shortcode:

  1. Highlight the text you want to turn into a link
  2. Click the hyperlink icon in the editor menu
  3. In the window that pops up, you will find the text you highlighted
    • Choose the protocol <other>
    • Enter the shortcode {LIVE_LINK} in the URL field
  4. Click OK to save the link

Pre-webinar reminder timing

Set reminder timing

Define the timing for a pre-webinar reminder in the email editor. The send time is relative to the scheduled start time of the webinar (set in the Schedules step of the webinar wizard).

NOTE: If someone registers for your webinar after a notification is scheduled to be sent, the new registrant will not receive that email. For example, if an email is configured to be sent 24 hours before the webinar and someone registers 3 hours before, they will not receive that email.

Post-webinar follow-ups

Important:

  • Always add at least one post-webinar follow-up for each webinar if you want to automatically send a replay after the event.
  • Post-webinar follow-up send time is relative to the scheduled start time of the webinar, NOT the time the webinar ends.

Use a recipient filter in post-webinar follow-ups to send messages at a particular time based on each attendee’s behavior.

Follow-up email recipient filters

Send to:

  • All registrants
  • Those who did or did not attend
  • Those who attended and did or did not order your product
  • Those who attended but left before a particular time
  • Those who attended, stayed to a particular time, and did not purchase

Important: If you choose to send only to those who did or did not purchase your product, the sales goal tracking code must be embedded in the sales funnel. Without the tracking code, WebinarJam cannot determine who purchased a product.

Test Email

At the bottom of the email editor window, send yourself a test email to ensure the formatting and message look good in your email inbox. Test emails can only be sent to the account email address.

Note: Shortcodes do not work in test emails because there needs to be registrant data for a given shortcode to use, and a test only collects the email address. If you send yourself a test email, the shortcodes will not be replaced.

To test the shortcodes, register for your webinar as an attendee to view live versions of the email notifications. Register through the “Run a test” registration page link to keep your live event analytics clean.

YouTube Live

This article is for WebinarJam only.

Configuration step of the setup wizard

Choose YouTube Live as the streaming service for a live webinar to broadcast directly to a YouTube channel.

YouTube live broadcast streaming

Important Notes:

  • You must apply for live streaming in YouTube and wait 24 hours for the application to be approved before you can connect YouTube as an integrated streaming service in your webinar settings. If you are not approved for live streaming, the connection in WebinarJam will fail.
  • Webinars set to stream through YouTube Live are automatically posted in the connected YouTube channel. To restrict viewing permissions to only subscribers and those with a direct link, follow the instructions in this article to post live uploads as “Unlisted.”
  • Elements configured at the Live step of the webinar wizard are exclusive to the WebinarJam live room. Attendees who watch the webinar from your YouTube channel will not see any deployed polls, offers, etc.

Configure YouTube Settings

Login to the YouTube account where you want to run your live stream. Double-check to make sure you are not logged into any other Google services that could confuse the setup.

Set channel features

  1. Go to YouTube > Settings
  2. Click Channel and Feature eligibility
  3. Enable Standard features and Intermediate features

Enable YouTube settings for live streaming

Set upload defaults

Live webinars broadcasted using YouTube Live are automatically published to your YouTube channel. As soon as the event begins, it is listed in your YouTube channel and can be watched live. When it ends, the video is saved as recorded content in the channel.

Change the default upload visibility to restrict the availability of live streams:

  1. In Settings, go to Upload defaults
  2. Select Unlisted in the Visibility drop-down to prevent all video uploads (recorded and live) from being listed in YouTube search or suggested content.
    • This setting impacts the default only. Visibility can be customized for each individual upload as well, letting you post public and restricted content.

Request live streaming access

  1. Go to YouTube
  2. From the top right, click Create and then Go live
    Go live in your YouTube channel
  3. If you haven’t already, follow the steps to verify your channel
    • Starting your first live stream may take up to 24 hours

Wait for live streaming approval to complete

Learn more about getting started with live streaming.


Connect WebinarJam to YouTube

Important: Your YouTube channel must be approved for live streaming before continuing.

In your WebinarJam account, open a webinar for editing:

  1. In the Configuration step of a webinar setup, open the Streaming service module
  2. Choose YouTube Live and click Connect YouTube
  3. Login to Google from the pop-up window
    • If your browser is already logged in to an account, you will immediately see an access authorization from WebinarJam Live.
  4. When authorization is complete, a YouTube connected message appears with the connected account address below
    • Click Reset to remove the connection if needed.

YouTube connected


Test the Webinar

  1. Clone the webinar to test the YouTube Live streaming service
  2. Launch the WebinarJam live room as the webinar host presenter
  3. Go Live to start the broadcast
  4. In another browser, enter the room as an attendee
    • If you see the broadcast video from both user views, the configuration is correct

Note: The YouTube logo will display in the lower right corner of the webinar broadcast video. This cannot be removed.


Troubleshooting

Playback on other websites has been disabled by the video owner

If the live room shows the error, “Watch this video on YouTube. Playback on other websites has been disabled by the video owner,” your YouTube account is not properly configured.

Change channels

Confirm that you are using the same channel as you have your webinar content on. You may need to associate this channel with your main Google account.

Contact YouTube Support

If you perform all of the above steps and are still getting the video embed error, please contact the YouTube support team for more help.

YouTube misconfiguration

If you see the error, “YouTube misconfiguration” while accessing your WebinarJam live room, something in the YouTube connection is not correct.

YouTube misconfiguration error

Check your connection

Open the webinar wizard and go to the Streaming service setting. Make sure you are logged into the same YouTube account that is displayed on the Connect YouTube screen. Your account email will appear in small writing below the YouTube icon.

Check your settings

Review this article to ensure that the YouTube account settings are correct. After making any necessary updates, go back to your webinar presenter’s link and try to launch the live room again.

EverWebinar Chat CSV formatting

This article is for EverWebinar.

Upload a CSV file to quickly add many lines of chat messages to an EverWebinar event.

In the webinar configuration wizard:

  1. Go to the Live step
  2. Open the Live chat box module and click Enable live chat
  3. Configure the chat options to create the ideal attendee experience
  4. At the bottom of the module, click Import from CSV to upload a file with multiple chat lines
    • Alternatively, enter chat lines one at a time using the fields in the setup wizard
Pro tip: Download the chat file from a WebinarJam live event and upload it. The WebinarJam CSV is correctly formatted for import into EverWebinar.

CSV Formatting

Resource: Download a CSV Chat Template

CSV file must contain only 7 columns containing chat message values. Each row in the CSV file represents a new chat message.

  • Hour: Number between 00 and 07
  • Minute: Number between 00 and 59
  • Second: Number between 00 and 59
  • Name: Name of the person
  • Role: Admin or Attendee
  • Message: The actual chat comment
  • Mode:
    • If role is Attendee: Chat, Question, or Answer
    • If role is Admin: Chat, Question, Answer, Highlighted, or Tip

Example of the correct format:

When the spreadsheet is complete, export or save it as a CSV file with UTF-8 encoding before uploading to EverWebinar.


Maximum Chat Lines

The maximum number of pre-loaded chat lines is 5,000, or 1 MB for a CSV file upload. This limit ensures a good experience for attendees by preventing high demands on the webinar room to load the chat.

In a custom chat file, do not exceed 5,000 lines or 1 MB in file size.

If WebinarJam live is used as the source file for the EverWebinar, the system will not auto-import a chat file that exceeds 5,000 lines. You will see an error message informing you that the chat was not imported.

To resolve this and get a usable chat file:

  • Go back to WebinarJam and download the chat history for the live webinar you imported.
  • Open the downloaded CSV file and manually delete chat lines until there are less than 5,000 lines. Save the file and confirm that it’s under 1 MB (delete more lines if needed).
  • Go back to EverWebinar and the Live step of the wizard. Upload the new CSV file as described in this article.
Pro tip: If you activate the “Save real comments” option, real chat lines will be added to the EverWebinar session until it reaches the limit of 5,000 lines of chat. Any additional lines will be ignored.

Presenter and moderator roles

This article is for WebinarJam and EverWebinar.

Each webinar has one host presenter and the option to add two additional user types:

  • Presenter (co-host on camera in WebinarJam, and control panel access in EverWebinar)
  • Moderator (behind the scenes Control Panel management)

Add presenters and moderators at the Configuration > Webinar presenters step of the webinar setup. Click the toggle between Moderator and Presenter to change the role when adding a new user.

Presenters and moderators settings

Check your plan:

  • Control Panel and moderators are available for EverWebinar and for WebinarJam Enterprise.
  • The number of presenters available depends on your WebinarJam plan.

Presenters

In WebinarJam

Presenters are on-camera speakers in a live event. Before the webinar begins, presenters use their unique access link to log in to the live room.

WebinarJam Presenters:

  • Are listed on the webinar registration page and in notification emails
  • Perform and audio and video settings check when they enter the live room
  • Appear on camera during the live webinar
  • Can turn their camera and microphone on and off during the live webinar
  • Can access and control the live injection features of the room, such as the agenda, polls, offers, etc.
  • Can post highlights and tips in the webinar chat
  • Can send private messages to attendees in the webinar and the other presenters
  • Can post public messages in the webinar chat
  • Can remove messages from the webinar chat and block attendees

Host presenter: Starts and ends the live broadcast and can assign admin permissions to other presenters.

In EverWebinar

Presenters have a passive role in EverWebinar because the automated events are not live. Instead of accessing the live room, EverWebinar presenter links give the user access to the Control Panel.

EverWebinar Presenters

  • Are listed on the webinar registration page and in notification emails
  • Can access the Control Panel

Moderators

Moderators are behind-the-scenes users that manage activity in the webinar from the Control Panel without being on camera.

Moderators:

  • Use a unique access link to login to the Control Panel at the time of the live event
  • Can access and control the live injection features of the room, such as the agenda, polls, offers, etc.
  • Can post highlights and tips in the webinar chat
  • Can send private messages to attendees in the webinar and the other presenters
  • Can post public messages in the webinar chat
  • Can remove messages from the webinar chat and block attendees

Learn more about Presenter and Moderator access links

Mailing through your autoresponder

This article is for WebinarJam and EverWebinar.

Send webinar notifications and reminders with an integrated autoresponder platform for additional control over email branding, styling, and scheduling. This is an alternative to using the built-in WebinarJam email builder.


Create Custom Fields

In the webinar configuration, you will need to match values from the webinar with custom fields in your autoresponder. This step is required so your autoresponder can include custom information in the emails sent for your event.

In your autoresponder, create six custom contact fields:

  • Live_Room_Link
  • Replay_Room_Link
  • Webinar_Date
  • Webinar_Time
  • User_Timezone (Required if registered time shows in User’s own time zone)
  • Room_Password (Required if the webinar room is password protected)

NOTE: Select text input as the custom field type for all values. Alternate types like drop-down, multi-select, or date-validated fields will not work.

What are custom fields?

Every autoresponder or CRM comes with standard contact data fields: first name, email address, phone number, etc.

Custom fields let you collect additional data that is specific to your market or usage. These fields are often used to personalize email marketing by injecting data into a message that is specific to an individual recipient. This is the function that your autoresponder will use to send unique details about a webinar to your registrants.

Pro tip:

If you run multiple events that are closely scheduled, consider creating unique custom fields for each event:

  • Live_Room_Link_1
  • Live_Room_Link_2
  • Replay_Room_Link_1
  • Replay_Room_Link_2

If an previous attendee registers for another webinar, the custom field values are overwritten in your autoresponder with the details from the most recent registration. If there is no overlap in the webinars’ email notification scheduling, multiple sets of custom fields are not needed.


Configure Your Webinar

To enable the integrated autoresponder or CRM:

  1. In WebinarJam
  2. Open a webinar and go to Notifications > Your Email Gateway
  3. Select Your own autoresponder
  4. All integrated autoresponders will appear below. Hover over your preferred application and click Custom Fields.

Select autoresponder in the email gateway settings

IMPORTANT: Due to limitations in their APIs, Maropost and Constant Contact are not supported for this feature.

Match Custom Fields

Match the details of your webinar to the custom fields created in your autoresponder.

Custom field matching

In the Custom fields pop-up:

  1. Click each field in the window to access a list of custom fields from your autoresponder
  2. Select the option from the drop-down that corresponds with each field value
  3. Save Custom fields and the Email Gateway module to complete the webinar setup

Custom field configuration successful

CRITICAL: Custom fields linked in a webinar configuration must remain active to work. If a field is deleted or changed, go back to the webinar configuration and update the custom fields portion of the integration.


Test the Integration

Test the autoresponder integration with an automation rule triggered by registration.

In the webinar configuration

  1. Go to Integrations > Email autoresponder integration
  2. Click the autoresponder tile to add or edit integration rules
  3. Select a trigger and action for the rule
    • Example: IF they register, THEN add to list

Autoresponder integration rules

In your autoresponder

  1. Create an email for webinar registrants that will send in response to the automation action configured at the previous step
    • Example: An email that sends when a contact is added to the list specified in the rule
  2. In the email body, use the webinar custom fields to insert information about the event (example in the following image)Kartra email builder with custom field variables

Test the registration flow

  1. Use the registration page link for the webinar to register with a valid email address
    • If all previous steps were completed correctly, this should trigger the integration rule and send you an email with the details of the webinar.
  2. Check your autoresponder:
    • Do the custom fields appear in your test contact with webinar details in them?
    • Is the contact subscribed to the list specified in your automation rule?
  3. Check your email inbox:
    • Did you receive the webinar notification?
    • Are the correct webinar details displayed?

If the details are correct in your autoresponder and the email, the setup is complete. Use the custom field variables with the webinar information to create more notifications, a replay follow-up, and any custom funnel designs that are possible in your autoresponder.

Your own SMTP gateway

This article is for WebinarJam and EverWebinar.

WebinarJam Mail is included with your subscription to deliver notifications and reminders configured for your webinars. If you prefer, integrate a third-party SMTP service to manage your mail.

Note: API-based connections are required to track email analytics such as email opens, clicks, bounces, etc.

Configure Your Webinar

To enable the integrated SMTP service:

  1. Open a webinar and go to Notifications > Your Email Gateway
  2. Select Your own SMTP gateway
  3. Save the module

Repeat this process for any additional webinars you want to update. Each time you create a new webinar, select the integrated SMTP service if preferred.

Email Send-from and Reply-to

Emails sent through the integrated SMTP will be sent from the “Sender Email” address specified in the integration connection settings. The sender address will be used as the send-from and reply-to address for all notifications.

Integration sender name

The name registrants will see as the sender for notifications is the webinar host’s full name. The host is set in the webinar configuration wizard, under Configuration > Webinar presenters.

Test the Integration

Note that WebinarJam/EverWebinar cannot check the status of your SMTP account or the validity of the API credentials provided.

To ensure the deliverability of your webinar notifications, provide a valid API key and keep the integrated SMTP account active. The WebinarJam server will send an outbound API request to your integrated provider using the API credentials provided and ask them to deliver an email notification at the appropriate time.

The WebinarJam server does not receive notice of any failure to reach your SMTP service or deliver the messages. In the event of delivery failure, the emails will not be resent, and you will not be notified. Always run a few tests to ensure your configuration is correctly set up.

Customize notification sender details

This article is for both WebinarJam and EverWebinar.

Send notification emails before and after a webinar so registrants automatically receive reminders and a copy of the replay.

By default, notifications are sent from the webinar host’s full name and email address. When a registrant receives a notification, the message in their inbox will be “from” the host.

To edit the notification sender details:

Configuration step of the setup wizard

  1. Open a webinar and go to Configuration > Webinar presenters
  2. Click the pencil icon on the host module
  3. Update the full name and email address in the contact fields
  4. Click Save and Save again to close the module

The webinar host and presenters

Emails from the preceding example will be sent from John Smith <[email protected]>

DKIM not configured warning

A warning message appears if the Webinar Host & Presenter’s email address uses a custom domain that has not been authenticated with DKIM records in the domain settings. Learn how to authenticate your sender domains.

Do not check the box to bypass DKIM security without understanding the impact. Learn more about the DKIM missing error.

IMPORTANT: If the webinar host has a free email address (such as Gmail, Hotmail, Yahoo, etc), the sender email address is converted to [email protected]. For example, if the webinar host is Joe Smith <[email protected]>, email reminders will be sent out as Joe Smith <[email protected]>. This is done to improve deliverability and reduce the likelihood that your messages will end up in spam.

Facebook Live

This article is for WebinarJam only.

Important: Facebook Live has changed

As of Monday, April 22, 2024, Meta removed Facebook Group API support for all third-party services including WebinarJam. As of this date, WebinarJam events using Facebook Live as the broadcasting service will no longer stream to Facebook Groups.

Please take action immediately and update any events that are scheduled to broadcast to a Group using Facebook Live on or after April 22, 2024. You can change your streaming service to WebinarJam Live, YouTube Live, or update your Facebook Live connection to stream to a Page instead of a Group.

Configuration step of the setup wizard

Choose Facebook Live as the streaming service for a live webinar to broadcast directly to a Facebook page or profile.

Facebook Live selection for webinar streaming

Important:

  • Webinars set to stream through Facebook Live will be automatically posted on the chosen Facebook Page. Depending on your privacy settings, this could make the event publicly accessible.
  • Elements configured at the Live step of the webinar wizard are exclusive to the WebinarJam live room. Attendees who watch the webinar from your Facebook page will not see any deployed polls, offers, etc.

Connect to Facebook

  1. In the Configuration step of a webinar setup, open the Streaming service module
  2. Choose Facebook Live and click Connect Facebook
  3. Login to Facebook from the pop-up window. If your browser is already logged in to an account, you will immediately see an access authorization from WebinarJam Live

Authorize a WebinarJam Live connection with Facebook

  1. In the Facebook window, click Edit access to choose the pages where you want to broadcast webinar events
    • Important: Depending on page permissions your account may not be authorized to post videos!  If possible, check your permissions before continuing.
    • Click Continue as [Name]
  2. On the next screen, choose who can see WebinarJam live posts in your Facebook timeline

Choose the privacy and visibility for your posts in Facebook

    • If you are testing, choose Only me to restrict post visibility so only you can see broadcasted events
    • Change this to a larger public user selection before going live with your first event
  1. Click Continue as [Name] to complete the Facebook setup
  2. When the connection is complete, a green “Facebook connected” status appears in the webinar setup

Facebook connection successful

    • Click Reset to remove the connected Facebook account from the webinar settings
  1. Select the Stream destination for your broadcast from the drop-down

Edit Facebook visibility or connection

To update the WebinarJam Live connection and settings in Facebook, login to your Facebook account and go to Settings > Business Integrations.

Facebook business integrations controls

To revoke access permission between WebinarJam and Facebook, click Remove. Learn more about disconnecting a business integration from Facebook.

Important: Disconnecting the Facebook account may impact any other webinars that are configured to broadcast to the same account. Double check the configuration for all webinars configured with Facebook Live after resetting a connection to make sure there are no unintended interuptions.

To change the visibility of WebinarJam posts, click View and edit.

Change the visibility of WebinarJam posts

Test a Facebook Live webinar

  1. Launch an event from your WebinarJam account and use the go live button in the room to start broadcasting.
    • Check your privacy! Your test will appear in the destination page according to the visibility set in Facebook.
  2. Go to the page in Facebook where the event is configured to broadcast to confirm that the stream is active.
Important: Using Run a test to test an event with Facebook Live broadcasting may be visible to visitors on your Facebook page. To run a private test in any mode, change the post visibility in Facebook to a private setting before you start the test.

© 2024 WebinarJam All Rights Reserved