WebinarJam and EverWebinar documentation Webinars for everyone!

WebinarJam Quick Start Guide

This tutorial will walk you through each setting available in the full configuration of a webinar.


Start Setup

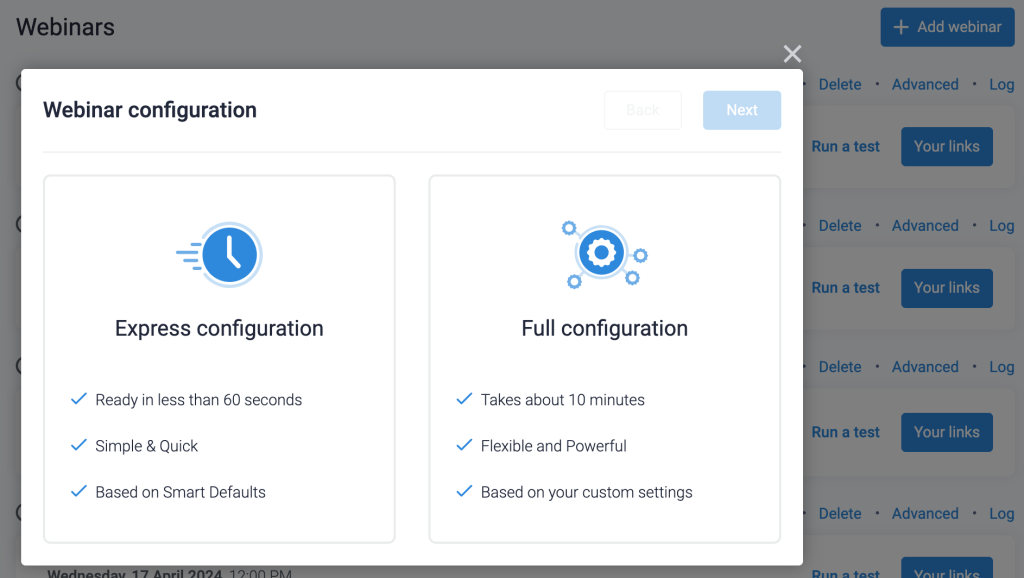
Start by clicking “Add Webinar” from your dashboard and select Full Configuration (shown below). You can click Express and it will limit your options, but you’ll be able to get going in less than 60 seconds. In this tutorial we’re going to take probably a little more than 10 minutes because I’m going to be explaining every step. Let’s click next.

Webinar Configuration

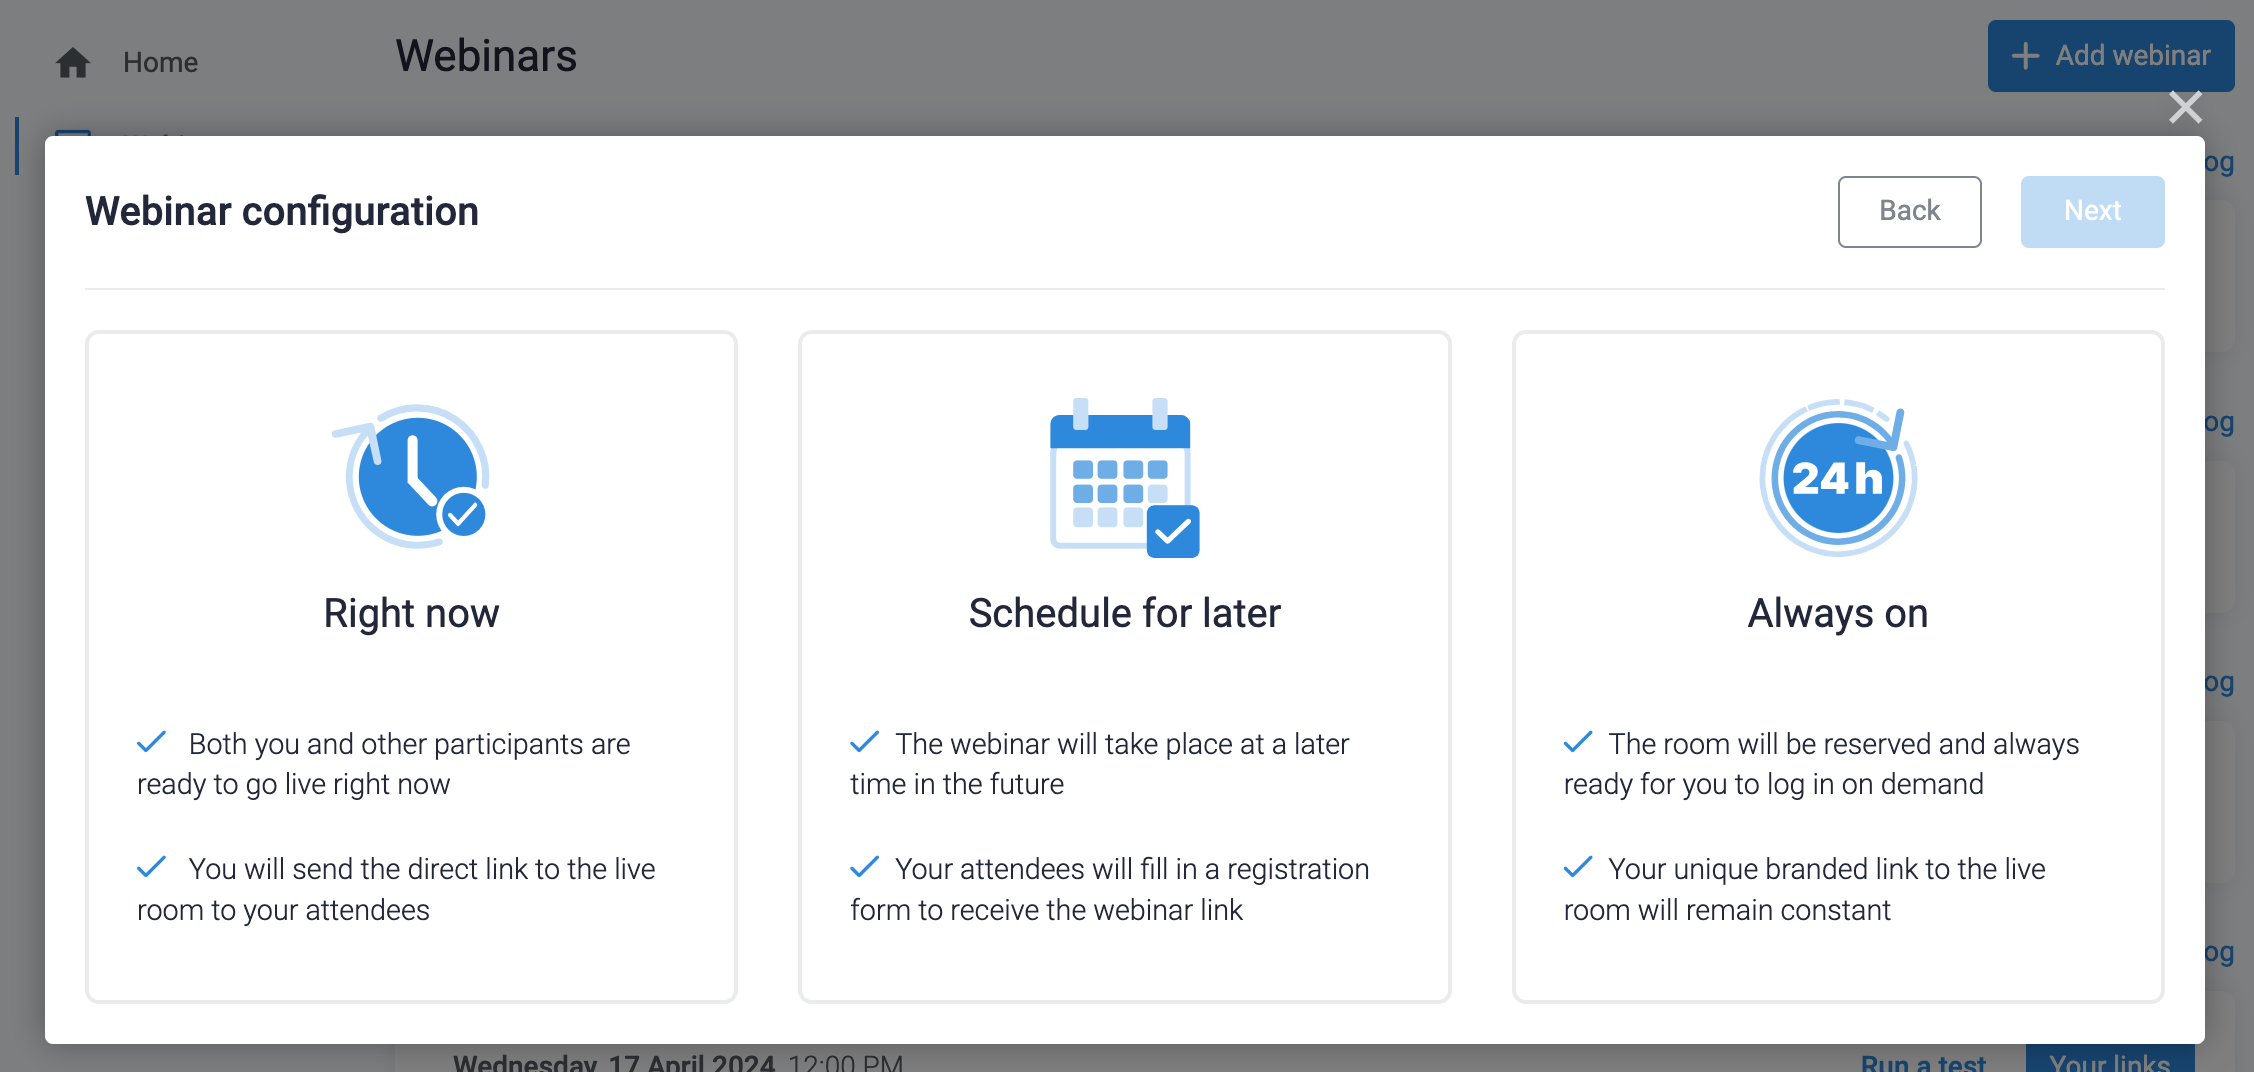
We have a few options here:

  • Right Now. This is if you want to just get a one-off webinar done quick. You’re not going to have any notifications. You’re not going to have any schedule. You’ll send the webinar room link directly to your presenters and your webinar attendees.
  • Schedule for Later. This is when you want an actual date and time for your webinar.  If you also want to set up notifications (including an automatic email to send out the webinar links), you’ll need to select this choice.
  • Always On. This is a webinar room that can be used repeatedly. This could be used for meeting rooms, on the spot training, and can be used over and over again. Like Right Now, this has no notification emails or schedule.

We’re gonna select Schedule for Later so we can see the schedule settings that don’t appear in the other two options.

Basic Settings

The first box (shown below) is filled with Basic Settings; click the pencil icon to open it. You’ll find the following:

  • Webinar Name (for your reference in the dashboard)
  • Webinar Title (for your potential registrants to see)
  • Webinar Description (also for your potential registrants to see)
  • Webinar Language (for the registration fields and buttons)

On Demand

You can also list your webinar in the On-Demand section, so let’s take a look at that real quick. Shown below is our On-Demand portal. There’s a lot of webinars available and they’re coming up real soon. You can choose by category (cooking and food, for example) and you can take a look at what’s available.

Directory Category

Back in the Basic Settings (shown below), we can choose the directory category (like internet marketing e-commerce) and then you can click the circle to upload a thumbnail image.

Webinar Presenters

Next are the Webinar Presenters (shown below). This is where your information is entered by default (it’s already here!) so if you are the only one you can just click confirm and move on.

I’d like you to know two things though about this side profile here. First, “Webinar Host & Presenter” indicates you are the creator of this webinar (shown below).

You can add people without them being a presenter but instead as a moderator. So for example, let’s say I want Tammy to moderate my webinar. As shown below, I’ll add her name and email to the fields, select Moderator, and choose Save.

Once I’ve clicked save, her information will appear on the right. This time, “Webinar Moderator” will be visible by her name (shown below).

If you want to edit details of either person, you’ll need to select the pencil icon to the far right. You can change any details including adding a different profile image by clicking the profile circle on the left. Make sure to click Save before moving on!

Streaming Service

Finally, in Streaming Service (shown below) we have three available options for you to use:

Webinarjam Live (selected above) is our streaming service. It means that you’ll be streaming through our servers which are pretty darn fast and private.

YouTube Live (selected below) will stream using YouTube’s servers and will stream both in your webinar room and on your YouTube account simultaneously. You’ll need to connect your YouTube account to use this however (you can find full instructions here).

Facebook Live (selected below) will stream using Facebook’s servers and will stream both in your webinar room and on your Facebook profile, group, or page.  You’ll need to connect to your Facebook account (you can find full instructions here).


Webinar Schedules

The next step are the schedules. There are three options:

  • One single session
  • Multiple sessions
  • A recurring series of presentations

One Single Session

Think of a One Single Session (screenshot below) like a movie. There may be multiple sessions you can go to, but it will be the same content each time. Therefore, you would only buy a ticket to one session, not to all of them.

Let’s say that you want to run a morning and an afternoon run, just to give your users more flexibility to attend whichever of the two (and only one of the two) fits their schedule best. In this case, you could configure a session at 9:00AM and another one at 1:00PM. Remember to click the blue “ADD” button!


Multiple Sessions

On the other hand, Multiple Sessions (screenshot below) are like a mini-series that span through a few days, every day screening a different episode. In this case, you subscribe to all the individual events.

You would configure multiple date/time combinations, and they will all be bundled as an indivisible multi-event presentation.


Recurring Series of Presentations

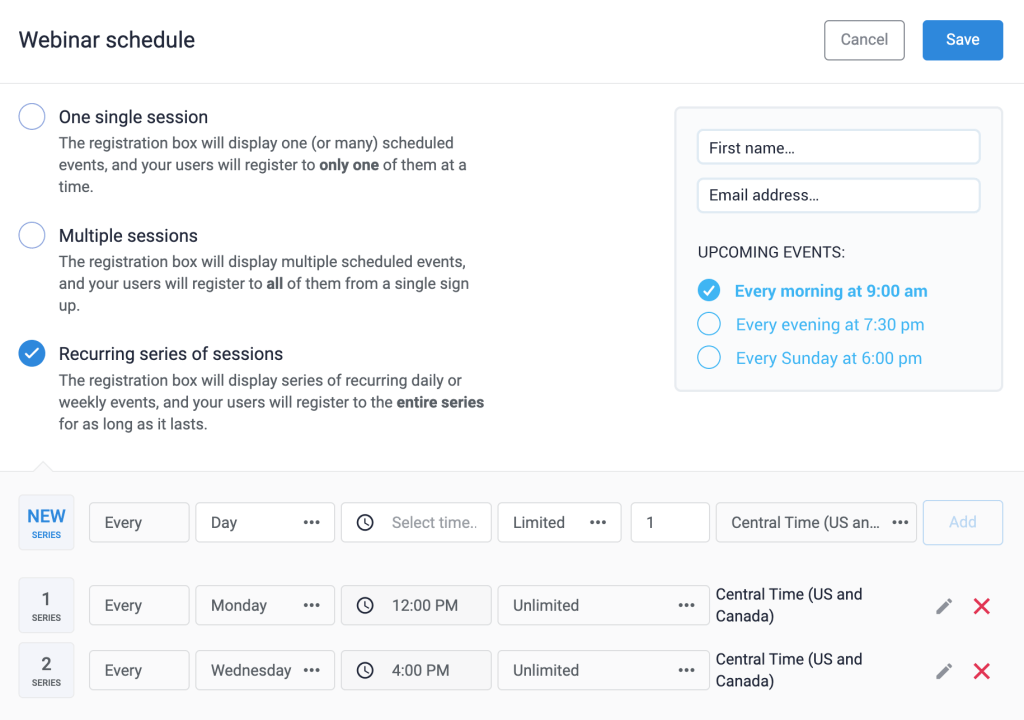
Finally, a Recurring Series of Presentations (screenshot below) is closer to a TV show with each episode providing new information (maybe even building on previous webinars), and the show will have a rather fixed and recurrent scheduling over time.

Users registering for a Webinar Series will register for the whole daily/weekly series, for as long as it lasts.

To add a schedule as a series, select a day of the week, a time, and whether the series has no stopping date (Unlimited) or has a set number of sessions (Limited, in which case you type the number of sessions), and finally the timezone. For example: say that you want to set up a weekly session, running every Saturday at 5:00PM, for a whole year (52 weekly sessions). Take a look at the screenshot below to see how you’d configure that.

The last step is clicking “ADD”. In the above below, only one recurrent series has been added, and of course you could configure more series if you wanted.


Registration

Third step contains your registration settings. The registration page (shown below) is the first page that people are going to arrive at to register for your webinar. This is the first inkling of your webinar that they’re going to get!

Edit a Registration Page

Select a template and you will be brought into an editing window. Anything with a pencil icon can be edited. This includes images, text (as shown below), and even videos (provided they are from YouTube or a direct link to an .mp4 file).

In the above example, Tammy (our moderator) has been added to the page. If I don’t want her name visible on this page, I’ll edit those boxes and delete her from the list of presenters (as shown below).

Once you save and exit (using the green Actions… menu in the upper right), you will be returned to the main settings. Split testing is also available here (shown selected below). You will need to choose what percentage of visitors should go to each page before Confirming.

Your Own Design on Your Own Website

You also may have noticed the option titled “Your Own Design on Your Own Website”. Choosing this will skip the design stage and give you a code to embed a button on your own webpage. This will be addressed later.

Registration Form Fields

For now, move on to the Registration Form Fields (shown below).

Here you can choose what details are requested from registrants when they register. At a minimum you must request first name and email (these are required for signing in to the webinar room). However you can switch the toggles to make the others not mandatory, or click the ‘X’ to delete them.

Auto-Subscription to Future Webinars

The next step, Auto-Subscription (shown below), gives your registrants an option to be automatically registered to your future webinars of your choice. They will only be subscribed to the webinars you choose, when you choose to do so.

Free registration vs Paid registration

Following this is “Free registration vs Paid registration” (shown below). If you choose to charge a fee, you’ll need to use a separate checkout platform to process the fee. Type in the amount in the first box and enter in the URL of your checkout page in the second one.

WebinarJam will redirect users to the checkout page when they choose to register. Once they complete the purchase, however, your external payment processor will need to send them back to WebinarJam’s Port-Payment Redirect URL. It is the final field listed in that setting and should be used as the product’s Thank You page (in most systems).

Password Protection

The final setting in registration is Password Protection. You can add a Master Password as shown below. In this case you will create a password that is the same for every registrant.

Alternatively, you can generate unique passwords for every registrant. In this case, WebinarJam will generate the passwords for you.


Notifications

Notifications can be found in the next step (shown below). WebinarJam allows 10 notifications before and 10 after your webinar.

Before you add/edit these you will need to choose an email gateway. If you do not have your own preferred SMTP service, we recommend just using WebinarJam Mail.

In addition to emails (as shown below), you can SMS, and recorded messages via phone calls, however those require further integrations.

Add Email Notification

For now, let’s walk through the included email system. Click the blue “Add Email” link (shown below along the right) to begin.

Edit Email

Clicking “Add Email” will open an email editing window (shown below). You can set the email timing (in relation to the webinar start time), the email subject, and the email body.

Something you’ll notice already in the body of the email (as well as listed on the right sidebar) are the Shortcodes {contained in curly brackets}. These are codes that are automatically replaced with the relevant information. You can learn more about these in our article about Notifications.

Finally, you can enter in your email address at the bottom to send a test email to yourself. This email will not replace the shortcodes, but will display everything else properly.


Integrations

With that done, you can move on to the next step: Integrations (shown below).

Here you can add integrations with various Email Autoresponders (such as Kartra) as well as add any tracking system you may have (such as Facebook Pixels).


Thank You

For now, move on to the Thank You step. There are two options here, the first being “Survey Your Registrants” (shown below).

Survey

You have four options for survey questions:

  • Poll allowing only one answer
  • Poll allowing multiple answers
  • Question for a short answer
  • Question for a long answer

Click the plus icon, next to a question type of your choice, to add it to your survey. Then fill out the question details on the right (clicking the ‘+’ to add each possible answer).

Thank You Page Design

The next box is for your Thank You Page Design. Just like the registration page, you’ll select a theme and edit whatever element you choose by clicking the pencil icon.


Live


The next step has the most options, all of them dealing with your live webinar (shown below). Let’s go through them one by one.

Autoplay

First up is Autoplay!  You can choose whether to use one of our splash pages with autoplay disabled, or choose to enable autoplay for most browsers!  Please note that autoplay will usually have to start muted.

Live Room Design

Next up is the live room design!  Here you can choose several neat options to add some branding to your webinars.

You can choose options from the above as follows:

  1. Select one of our pre-designed webinar room themes
  2. Pick which color scheme
  3. Choose whether to display presenter social media information

Polls and Quizzes

Next is the Polls and Quizzes option (show below). Any poll you set up here will be available when you are live, however you can set it up on the fly in the webinar room itself. The same can be said for all the following options (if you forget something, you can create it inside the live webinar).

Product Offers

Product Offers (the next option, shown below) are popped up in the chat box area and provide a button for attendees to click. Click “Add New Offer” and the below window will pop up for you to create the offer. As you edit the options, the preview on the right will change. Once the required fields are filled, you can click to save.

Broadcast Sales in Real Time

Note that the option to “Broadcast Sales in Real Time” will require adding a tracking code to your product’s Thank You page. This tracking code can be found on your dashboard for the webinar’s Advanced options.

Video Injections

Video Injections (shown below) are a way to play a pre-recorded video clip directly to your audience. All you need is a link to a YouTube video or a direct link to an .mp4 file.

File Handouts

You can also share files (of any kind up to 80mb) directly with your attendants (shown below).

Slide Presentation

Also, you can add your slide presentation to your webinar (shown below). PPT, PPTX, KeyNote, and PDF (up to 80mb) are acceptable file formats for this option.


Bad words filter

You can also prevent your users from using particular words.  Simply go to your Profile (1) and then Settings (2) to add any words you don’t want shared during your webinar.


Autoplay

You have the choice to enable autoplay for your webinars!  If disabled, you can choose your call to action text displayed on the video as well as the thumbnail that is displayed behind it!


Replay

In the next, and final, step we’ll be deciding what to do about the webinar replay. If you choose to enable the replay in the first box, 4 additional options will be available (shown below).

Webinar Replay Contents

The first option is deciding to what the Webinar Replay link will lead; there are three options (shown below). First is the Replica Replay. This is a recording of your webinar as it happened, including chat, surveys, offers, etc. It cannot be paused, but instead closely mimics the live experience.

Custom video allows you to replace the video stream with your own video source (other than the recorded webinar). You can use a YouTube link or a direct link to an .mp4 file. Below that you’ll need to enter the exact duration of the video so the system knows when to close the room at the end.

Finally, you can redirect the replay link to any URL you would like. This is particularly helpful if people arrive after the webinar is over and you want to lead them to a specific page that isn’t the replay (such as a sales page or otherwise).

 Replay Controls

Next up is the option to either enable or disable replay controls.  You can choose to allow your replay viewers to fast forward, rewind, and scan through your replays!

 Replay Page Expiration Date

Next is the Replay Page Expiration Date (shown below). You can set a number of hours for the replay to be available. After this time, the Replay link will redirect to an expiration page (telling the visitor that they have arrived too late).

Allow Users to Submit Questions

The final option is whether to add a “Question Box” (shown below). By activating this, you enable the chat box for visitors to type into. Any messages they enter will be sent to the email address of your choice.

Sales tracking code

Both in WebinarJam and EverWebinar, you may configure an offer to pop at any time through your webinar, converting your sessions into money-generating machines!

Well, since the actual payment transactions happen outside our platform, it’s important that your payment system (whether PayPal or any credit card checkout cart) reports back to let us know that a sales has indeed taken place. But… how is that communication actually happening? That’s what our Sales Tracking Code is for.


Finding the sales tracking code

First of all, let’s review where to grab that code.

Once you have completed configuring your webinar, and before you run your actual event, open the Advanced window, enter the Goal Tracking tab, and copy the sales tracking code. See screenshot below.

A few important things to note at this point:

  • The system will only generate a sales tracking code if you’re actually configured an offer for your webinar. Otherwise, this tab will remain empty.
  • The system will generate one sales tracking code per offer configured, since you can indeed set up multiple offers per webinar.


Tweaking the sales tracking code

You will notice that the code contains a “?price=0.00” segment. You need to modify the “0.00” to reflect the price amount for each individual sale. For example, if your product is sold at $40, then you’d enter “?price=40.00“. That’s what’s going to allow WJ and EW to track not only your sales numbers but your sales revenue too.

There are some limitations, such as for example if you pricing model involves a recurring payment subscription (example $19.00 per month) or a payment plan (example 3 payments of $99). In this case, you’ll have to decide what is the appropriate value for the ?price parameter: either the first payment in the subscription, or perhaps your estimated dollar-per-customer value. That’s up to you.

The second parameter available for the sales tracking code is the type of currency.  Simply fill out the part after “&currency=” with the appropriate currency.  Note you will have to select one of the currency types listed below.

USD, EUR, GBP, YEN, CAD, AUS, CHF, NZD, INR, BRL, DKK, NOK, SEK, TRY, PLN, CZK, RUB, LEU, BGN, HUF, LTL, ILS, ZAR, HKD, RSD, MYR

If you do not fill out this parameter, or include one our system does not recognize, it will by default use USD.

Embedding the sales tracking code

Alright, so now that you have the sales tracking code, we must deploy it!

The code is meant to be embedded directly in your checkout flow’s Thank You page, meaning the page that your customers are redirected immediately upon successfully completing payment. More specifically, inside the <BODY> tags of the page HTML.

Every time a customer visits that page, the tracking code will be triggered and the webinar analytics will register a new sale and will add the sale value to your revenue balance.

We have one final trick up our sleeve! In case you’re using that same checkout funnel outside your webinar environment, we don’t want other customers triggering the sales tracking code and, therefore, inflating your webinar analytics. For that reason, the sales tracking code will only register sales if it recognizes the customer as an attendant to your webinar session. Needless to say, this is achieved by the power of cookies!


Finding your analytics

Sales and revenue metrics can be found at the My Analytics page, inside the Monetization section, along with other useful data such as Sales Conversions or Earnings Per Attendee. Truly a God sent to calculate your webinar ROI if you’re driving traffic via paid ads!

See screenshot below.

Scheduling

WebinarJam Scheduling

There are three options for scheduling in WebinarJam:

  • One single session
  • Multiple sessions
  • A recurring series of presentations

One Single Session

Think of a One Single Session (screenshot below) like a movie. There may be multiple sessions you can go to, but it will be the same content each time. Therefore, you would only buy a ticket to one session, not to all of them.

Let’s say that you want to run a morning and an afternoon run, just to give your users more flexibility to attend whichever of the two (and only one of the two) fits their schedule best. In this case, you could configure a session at 9:00AM and another one at 1:00PM. Remember to click the blue “ADD” button!


Multiple Sessions

On the other hand, Multiple Sessions (screenshot below) are like a mini-series than span through a few days, every day screening a different episode. In this case, you subscribe to all the individual events.

You would configure multiple date/time combinations, and they will all be bundled as an indivisible multi-event presentation.


Recurring Series of Presentations

Finally, a Recurring Series of Presentations (screenshot below) is closer to a TV show with each episode providing new information (maybe even building on previous webinars), and the show will have a rather fixed and recurrent scheduling over time.

Users registering for a Webinar Series will register for the whole daily/weekly series, for as long as it lasts.

To add a schedule as a series, select a day of the week, a time, and whether the series has no stopping date (Unlimited) or has a set number of sessions (Limited, in which case you type the number of sessions), and finally the timezone. For example: say that you want to set up a weekly session, running every Saturday at 5:00PM, for a whole year (52 weekly sessions). Take a look at the screenshot below to see how you’d configure that.

The last step is clicking “ADD”. In the above below, only one recurrent series has been added, and of course you could configure more series if you wanted.


EverWebinar Scheduling


Because EverWebinar is pre-recorded, there are a number of additional options for scheduling (shown above). We’ll review them one by one here. First is simply adding individual times and days/dates (shown below). Choose Every (a repeating schedule) or On (a specific date), then choose the day, time, and time zone.

User’s Own Time Zone

As shown below, I am choosing The user’s own time zone instead of a specific time zone. The system will automatically detect the time-zone for your potential registrants and set the webinar for them. Makes sure to click ADD to ensure your schedule is added!


Instant Watch Replay

The next option is the Instant Watch Replay (shown below). With this turned on, the Registration Page will show “Watch the replay now!” in addition to your other schedules. A visitor clicking this option will skip the wait for a session, and watch the replay immediately.

It is important to note that, since it’s a meant to mimic a replay video, the webinar room will not display any rolling chat feed. Remember to also enable the Replay session itself later on in this configuration wizard!


Allow Late Attendance

After this is “Allow Late Attendance” (shown below). This adds another option to the available schedules (like the above setting), but this time for visitors to join a webinar that is already “in progress”. When they enter the “live” room, the webinar will auto-forward to the correct time stamp.


Just In Time

Possibly the most important feature here is “Just In Time” scheduling (shown below). Using this, you can allow for visitors to see a session coming up very soon! You can choose to display sessions at 15, 30, and 60 minute intervals:

  • Every :15, :30, :45 or :00 (15 minutes)
  • Every :30 or :00 (half hour)
  • Every :00 (hour)

Hide Night Time Schedules

You can also Hide night time schedules to create the more realistic appearance of a regular working schedule. If someone visits your registration page at 2am (and you have blocked schedules from 11pm-7am) the next available session will be in the day time.


Displayed Schedules

Which schedules you actually display is shown in the next setting Displayed Schedules (shown below). You can choose how many available schedules to display to visitors. If you choose the first option, only the Just in Time schedule and Yesterday’s replay will be visible.


Block Short Term Registrations

If you don’t want last second registrations, you can block up to 6 days out (shown below). If you choose to block any short-term registrations, Just in Time scheduling will not work.


Block Dates

Finally, you can use this last option (shown below) to block holidays or any other dates you may not want available.


EverWebinar Quick Start Guide

This tutorial will be an overview of every EverWebinar setting, with links to more information where needed.

EverWebinar Configuration

EverWebinar Source

The first essential step is to choose your webinar source (shown below). This is the video that will play in the webinar room as the “live stream”. You can choose between an external video file or a previous WebinarJam live session.

External Video File

In the case of an external video file, add a link to a YouTube video or a direct link to an .mp4 file. Make sure to accurately enter the duration of your video so the webinar ends/closes at the correct time.


Previous WebinarJam

For a previous WebinarJam live session (shown below), just select the webinar and event date/time. No duration settings are necessary since the system already knows how long the source is.

When using this option, all live elements will be imported. This includes chat, offers, broadcast messages, and more.


Basic Settings

The second step is for your Basic Settings (shown below). This includes:

  • Webinar Name (for your reference in the dashboard)
  • Webinar Title (for your potential registrants to see)
  • Webinar Description (also for your potential registrants to see)
  • Webinar Language (for the registration fields and buttons)


On-Demand

You can also list your webinar in the On-Demand section (shown above at the bottom of the frame), so let’s take a look at that real quick. Shown below is our On-Demand portal. There’s a lot of webinars available and they’re coming up real soon. You can choose by category (cooking and food, for example) and you can take a look at what’s available.

Webinar Presenters

Next are the Webinar Presenters (shown below). This is where your information is entered by default (it’s already here!) so if you are the only one presenting (or rather, on the video), you can just click confirm and move on.


I’d like you to know two things though about this side profile here. First, “Webinar Host & Presenter” indicates you are the creator of this webinar (shown below).

You can add people without them being a presenter but instead as a moderator.  So for example, let’s say I want Tammy to moderate my webinar. As shown below, I’ll add her name and email to the fields, select Moderator, and choose Save.

Once I’ve clicked save, her information will appear on the right. This time, “Webinar Moderator” will be visible by her name (shown below).

If you want to edit details of either person, you’ll need to select the pencil icon to the far right. You can change any details including adding a different profile image by clicking the profile circle on the left. Make sure to click Save before moving on!


Webinar Schedules

The next step is the final essential step: Webinar Schedules (shown below). As long as this is filled out, you will have a functioning webinar!


There are a lot of options for scheduling, but for this tutorial we will simply add an every day, 2PM webinar. As shown below, I am choosing The user’s own time zone instead of a specific time zone. The system will automatically detect the time-zone for your potential registrants and set the webinar for them.


To add a schedule, you must click the ADD button on the far right. Only once this button is clicked will your schedule be added. For further detail on scheduling, click here.


Registration Page

The following step deals with your registration page. First (shown below), is your registration page design. You can choose from a number of templates.


Once you select a template (shown above), you will be sent into an editing window (shown below). Here you can edit any element on the page that has a blue pencil icon in the corner.

When you are ready to move on, use the green Actions menu (in the upper right of the window) to preview your page and save & exit.


Enable Split Testing

If you’d like, you can split-test your registration page (as shown below) by clicking “Enable Split-Testing” and choosing a percentage of visitors to send to the second page.

To choose the page design for page “B”, click the toggle switch in between the two letters, choose a template, and edit it just as you did the first one.


Registration Form Fields

Following this, choose the information that registrants are required to enter for registration (shown below). By default First Name and Email are on and required. This is because these two bits of information will be used to login to the webinar room itself.

Last Name and Phone Number can be added to your form as well, but you can make these optional by clicking the toggles on the right.


Free or Paid Registration

If you’d like, you can charge for your webinar in this step (shown below). You will need an external payment processor and/or cart system (like Kartra!) to use this feature. Once a registrant finishes their purchase, they will need to be redirected to the link at the bottom to complete registration.


Password Protection

Finally, you can password protect your webinar (shown below). If you choose this, you can decide between one master password or unique passwords for every attendee. A master password is one you choose yourself that all attendees will use. The unique passwords option has the system create a unique password for each registrant.


Notifications

The next step (shown below) is all about your notifications. First (at the top) is your email gateway. By default this is set to our servers, however if you have your own SMTP gateway you’d like to use, click here to learn how to integrate properly.

Otherwise, just move on to the next part: Reminder Notifications.

You can add up to 10 notifications before and 10 notifications after the webinar starts. You can integrate Twilio to add calls and SMS notifications as well, but we will just discuss email here. Click here to learn more about integrating Twilio.

Click ADD EMAIL (shown above) and a window will pop up to create/edit your notification (shown below). You can choose the timing of the email by number of hours before or after the webinar starts.

Post Webinar Segmentation

If this is a post-webinar notification, you can limit sending this email to:

  • All Registrants
  • Those who did or did not attend
  • Those who attended and did or did not order your product
  • Those who left before a time you specify
  • Though who stayed to a time you specify, but didn’t purchase

Email Shortcodes

Finally, take note of the shortcodes in the right sidebar. These are replaced with relevant information, automatically, when the email is sent out. You can read more about those right here.

ADD EDIT EMAIL IMAGE


Notifications

After completing the notification step, you can add various integrations and tracking systems to your webinar (shown below). Email autoresponder integration allows you to send registrant data to a third-party platform. 3rd party tracking systems allows you to add things like Google Tag Manager and Facebook Pixels to your webinar pages.


Thank You Setup

In the next step, you choose options for your Thank You page.

Survey

The first option (shown below) is a Thank You page survey for your registrants. You can add a:

  • Poll allowing only one answer
  • Poll allowing multiple answers
  • Question for a short answer
  • Question for a long answer

Or a combination of them! Once people respond to the survey, you will find results here and in the Live Links button on your dashboard.


Thank You Page Design

The next option is the design of the Thank You page itself (shown below). Just as with the registration page, you’ll select one template and edit the appearance before moving on.


Live Settings

Finally, we arrive at the live room settings. Each live element you can use in WebinarJam (such as file sharing and offers) are available to be precisely timed here. You can read about all of them in detail here, but for this tutorial we will discuss the live element settings that are unique to EverWebinar.

Live Chat Options

First of which (shown below) is the live chat box.

If you choose to Enable Live Chat, you can add pre-written lines of chat (or “chat roll”) by entering the time the message appears (in hours, minutes, and seconds), the name of the person sending the message, their role (Attendee or Admin), the message itself, and finally the mode (chat or question). Once this is all filled out, click Add to add the line of chat.

If you used a previous WebinarJam Live Session as your source, the original chat will already be in here! If you would like to add messages in bulk, you will need to upload a formatted CSV file. You can read more about that here.


You can also choose to disable the simulation of live chat in exchange for a Question Box (shown below). Enter your email address and all messages in the webinar room will be emailed to you directly.

Alternatively, you can disable the chat options altogether.


Highlighted Announcements

Next are Highlighted Announcements (shown below). In a WebinarJam Live webinar, you can choose a chat message (such as a glowing testimonial) to highlight. If you are trying to simulate live chat, make sure the message you are typing here also exists in your chat roll from earlier.


Redirect to External Websites

A WebinarJam Live webinar allows you to redirect users to a page of your choice, so EverWebinar allows the same! You just need to choose the time at which attendees need to be redirected.


Sticky messages

Sticky messages (shown below) are displayed at the top of the chat sidebar. You can choose a start time (for the message to appear) and an end time (for the message to disappear).


Display Number of Attendees

If you are trying to simulate live room attendance, it may be helpful to display a number of attendees (shown below). You can choose between fixed and dynamic. Fixed is one number that you choose, which will stay on screen for the whole webinar. Dynamic will mimic the attendance of a real webinar with an initial increase in attendees (to the number that you specify) and gradually falling off.


Live Sales Notifications

Finally, in the live room options, you can add Live Sales Notifications (shown below). This is a banner that announces an attendee has purchased your product and can be used to encourage other (real) users to purchase as well.


Bad words filter

You can also prevent your users from using particular words.  Simply go to your Profile (1) and then Settings (2) to add any words you don’t want shared during your webinar.


Autoplay

You have the choice to enable autoplay for your webinars!  If disabled, you can choose your call to action text displayed on the video as well as the thumbnail that is displayed behind it!


Webinar Replay options

In the final step, you’ll set up your Webinar Replay options. The first option is whether to enable the replay at all. Below, the webinar replay has been added by selecting Yes, record the webinar session.


Just like the live room, you can add a question box to the webinar replay (shown below). Just add your email address.


That brings us to the end of the setup process! You can now retrieve your registration links to share from your dashboard. Just be sure to test first!

© 2023 WebinarJam All Rights Reserved